TESTO 310 Instruction Manual
Flue gas analyzer
Hide thumbs
Also See for 310:
- User manual ,
- Instruction manual (36 pages) ,
- Brief instructions (4 pages)

Subscribe to Our Youtube Channel
Related Manuals for TESTO 310


Summary of Contents for TESTO 310
- Page 1 310 · Flue gas analyzer Instruction manual [en-US] Testo-Direct nfo@Testo-Direct.com 1.888.475.523 www. .com...
-
Page 2: Table Of Contents
5.3.1.3. Setting fuel ..................22 5.3.2. Flue gas ......................22 5.3.3. Ambient CO ....................23 5.3.4. Draft measurement ..................23 5.3.5. Pressure ......................24 Maintaining the product ................ 26 6.1. Cleaning the measuring instrument ..........26 Testo-Direct nfo@Testo-Direct.com 1.888.475.523 www. .com... - Page 3 Cleaning the flue gas probe ............26 6.3. Draining the condensate container ..........26 6.4. Checking / replacing the particle filter ........... 27 Tips and assistance ................28 7.1. Questions and answers ..............28 7.2. Accessories and spare parts ............29 Testo-Direct nfo@Testo-Direct.com 1.888.475.523 www. .com...
-
Page 4: Safety And The Environment
Note: Basic or further information. 1..Action: more steps, the sequence must be followed. 2..> ... Action: a step or an optional step. Result of an action. [OK] Control keys or buttons of the program interface. Testo-Direct nfo@Testo-Direct.com 1.888.475.523 www. .com... -
Page 5: Ensure Safety
Use only original spare parts from Testo. > Additional repair or maintenance work must only be carried out by authorized personnel. Otherwise Testo will refuse to accept responsibility for the proper functioning of the measuring instrument after unauthorized repair and for the validity of certifications. -
Page 6: Protecting The Environment
(observe local regulations) or return the product to Testo for disposal. Technical Specifications 3.1. The testo 310 is a handheld measuring instrument for the residential flue gas analysis. The testo 310 can be used for the following: •... -
Page 7: Technical Data
(0.1 hPa) (± 0.5hPa) Flue gas 32 to 752°F 0.1°F ±1,8°F (32.0 to 212.0’°F) <50s temperature (0.0 to 400.0 °C) (0.1°C ) (± 1°C (0.0 to 100.0°C)) ± 1.5% of meas. val. (>212°F / >100°C) Testo-Direct nfo@Testo-Direct.com 1.888.475.523 www. .com... -
Page 8: Other Instrument Data
EU Directive 2004/108/EC Warranty Measuring instrument, flue gas probe: 24 months Thermocouple: 12 months Sensors O2, CO: 24 months, Rechargeable battery: 12 months Terms of warranty Terms of warranty: see website www.testo.com/warranty Testo-Direct nfo@Testo-Direct.com 1.888.475.523 www. .com... -
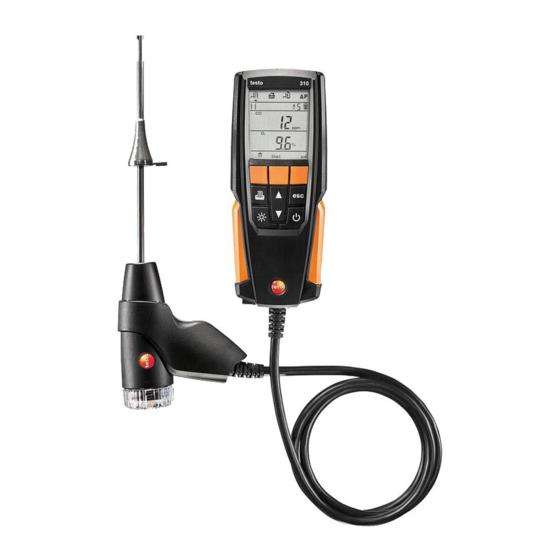
Page 9: Product Description
3 Keypad 4.1.2. Keypad Button Functions Switch measuring instrument on / off [OK] Function key (orange, 3x), relevant function is shown on the display Example [▲] Increase value, select parameter [▼] Decrease value, select parameter Testo-Direct nfo@Testo-Direct.com 1.888.475.523 www. .com... -
Page 10: Display
4 Product description Button Functions [esc] Back, cancel print process Switch display light on/off Transmit data to the Testo protocol printer. 4.1.3. Display 1 Measurement type (an arrow marks the measurement type that is activated): Icon Measurement Flue gas (icon visible when the instrument is... - Page 11 3 segments 75-100% • 2 segments 50-75% • 1 segment 25-50% • no segment <25% 3 Reading display line 1 See Country versions, page 15. 4 Reading display line 2 See Country versions, page 15. Testo-Direct nfo@Testo-Direct.com 1.888.475.523 www. .com...
-
Page 12: Connections
Switch to the next parameter: 4.1.4. Connections 1 Charging socket for mains unit (Micro USB) 2 Cable to the flue gas probe 3 Gas outlet 4.1.5. Condensate outlet/interface 1 Infrared interface 2 Condensate outlet Testo-Direct nfo@Testo-Direct.com 1.888.475.523 www. .com... -
Page 13: Rear View
3 Magnetic holder 4 Gas outlet 5 Magnetic holder CAUTION Damage to other equipment caused by strong magnets! > Keep a safe distance from products which could be damaged by magnets (e.g. monitors, computers, pacemakers, credit cards). Testo-Direct nfo@Testo-Direct.com 1.888.475.523 www. .com... -
Page 14: Flue Gas Probe
Similarly, the setting influences the date and time format. The area version is set in the instrument configuration menu / commissioning, see Instrument configuration menu / commissioning, page 19. Testo-Direct nfo@Testo-Direct.com 1.888.475.523 www. - Page 15 P2, CO CoO GAS - Coke oven Line 2: , qA, CO Toun GAS - Town gas Eff, Lambda, LI OIL - EL fuel oil HE OIL - Heavy fuel oil Uood 15 - Wood 15% Testo-Direct nfo@Testo-Direct.com 1.888.475.523 www. .com...
-
Page 16: Reading Display
Eff.net Net efficiency (without the latent heat of condensation) Eff.gross Gross efficiency (with the latent heat of condensation) Efficiency λ Air ratio Pressure Carbon dioxide Flue draught Carbon monoxide undiluted Ratio Air Excess air Testo-Direct nfo@Testo-Direct.com 1.888.475.523 www. .com... -
Page 17: Using The Product
5.1. Power Supply/ rechargeable battery The rechargeable battery is permanently installed and can only be changed by a Testo service center. The measuring instrument is supplied with a partially charged rechargeable battery. > Charge the rechargeable battery fully before using the measuring instrument. -
Page 18: Performing Settings
> Switch to the next parameter: [OK]. > Select the unit: [▲] and [▼]. Unit of pressure > Switch to the next parameter: [OK]. > Select the unit: [▲] and [▼]. Unit of temperature > Switch to the next parameter: [OK]. Testo-Direct nfo@Testo-Direct.com 1.888.475.523 www. .com... -
Page 19: Measurements Configuration Menu
> Exit the configuration menu: [OK]. > Select the unit: [▲] and [▼]. Unit of pressure > Switch to the next parameter: [OK]. > Select the unit: [▲] and [▼]. Unit of temperature > Exit the configuration menu: [OK]. Testo-Direct nfo@Testo-Direct.com 1.888.475.523 www. .com... -
Page 20: Measuring
5.3.1.2. Using the flue gas probe Checking the thermocouple The thermocouple of the flue gas probe must not contact the probe cage. > Check before use. Bend the thermocouple back if necessary. Testo-Direct nfo@Testo-Direct.com 1.888.475.523 www. .com... -
Page 21: Setting Fuel
The readings are displayed. > Change reading display line 1: [▲]. > Change reading display line 2: [▼]. 2. Stop measurement: [Stop]. > Remove flue gas probe from the flue gas duct and purge with fresh air. Testo-Direct nfo@Testo-Direct.com 1.888.475.523 www. .com... -
Page 22: Ambient Co
2. After zeroing, position the flue gas probe in the core current (area of the highest flue gas temperature). The indication of the measured flue gas temperature in line 2 helps when positioning the probe. The reading is displayed. 3. Quit measurement: [Stop]. Testo-Direct nfo@Testo-Direct.com 1.888.475.523 www. .com... -
Page 23: Pressure
Prepare for measurement 1. Open filter chamber of the flue gas probe: Turn it gently anti- clockwise. 2. Remove particle filter (1). 3. Remove the sealing plug (2) in the filter chamber from the holder. Testo-Direct nfo@Testo-Direct.com 1.888.475.523 www. .com... - Page 24 2. Remove the sealing plug from the gas path. 3. Insert the filter into the gas path and check that it is fitted securely, 4. Close filter chamber of the flue gas probe. 5. Remove silicone hose from the probe shaft. Testo-Direct nfo@Testo-Direct.com 1.888.475.523 www. .com...
-
Page 25: Maintaining The Product
Mild household cleaning agents and soap suds may be used. Any cleaning of contamination within the probe shaft may only be performed by Testo Customer Service. 6.3. Draining the condensate container The fill level of the condensate trap can be seen by the markings on the condensate trap. -
Page 26: Checking / Replacing The Particle Filter
The filter chamber may contain condensate. 1. Open the filter chamber: Turn gently counter-clockwise. 2. Remove the filter and replace it with a new one (0554 0040). 3. Attach the filter chamber and gently turn clockwise to lock. Testo-Direct nfo@Testo-Direct.com 1.888.475.523 www. -
Page 27: Tips And Assistance
> Remove the sealing plug and does not shut down. insert the filter. Error message: O2 sensor is worn out > Contact Testo Service Zeroing in the flue gas duct > Carry out zeroing outside the flue gas duct Error message:... -
Page 28: Accessories And Spare Parts
> Input of your personal data can be done by Testo service. For additional information, please contact your dealer or Testo Customer Service. For contact details, see the back of this document or the website www.testo.com/service-contact.
Need help?
Do you have a question about the 310 and is the answer not in the manual?
Questions and answers
Error code 6 keeps coming up will not zero
Error code E06 on the TESTO 310 means zeroing was carried out in the flue gas duct. To resolve it, perform zeroing outside the flue gas duct. Zeroing is repeated a maximum of four times.
This answer is automatically generated