Table of Contents
Advertisement
Advertisement
Table of Contents

Related Manuals for IMKO TRIME-FM


Summary of Contents for IMKO TRIME-FM
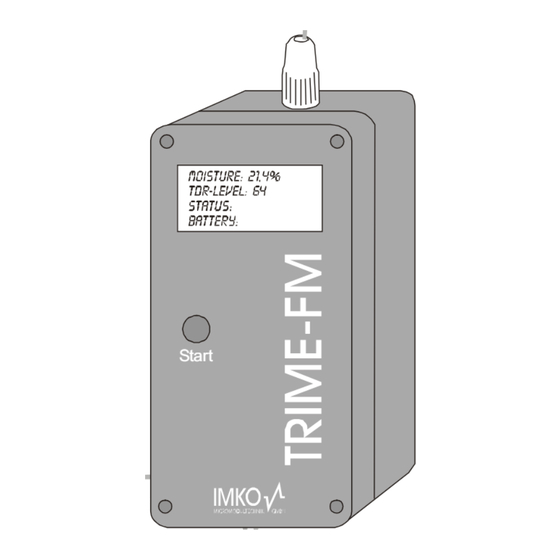
- Page 1 TRIME-FM User Manual...
-
Page 2: Table Of Contents
Thank you for buying IMKO. Should you have any queries please don’t hesitate to contact your local distributor or address directly IMKO Micromodultechnik GmbH Im Stoeck 2 D-76275 Ettlingen Germany Phone: +49-7246-5921-0 Fax: +49-7246-90856 e-mail: info@imko.de internet: http://www.imko.de as of April 15... -
Page 3: Trime-Fm2 /-Fm3 Field Measurement Device (Version P2 Or P3)
Since the highest measuring sensitivity is directly around the rods or the access tube, the TRIME-FM would measure too low values, if there was an air gap. In water saturated soils the measured values would be too high. -
Page 4: Battery Operation
1.1.9 PC-Connection via RS232 The TRIME-FM can be connected to a PC via the RS232 connector and the appropriate cable, in order to carry out data logging, changing the operating mode, or calibration. As long as the PC is connected the power-off automatic is disabled to prevent switching off. -
Page 5: Technical Data
1.1.10 Technical Data Power supply: 7V..15V-DC, 600 mA/h battery capacity Supply current: 8mA standby 200mA while 10..15sec. measuring time Resolution: 0,1% ±0,3% Repeating accuracy: Measurement range 0-100% Temperature range: -15°C...50°C, expanded temperature ranges on request! max. ±0,5% Temperature caused value drift: Standard interface: analogue output 0..1V or 0(4)..20mA, RS232/V24, IMP232 MICRONET... -
Page 6: Probe Dimensions
Probe Dimensions 2-Rod 2-Rod 2-Rod Miniatur Probe Probe Probe Probe With screw for optional tube extension Different length: 50, 80, 100mm Rod diameter: 2,4mm Rod diameter: 3,5mm Rod diameter: 6mm Rod diameter: 6mm 3-Rod 3-Rod 3-Rod Probe Probe P3 Probe P3S Rod diameter: 3,5mm Triangular arrangement... -
Page 7: Preparation Rods
Preparation Rods For the protection of the rod tips it is necessary to use the preparation rods for probe P2, P2Z, P2G and P3. A defect and blank rod is sensitive against electrostatic charge and can destroy the electronic! -
Page 8: Mounting Of Spare Rods With O-Ring Seals
Mounting of Spare Rods with O-ring Seals 4) put silicon grease to the threads of the rods (new spare rod are greased at works) 1) prepare probe body, seals, rods 5) screw the rods into the probe body 2) put the seals into the borings 3) push the seals to the basis of the borings where the threads begin... -
Page 9: The Trime-T3 Tube Access Probe
The TRIME-T3 Tube Access Probe Introduction The measuring of soil water content with Time Domain Reflectometry is now a well established method. However water content profiling is not possible with conventional TDR rod probes. The TRIME tube probe was developed for this reason. Since 1994 the TRIME-T3 has found numerous applications in earth and environmental sciences, fulfilling even the most exacting requirements. -
Page 10: Measuring Experiences
Note that the necessity of a close contact between access tube and material is vital for reliable measurements and that the tubes should be installed by our recommended method. • For example at an assumed water content of 15 vol. % an air gap of 1 mm around the whole length of the tube would result in an underestimation of 1 - 2 vol. -
Page 11: Summary
Figure 4: Comparison of neutron probe, TRIME-T3 and gravimetric method for water content determinations in a loess soil. Figure 5 : Comparison of neutron probe and TRIME-T3 for water content determinations an illitic clay. Some materials, especially very clayey soils and soils with high organic contents, can afford material specific calibrations due to their different dielectric behaviour. -
Page 12: Access Tubes And Augers
The IMKO auger equipment consists of: access tube support pillar with three soil anchors, ramming head with clamp device, screw auger with handle, clamp device for the rubber bung, and an internal steel guide/protection tube. -
Page 13: Instructions For Access Tube Installation
Instructions for Access Tube Installation The following instructions should be taken account of: The ramming head, the TECANAT access tube and the internal steel guide and protection tube are one unit. Ramming Head The internal protection tube has to lie on with Clamp Device the cutting shoe of the access tube, Fixation-... -
Page 14: Inserting T3 Into The Tecanat Tube
Inserting T3 into the TECANAT tube When you are going to work with your TRIME-T3 tube access probe: Press the spring mounted wave-guides to the probe body when you insert the T3 probe into the tube! Thereby you avoid ripping off the spring mounted wave-guides. TECANAT plastic tube Please note Should you use new T3 probes (eight wave-guiding plates instead of two) in old GFK tubes, we advice... -
Page 15: Basic Alignment With The Calibration Set
You would have to send instruments and probes to us in any of the above cases where basic alignment is required if you have no calibration set. IMKO will charge calibration costs. Moreover you will save the forwarding charges and you will not have to interrupt your measuring campaign, if you calibrate by yourself. -
Page 16: How To Make The Basic Alignment
START button to switch on the instrument. After this „dummy measurement“ is finished, you can plug in the calibration connector at the side of the TRIME-FM. The display shows the first reference value of dry glass beads for the appropriate probe (e.g. 2,8%). The probe cable must now be unwound and spread out in a way that the cable doesn't touch itself. - Page 17 ASIC LIGNMENT 1 Connect the probe (P3 etc.!) to the TRIME-FM. 2 Press START button for switching on the TRIME-FM. Display shows: TRIME-System Software Version 2.3 SN XXXX (=serial number of the TRIME-FM) 3 Connect the calibration connector at the 7pin flange connector of the TRIME-FM.
-
Page 18: Emv/Emi Precaution
EMV/EMI precaution by means of ferrite filters ensures better disturbance suppression. Ferrite filters are clipped to both ends of the probe cable. They are important for an improved measurement accuracy. snap here EMV/EMI- Ferrit Filter ZCAT-1518 TRIME-FM Measuring Start TRIME-FM Analog- Vers ion P2 cable G m b H... -
Page 19: Instructions For Wiring
Instructions for Wiring In diesem Bereich Buchseneinsatz Gewindering female insert einfetten ! coupling ring In this area place a thin coat of grease ! Hülse mit Feder Shell with spring Dichtring gasket Druckring Druckschraube thrust coilar pressing screw Dichtring gasket Dichtring Druckring gasket... -
Page 20: Water Tight Connectors And Cable Confection For Use With The Environmental Measurement System Envis
IMKO supplies special seals. 2. All unused connectors have to be protected by blind covers. IMKO supplies all equipment respectively all open connecting terminals protected by blind covers. Additional ones can be obtained by IMKO. -
Page 21: Operating Instructions Acs-Series
Operating instructions ACS-series Use of the charger Automatic charger / discharger for 4-10 cells nickel-cadmium and nickel-metalhydrid battery packs (4,8-12,0 V) with a capacity of 500–5000 mAh (ACS 410p traveller 800-9.000 mAh). Features • Micro controller controlled charging • Test phase at the beginning of the charging in order to recognize and indicate defect battery packs •... - Page 22 Operation The charger starts charging automatically as soon as a battery pack is installed and the charger is plugged in. Usually, the battery packs are brought into contact by the plugs which are enclosed the supply. If the red LED after the test phase (about 10 seconds) still keeps flashing, check the polarity of the battery pack.
Need help?
Do you have a question about the TRIME-FM and is the answer not in the manual?
Questions and answers