Advertisement
Table of Contents
- 1 Table of Contents
- 2 System Requirements
- 3 Installing the Driver
- 4 Hardware Installation
- 5 Wireless Graphic Tablet
- 6 Usage Tips
- 7 Control Interface
- 8 Pen Pressure Sensitivity Test
- 9 No Shortcut Keys
- 10 Digital Pen Pressure Sensitivity Adjustment
- 11 AAA Battery Pen
- 12 Rechargeable Li-Ion Battery Pen
- 13 IV. Question & Answer
- 14 V. Specifications
- Download this manual
See also:
User Manual
Advertisement
Table of Contents

Subscribe to Our Youtube Channel
Related Manuals for Huion DWH69


Summary of Contents for Huion DWH69
- Page 1 Content Wireless Graphic Tablet User Manual Content...
-
Page 2: Table Of Contents
Content CONTENT I. General Information 1. Overview 2. Graphic Tablet Functions 3. System Requirements 4. Installing the Driver On Windows 5. Hardware Installation 6. Wireless Graphic Tablet 7. Usage Tips II. Driver Interface Introduction 1. Control Interface 2. Pen Buttons Settings 2.1 Key Functions 3. -
Page 3: System Requirements
1. Overview Welcome to the world of Huion tablet and Huion digital pen! You are able to discover how easy is to control your personal computer by using a wireless digital pen instead of a mouse. The function of the digital pen is able to draw a very thin, thick, light or dark line, which is called pressure sensitivity. - Page 4 Content d. Click the Continue button on the welcome screen. e. Choose: Install for all users of this computer f. Choose: Continue g. Choose: Install h. Enter your user name and password i. Once the installation is completed, click the Close button to exit the installer. Content...
-
Page 5: Hardware Installation
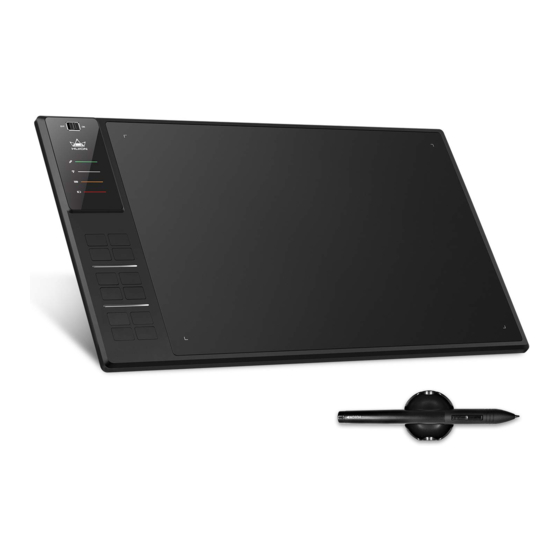
Please turn on the pen and graphic tablet if there is a switch on them. c. Battery pen and rechargeable pen using the instructions found in section lll below. 6. Wireless Graphic Tablet 6.1 Dual working modes - wired & wireless Wireless Graphic Tablet: Model: DWH69 USB Port Wireless Receiver Power Switch Battery Slot... -
Page 6: Wireless Graphic Tablet
Content Battery Slot Wireless Receiver Power Switch LED Indicator Working Area 1. Charging Method • Connect the wireless graphic tablet to your PC by using USB cable. Turn the power switch ON. 2. Connection Method (1) Wireless Mode • Turn the power switch ON, then plug the wireless receiver to PC and wait for 3 seconds. •... -
Page 7: Usage Tips
Content 6.2 Follow the steps to verify if the tablet is installed properly The LED light on the tablet is the main indicator for hardware funtionatity. Depending on your graphic tablet model, it may be located at a different place of the tablet. That is shown in the diagram above. This LED indicator normally stays off, and will only turn on or off in response to various conditions. -
Page 8: Control Interface
Content ǁ. Driver Interface Introduction 1. Control Interface for Windows When you double click the driver tablet icon ( ) which normally appears in the system tray at the corner of the screen, you will see the control panel (picture above). It will display driver related information. You can set functions for the pen buttons and regulate the pen pressure sensitivity. -
Page 9: Pen Pressure Sensitivity Test
Content 3. Pen Pressure Sensitivity Test Click the control interface into Pen Pressure Sensitivity Test. 4. Advanced Setting Click the “Advanced Setting” (see the selected area above), you can access into the working area and keys function settings. 4.1 Workspace Settings Area A: Soft key Area D: Soft key settings area Working area: Area A+Area C... -
Page 10: No Shortcut Keys
Content Softkeys Enable: Select this key, the function shortcut keys will be enabled in the work area of the graphic tablet. Full Area: Full range selected, graphic tablets’ working area will be expanded to Zone A plus Zone C, soft key function is disabled. -
Page 11: Digital Pen Pressure Sensitivity Adjustment
Content 5. Digital Pen Pressure Sensitivity Adjustment Area 1 Area 2 Pressure Sensitivity: Move the slider from left to right, it can be used to adjust the sensitivity of the tip and the severity of the stroke when drawing, which affects the change of the handwriting(Area 1). Screen Setting: When your computer is connected with two screens and use the extended mode, you can choose the corresponding working area of the graphic tablet in the setup screen area(Area 2). - Page 12 Content The configuration dialog allows you to modify pressure sensitivity, monitor selection, customize the buttons, etc. a. Click the Applications enter into the HUIONDrive. b. Double-click the HUIONDrive to access the TabletDrivePanel to change settings of the graphic tablet. c. Double-click the TabletDriverUninstall to open it, then you can restart the Daemon Process, or uninstall the Driver. 1.
- Page 13 Content Pen’s default settings: (1) The pen nib is equivalent to the mouse left button function. (2) The First Button is equivalent to the mouse middle function (3)The Second Button is equivalent to the mouse right function. Note: (1)"Left Button, Middle Button, Right Button" functions represent a normal mouse left, middle, right button functions. (2) When choosing "Middle Button", the corresponding pen button will has the same "Press"...
- Page 14 Content SoftKey Enable: Select this key, the function shortcut keys will be enabled in the work area of the graphic tablet. Full Area: Full area selected, graphic tablets’ work area will be expanded to Zone A plus Zone C, SoftKey function is disabled.
- Page 15 Content 4. Digital Pen Pressure Sensitivity Adjustment Area 1 Area 2 Pressure Sensitivity: move the slider from left to right, it can be used to adjust the sensitivity of the tip and the severity of the stroke when drawing, which affects the change of the handwriting(Area 1). When your computer has two screens in extended mode, you can choose the corresponding work area of the graphic tablet in the setup screen area(Area 2).
-
Page 16: Aaa Battery Pen
Content III. Pen Storage and Maintenance 1. AAA Battery Pen 1.1 Storing the AAA Battery Pen The AAA battery pen should be stored in such a way that nothing touches the tip. Prolonged pressure on the tip, even a slight pressure, can damage the ability of the pen to use the full range of pressure sensitivity. If the pen will simply be unused overnight or for any other short period of time, placing it in the included pen holder or horizontally on the desk is sufficient. -
Page 17: Rechargeable Li-Ion Battery Pen
Content 2. Rechargeable Li-ion Battery Pen Charging port 1. Tap on any surface with the tip of the pen to “wake it up”. 2. It will “ auto sleep” if not used for a period of time. Plug in USB cable and charging Note: If the line is unstable, it means you have to charge. -
Page 18: Iv. Question & Answer
Please uninstall all drivers and close the drawing software, then reinstall the Huion drive. Once installation is finished, open the drawing software to check if it works. Question 5: How to deal with abnormal drawing problems in the painting software? Answer: Please follow these steps in control panel and graphic driver panel. -
Page 19: V. Specifications
5080 lpi Power Supply 500mA Report Rate (Wired) 230 rps OS Compatibility Win7/8/8.1/10/Mac OS 10.8.0 or later Reading Height Approx. 11mm Model: DWH69 Dimensions (LxWxH) 353x230x21mm Interface Support USB/2.4G Active Area (LxW) 228x152mm (9x6 Inch) Interface Type Micro USB Pen Pressure...
Need help?
Do you have a question about the DWH69 and is the answer not in the manual?
Questions and answers