Table of Contents
Advertisement
Available languages
Available languages
Quick Links
Advertisement
Chapters
Table of Contents

Related Manuals for Sonoro Cubo


Summary of Contents for Sonoro Cubo
- Page 1 Bedienungsanleitung Instruction manual Mode d‘emploi...
- Page 2 GmbH Unter Goldschmied 6 50667 Köln Germany info@sonoro-audio.com www.sonoro-audio.com 08/10 Der Hersteller arbeitet ständig an der Weiterentwicklung aller Typen und Modelle. Bitte haben Sie Verständnis dafür, dass deshalb jederzeit Änderungen des Lieferumfangs in Form, Ausstattung und Technik möglich sind. Aus den Angaben, Abbildungen und Beschreibungen dieser Bedienungsanleitung können daher keine Ansprüche hergeleitet...
-
Page 3: Table Of Contents
Inhalt ....................5 1. Sicherheitshinweise ..................5 1.1 Niemals selbst reparieren ....................5 1 2 Der CD-Spieler ................5 1 3 Reinigung und Aufbewahrung ....................... 6 1.4 Betrieb ....................6 1.5 Uhren Batterie ................6 1.6 Disk einlegen und entnehmen ...................... - Page 4 Inhalt ....................16 7.7 Stummschaltung .................... 16 7.8 Ausschaltautomatik ..............16 8. iPod Wiedergabe (über optionale eDock) ® ......................17 9. Weckbetrieb ....................17 9.1 Alarmfunktion ................17 9.2 Schlummerfunktion (SNOOZE) ......................17 10. Entsorgung ....................17 10.1 Verpackung ......................18 10.2 Gerät ......................
-
Page 5: Sicherheitshinweise
1. Sicherheitshinweise Stellen Sie das Gerät auf eine feste, ebene Oberfläche. Achten Sie darauf, dass • das Gerät nicht verdeckt wird, damit immer eine ausreichende Luftzirkulation gewährleistet ist; • keine direkten Wärmequellen (z. B. Heizungen) auf das Gerät wirken; • kein direktes Sonnenlicht auf das Gerät trifft;... -
Page 6: Betrieb
Verbinden Sie das Netzkabel mit einer gut zugänglichen Netzsteckdose . 1.5 Uhren Batterie Dieses cubo Modell verfügt über eine austauschbare Batterie (CLOCK BATTERY) zur Sicherung des Uhrenspeichers. Im Fall einer Stromunterbrechung, etwa durch einen Stromausfall, werden Ihre Weckzeit und Uhrzeiteinstellungen gesichert. Die gesamte Displaybeleuchtung und die Weckalarmfunktionen werden ausgeschaltet. -
Page 7: Inbetriebnahme
® oder ähnliches, anzuschließen. Verwenden Sie dazu bitte ein geeignetes Klinkenkabel und verbinden Sie das externe Gerät mit der AUX-IN Buchse auf der Rückseite des cubo. Wählen Sie durch Drücken der MODE Taste den AUX Modus (AUX erscheint im Display). -
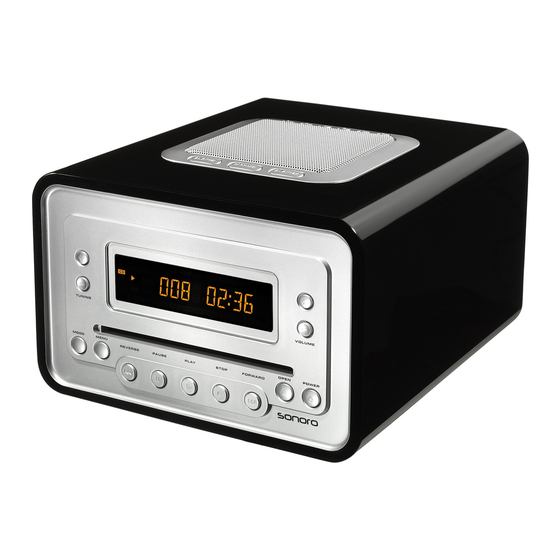
Page 8: Bedienelemente Und Anschlüsse
3. Bedienelemente und Anschlüsse cubo Vorderseite: 9 10 11 12 3 4 5 Tuning Sendersuchlauf + 12 Standby Gerät einschalten und in Sendersuchlauf - Standby schalten Tuning Fach 13 Volume Lautstärkeregelung +/- Mode Betriebsart (DAB+/DAB, FM, CD, iPod, AUX) im DAB+/DAB Radio-Betrieb... - Page 9 Wiedergabe starten Stop Menüaufruf; bei wiederholtem Drücken Wechsel in die nächst höhere Navigationsebene 10 Skip Forward Kurz drücken: Nächsten Titel wiedergeben; Drücken und Halten: Schneller Vorlauf im Titel cubo Oberseite: cubo Rückseite: 14 15 16 17 18 19 21 22...
- Page 10 Fernbedienung: Alarm 1 im MP3-CD-Betrieb Volume Lautstärkeregelung - 12 Tuning + nächster Ordner / nächstes Album Volume Lautstärkeregelung + 13 Tuning - vorheriger Ordner / vorheriges Album Play CD Wiedergabe / Pause CD Pause Standby Gerät einschalten und in im DAB+/DAB Radio-Betrieb Standby schalten 12 Quick Scan wenn länger als 2 Sekunden gedrückt...
-
Page 11: Grundfunktionen Einstellen
4. Grundfunktionen einstellen 4.1 Uhrzeit stellen Schalten Sie das Gerät in den Standby Modus. Drücken Sie MENU, im Display erscheint SET-CLOCK. Drücken Sie erneut MENU, die Zeitanzeige blinkt. Stellen Sie mit den Sendersuchlauftasten die gewünschte Stunde ein. Stellen Sie die Minuten mit den Lautstärketasten ein. Zum Speichern drücken Sie erneut MENU. -
Page 12: Fm (Ukw) Radiobetrieb
Drücken Sie TUNING+ oder TUNING-, um manuell Sender zu suchen oder halten Sie die Taste zwei Sekunden gedrückt, bis der automatische Sendersuchlauf startet. Sollte der Radioemp- fang nicht Ihren Vorstellungen entsprechen, so schließen Sie cubo entweder über eine für den Empfang von DAB+/DAB geeigneten Hausantenne an, oder versuchen Sie durch Ausrich- tung der Teleskopantenne die Empfangsqualität zu verbessern. -
Page 13: Quick Scan, Automatische Sendersuche(Kanal 10
Sie wechseln zwischen den Sendern, indem Sie die TUNING + und TUNING - Tasten zum blättern durch die Senderliste nutzen. 6.5 Senderinformationen Der DAB cubo zeigt zu jedem Sender zusätzliche Informationen an. Durch kurzes Drücken der STOP (INFO) Taste können Sie durch diese Senderinformationen blättern um sich diese anzeigen zu lassen. -
Page 14: Sender Speichern Und Aufrufen
6.6 Sender speichern und aufrufen Halten Sie eine der 6 Stationstasten oberhalb des Lautsprechers gedrückt, bis ein kurzer Piep Ton zu hören ist. Der Sender ist nun auf dieser Position gespeichert. Um den Sender später wieder aufzurufen, drücken Sie nur die entsprechende Stationstaste. 6.7 DAB+/DAB System zurücksetzen (RESET) Durch das Zurücksetzen des DAB Systems stellen Sie den Auslieferungszustand wieder her. -
Page 15: Titelsuchfunktion
7.2 Titelsuchfunktion Halten Sie während der Wiedergabe eine der SKIP Tasten gedrückt und der Suchlauf startet. Lassen Sie die Taste an der gewünschten Position wieder los. 7.3 Wiederholfunktion Drücken Sie während der CD-Wiedergabe zweimal die Taste MENU. Wählen Sie mit der SKIP FORWARD Taste REP 1 (momentan gespielter Titel wird endlos wiederholt) oder REP ALL (alle Titel werden wiederholt) aus. -
Page 16: Stummschaltung
Display zeigt MENU. Die Skiptasten navigieren in diesem Fall durch die einzelnen Ebenen des iPod , die PLAY Taste bestätigt Ihre Eingabe. Wenn 6 Sekunden keine Eingabe ® erfolgt, schaltet Ihr cubo zurück in den normalen iPod Mode. ® Die eDock funktioniert selbstverständlich auch mit dem iPhone, allerdings ist dieses dazu in den Airplane Mode zu schalten. -
Page 17: Weckbetrieb
9. Weckbetrieb 9.1 Alarmfunktion Sie können zwei verschiedene Alarm-/Weckzeiten programmieren. Drücken und halten Sie eine der zwei Alarm Tasten bis die Zeit blinkt. Wählen Sie mit den Sendersuchlauftasten die Stunden. Stellen Sie nun mit den Lautstärketasten die Minuten ein. Bestätigen Sie die Eingabe mit der entsprechenden ALARM Taste. -
Page 18: Gerät
• Wenn das Signal zu schwach ist, die Antenne neu ausrichten oder eine geeignete Außenantenne für besseren Empfang anschließen • Den Abstand zwischen dem cubo und anderen Geräten wie z.B. Fernsehgerät oder Videorecorder vergrößern Kein Ton oder schlechte Wiedergabequalität •... -
Page 19: Technische Daten
DAB : 174 MHz --- 240 MHz Technische Änderungen vorbehalten. Konformitätserklärung Hersteller: sonoro audio GmbH Hiermit erklären wir, dass der sonoro cubo aufgrund seiner Konzeption, Konstruktion und Bauart den grundlegenden Anforderungen der EMV-Richtlinie 2004/108/EWG, der Niederspannungs-Richtlinie 2006/95/EWG und der R&TTE Richtlinie 1999/5/EWG einschließlich... - Page 21 GmbH Unter Goldschmied 6 50667 Köln Germany info@sonoro-audio.com www.sonoro-audio.com 08/10 The manufacturer continuously works on the further development of all types and models. We ask for your understanding that changes of the scope of delivery in regard to form, components and technology are therefore possible at any time.
- Page 22 Table of contents ..................... 5 1. Safety Precautions ................ 5 1.1 Never attempt to repair if yourself ..................... 5 1 2 The CD player ....................5 1 3 Cleaning and care ......................6 1.4 Operation ..................6 1.5 Battery compartment ................
- Page 23 Table of contents ....................16 7.7 Muting function ................... 16 7.8 Automatic switch off ....,..........16 8. iPod playback (using optional eDock) ® ......................17 9. Alarm mode ....................17 9.1 Alarm function ....................17 9.2 Snooze function ........................ 17 10.
-
Page 24: Safety Precautions
1. Safety Precautions Place the device on a firm, level surface. Make sure that • the device is not covered, so as to ensure there is always adequate circulation of air; • there are no direct sources of heat (e.g. radiators) affecting the product; •... -
Page 25: Operation
Connect the power supply to an easily accessible mains outlet. 1.5 Battery compartment This cubo model has a replaceable battery (CLOCK BATTERY) to back up the clock memory. This means if the power supply is interrupted, e.g. in the event of a power failure, the alarm and clock settings are saved. -
Page 26: Getting Started
® device. Please use a suitable audio cable and connect the external device to the AUX-IN jack on the rear of the cubo. Select AUX mode by pressing the MODE button (AUX will appear on the display). 2.4 Connecting the antenna Connect the supplied antenna to the antenna socket (ANTENNA). -
Page 27: Controls And Connectors
3. Controls and Connectors cubo front: 9 10 11 12 3 4 5 Tuning Station search + 12 Standby Switch on device and switch to Station search - standby mode Tuning slot 13 Volume Volume control +/- Mode Operating mode... - Page 28 Select menu; press repeatedly to move to the next higher navigation level Stop 10 Skip Forward briefly press: Play next track; press and hold: fast forward within the track cubo top: cubo back: 14 15 16 17 18 19 21 22...
-
Page 29: Remote Control
The remote control is a high-frequency remote control device. In its initial state, as supplied to the customer, this is paired to prevent any other devices being influenced by the cubo. Should re-pairing be necessary during servicing, proceed as described in section 2.6. -
Page 30: Setting Basic Functions
4. Setting Basic Functions 4.1 Setting the time Switch the device to standby mode. Press MENU, the display will show SET-CLOCK. Press MENU again, the clock time display will fash. Use the TUNING controls to set the hour as desired. Use the VOLUME controls to set the minutes as desired. -
Page 31: Fm Radio Operation
If you find the radio reception unsatisfactory, you can either connect the cubo to your roof aerial which is customised for DAB+/DAB or try to improve the reception by redirecting your telescope antenna. -
Page 32: Quick Scan, Automatic Station Search (Channel 10
Then the number of received services (radio stations) will be shown on the display, e.g.: 10 Serv. The DAB cubo stores the number of available stations and will automatically jump to the first available station. 6.3 Manual DAB+/DAB station search Press and hold the STOP (INFO) button for more than two seconds until the display indicates Manual. -
Page 33: Storing And Selecting Stations
6.6 Storing and selecting stations Press one of the six station buttons above the loudspeaker until you hear a short “beep”. The station is now stored at this position. To select the station later, you only need to press the corresponding station button. 6.7 Resetting the DAB+/DAB system By resetting the DAB system, you will restore the default factory settings. -
Page 34: Title Search Function
7.2 Title search function During playback, hold down one of the SKIP buttons, and the search will start. Let go of the button at the desired position. 7.3 Repeat function While playing the CD, press the MENU button twice. Select REP 1 (the title currently playing will be repeated continuously) or Rep All (all titles will be repeated) with the SKIP FORWARD button. -
Page 35: Muting Function
, the PLAY button confirms ® your selection. If no entry is made within 6 seconds, your cubo will switch back to normal iPod mode. The eDock of course also works with the iPhone, although to do this it has to be ®... -
Page 36: Alarm Mode
SNOOZE button twice. Confirm the snooze time by pressing the SNOOZE button again. 10. Disposal 10.1 Packaging The packaging of your designer cubo CD/DAB+/DAB radio protects it against damage during transport. The packaging consists of raw material that can be re-used or recycled. -
Page 37: Device
10.2 Device When your cubo has reached the end of its useful life, on no account should you throw the CD radio in the normal household waste. Enquire where it may be disposed of in an environmentally sound manner. Please keep in mind that your electronic entertainment device is subject to the European Directive 2002/96/EC for the reduction of electronic waste. -
Page 38: Technical Data
Subject to technical changes. Declaration of Conformity Manufacturer: sonoro audio GmbH We hereby declare that the sonoro cubo, with respect to its design and construction, conforms to the requirements of the EMC Directive 2004/108/EC, the LVD directive 2006/95/EC and R&TTE directive... - Page 40 GmbH Unter Goldschmied 6 50667 Köln Germany info@sonoro-audio.com www.sonoro-audio.com 08/10 Le fabricant développe en permanence tous ces types et modèles de produits. Pour cette raison, des changements peuvent être apportés à tout moment au contenu du coffret, à la forme, à l‘équipement et à la technologie appliquée et nous apprécions votre compréhension à...
- Page 41 Table des matières ....................5 1. Consignes de sécurité ..........5 1.1 Ne tentez jamais de réparer l’appareil vous-même ....................5 1 2 Le lecteur de CD ..................5 1 3 Nettoyage et stockage ......................6 1.4 Utilisation ..................6 1.5 Batteries de l’horloge ................
- Page 42 Table des matières ................... 16 7.7 Arrêt momentané du son ....................16 7.8 Arrêt automatique ............16 8. iPod Lecture (via l’eDock disponible en option) ® ......................17 9. Mode Réveil ..................... 17 9.1 Fonction d’alarme ................17 9.2 Fonction Répétition (SNOOZE) ......................
-
Page 43: Consignes De Sécurité
1. Consignes de sécurité Placez l’appareil sur une surface stable et plane. Veillez à • ne pas couvrir l’appareil afin de toujours garantir une circulation d’air suffisante ; • éviter de placer l’appareil à proximité des sources de chaleur directes (p. ex. les chauffages) ; •... -
Page 44: Utilisation
Raccordez le câble d’alimentation à une prise de courant facilement accessible. 1.5 Batteries de l’horloge Ce modèle cubo possède une pile (CLOCK BATTERY) remplaçable qui protège la mémoire de l’horloge. Si l’alimentation est coupée, par exemple en cas de panne de courant, l’heure de réveil et les réglages de l’heure sont sauvegardés. -
Page 45: Mise En Service
® approprié avec connecteur jack et reliez l’appareil externe à la prise AUX-IN située à l’arrière du cubo. Sélectionnez le mode AUX (AUX s’affiche à l’écran) en appuyant sur la touche MODE. 2.4 Raccordement d’une antenne Raccordez l’antenne fournie à la prise pour antenne (ANTENNA). -
Page 46: Éléments De Commande Et Connexions
3. Éléments de commande et connexions Face avant du cubo: 9 10 11 12 3 4 5 Tuning Recherche de stations + 12 Standby Pour allumer l’appareil et le Recherche de stations - mettre en veille Tuning Fente CD 13 Volume Réglage du volume +/-... - Page 47 Ouverture du menu; si pression répétée, passage au niveau de menu immédiatement supérieur Pression brève: lecture du titre suivant; pression maintenue: avance rapide dans la piste 10 Skip Forward Face supérieure du cubo: Face arrière du cubo: 14 15 16...
- Page 48 Télécommande: Alarm 1 13 Tuning - Dossier précédent/album précédent Volume Réglage du volume - Volume Réglage du volume + en mode radio DAB+/DAB Play Lecture CD / Pause Pause CD 12 Quick Scan Si appuyé pendant plus de Standby Pour allumer l’appareil et 2 secondes le mettre en veille 13 Full Scan...
-
Page 49: Réglage Des Fonctions De Base
4. Réglage des fonctions de base 4.1 Réglage de l’heure Allumez l’appareil en mode Veille. Appuyez sur Menu, Set-Clock s’affichera. Appuyez encore sur Menu, l’heure clignotera. Réglez l’heure souhaitée en appuyant sur les touches de recherche de station. Réglez les minutes souhaitées en appuyant sur les touches de réglage du volume. Pour mettre en mémoire, appuyez une nouvelle fois sur MENU. -
Page 50: Mode Radio Fm
Si la réception de la radio n’est pas satisfaisante, raccordez le cubo sur l’antenne télescopique ou bien essayez d’améliorer la qualité de réception en orientant l’antenne-cadre qui est adapté... -
Page 51: Recherche Rapide, Recherche Automatique Des Stations (Canal 10
Quick Scan s’affiche d’abord à l’écran, puis la progression de la recherche en %. Ensuite, le nombre des stations trouvées s’affiche à l’écran, p. ex. : 10 Serv Le cubo DAB mémorise le nombre des stations disponibles et passe automatiquement à la première station disponible. -
Page 52: Mémorisation Et Rappel Des Stations
6.6 Mémorisation et rappel des stations Maintenez appuyée l’une des 6 touches de stations située au-dessus du haut-parleur jusqu’à ce qu’un bip se fasse entendre. La station est alors mémorisée sur cette touche. Pour rappeler la station ultérieurement, appuyez simplement sur la touche de station correspondante. 6.7 Réinitialisation du système DAB+/DAB (RESET) La réinitialisation du système DAB permet de rétablir l’état à... -
Page 53: Fonction De Recherche De Piste
7.2 Fonction de recherche de piste Pendant la lecture, maintenez l’une des touches SKIP appuyée, la recherche démarre. Relâchez la touche lorsque la position souhaitée est atteinte. 7.3 Fonction de répétition Pendant la lecture d’un CD, appuyez deux fois sur la touche MENU. -
Page 54: Arrêt Momentané Du Son
® ; la touche PLAY permet de valider votre saisie. Si aucune saisie n’a lieu pendant 6 secondes, votre cubo revient en mode iPod ® normal. Bien entendu, l’eDock fonctionne également avec l’iPhone, cependant, le mode Avion doit tout d’abord être activé... -
Page 55: Mode Réveil
9. Mode Réveil 9.1 Fonction d’alarme Vous pouvez définir deux heures de réveil/d’alarme différentes. Maintenez l’une des deux touches d’alarme appuyée jusqu’à ce que l’heure clignote. À l’aide des touches de recherche de station, sélectionnez les heures. Réglez à présent les minutes en appuyant sur les touches de réglage du volume. Validez votre choix en appuyant sur la touche ALARM correspondante Appuyez à... -
Page 56: Appareil
Si le signal est trop faible, réorienter l’antenne ou raccorder une antenne extérieure adapté pour améliorer la réception. • Augmenter la distance entre le cubo et les autres appareils, p. ex. un téléviseur ou un magnétoscope. Pas de son ou mauvaise qualité de lecture •... -
Page 57: Caractéristiques Techniques
Déclaration de conformité Fabricant : sonoro audio GmbH Nous déclarons ici que l‘appareil sonoro cubo de par sa conception, sa construction et son type de construction est conforme aux exigences essentielles de la directive CEM 2004/108/CE, de la directive Basse tension 2006/95/CE et de la directive R&TTE 1999/5/CE, y compris les... - Page 61 0918-607-10...
Need help?
Do you have a question about the Cubo and is the answer not in the manual?
Questions and answers