Table of Contents

Related Manuals for Akai APC40 MKII


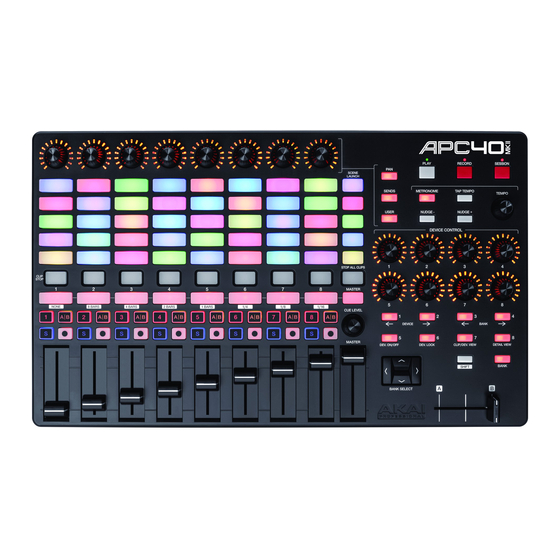
Summary of Contents for Akai APC40 MKII
- Page 1 User Guide English ( 2 – 6 ) Guía del usuario Español ( 7 – 11 ) Guide d'utilisation Français ( 12 – 16 ) Guida per l'uso Italiano ( 17 – 21 ) Benutzerhandbuch Deutsch ( 22 – 26 ) Appendix English ( 27 )
- Page 2 You can now use APC40 mkII with Live. Basic Operation Refer to this section to learn how to do basic tasks in Ableton Live using APC40 mkII. Important: Before doing any of the following, set up APC40 mkII as a controller in Live (described in the Quick Start section above).
- Page 3 You can use the Bank Left/Right (/) buttons to select the previous or next bank in that device. Tip: Alternatively, you can press the Device Lock button to lock or unlock APC40 mkII to or from the currently selected device. When locked, you can use APC40 mkII's controls for that...
- Page 4 Power Switch: Press this button to power APC40 mkII on and off. Footswitch Input: Connect an optional 1/4" (6.35mm) TS footswitch to this input. Kensington Lock Slot: You can use this Kensington lock slot to secure the APC40 mkII to a table or other surface.
- Page 5 Press and hold Shift and then press this button to select Bank 5 of the currently selected device. 22. Device Lock: Press this button to lock or unlock APC40 mkII to or from a device. When locked, you can use APC40 mkII's controls for that device regardless of where the current focus is in your Live Set.
- Page 6 25. Bank: Press this button to activate or deactivate while using the Bank Select buttons to move the selection by 8 tracks (left or right) or by 5 scenes (up or down), effectively shifting the entire 8x5 matrix controlled by the Clip Launch buttons (represented in Live by a rectangle). The Clip Launch buttons' colors will match the clips' colors as assigned in Live.
- Page 7 Pour de l’assistance supplémentaire, veuillez visiter akaipro.com/support. Guide de démarrage Utilisez le câble USB inclus pour relier le port USB du APC40 mkII au port USB d’un ordinateur (sous tension). Sur votre ordinateur, lancez Ableton Live.
- Page 8 Pour régler les niveaux de départ, appuyez sur la touche Sends afin de mettre les boutons assignables du APC40 mkII en mode Sends, ce qui leur permettra de contrôler les niveaux de Send A des huit pistes en cours.
- Page 9 Port USB : Utilisez un câble USB standard pour relier ce port au port USB de votre ordinateur. Le port USB de l'ordinateur permet d’alimenter le APC40 mkII. Cette connexion est également utilisée pour la transmission de données MIDI vers et depuis votre ordinateur.
- Page 10 10. Touches des pistes : • Touche d’activation de piste (#) : Appuyez sur cette touche pour mettre la piste en sourdine et la réactiver. • Assignation du crossfader (A|B) : Appuyez sur cette touche pour faire défiler les trois options d’affectations du crossfader pour la piste : A, B, ou Off (désactiver).
- Page 11 22. Device Lock : Appuyez sur cette touche afin de verrouiller/déverrouiller l’APC40 mkII au périphérique actuellement sélectionné. Lorsqu'il est verrouillé, vous pouvez utiliser les commandes du APC40 mkII pour ce périphérique, peu importe où vous en êtes dans votre Set Live.
- Page 12 Cliccare su un menù a discesa Control Surface (superficie di controllo) disponibile e selezionare Akai APC40 mkII. Cliccare su un menù a discesa Input (ingressi) disponibile e selezionare Akai APC40 mkII. Cliccare su un menù a discesa Output (uscite) disponibile e selezionare Akai APC40 mkII.
- Page 13 Stop della traccia). Per regolare ciascun volume, servirsi dei fader Track Volume. Per regolare il panning, premere il tasto Pan per mettere le manopole assegnabili dell'APC40 mkII in modalità Pan. Le otto manopole assegnabili controlleranno le posizioni di panning delle otto tracce correnti.
- Page 14 Porta USB: servirsi di un cavo USB standard per collegare questa porta a una porta USB del computer. La porta USB del computer alimenta l'APC40 mkII. Questo collegamento serve anche a inviare e ricevere dati MIDI da e verso il computer.
- Page 15 22. Device Lock (blocco dispositivo): premere questo tasto per bloccare o sbloccare l'APC40 mkII da un dispositivo. Una volta collegato, è possibile utilizzare i comandi dell'APC40 mkII per il dispositivo indipendentemente da dove si trova l'attenzione attuale nel Live Set.
- Page 16 23. Bank Left/Right (/) (banco sx/dx): servirsi di questi tasti per selezionare il banco di comandi precedente o successivo in un dispositivo. Ciascuno di questi tasti si illuminerà qualora vi sia un banco disponibile in quella direzione. La barra di stato in fondo alla finestra mostra il banco corrente.
- Page 17 1.8 kg Specifications are subject to change without notice. Trademarks and Licenses Akai Professional is a trademark of inMusic Brands, Inc., registered in the U.S. and other countries. Ableton and the Ableton Logo are trademarks of Ableton AG. Mac and OS X are trademarks of Apple Inc., registered in the U.S. and other countries.
- Page 18 akaipro.com Manual Version 1.0...
Need help?
Do you have a question about the APC40 MKII and is the answer not in the manual?
Questions and answers