Advertisement
Quick Links
SERVICE MANUAL
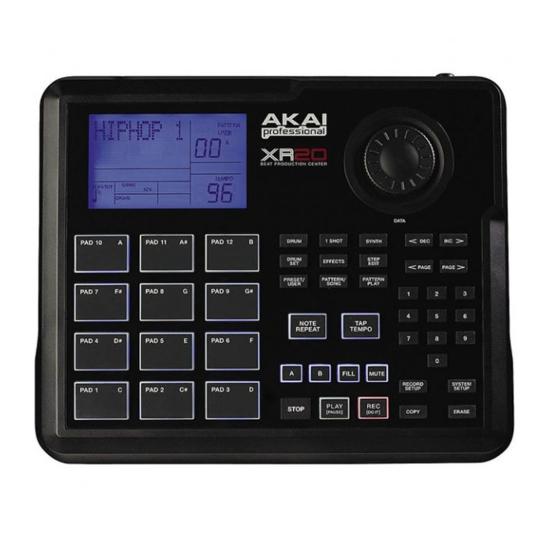
Audio Outputs:
Pads:
Sample/DAC Bit
Resolution
Sounds:
Sounds Accessible via
Pads
Sounds Accessible via
MIDI
Polyphony
Panning
Velocity Response
Timing Resolution
Time Signature Range
Tempo Range
Notes/Patterns/Songs
Kits
MIDI Prog Change
Response
Sync
Footswitch
Jacks/Functions
Microphone Input
Other Features
Power
SPECIFICATIONS
TECHNICAL SPECIFICATIONS
1 TRS ¼" (aux)
2 TS ¼" (main)
1 TRS ¼" (phones)
12 velocity sensitive (w/Dynamic Articulation™)
16 / 24
700+
12
120
32 voice
7-position user programmable
8 loudness levels via pads, 127 via MIDI
96 ppq
1-128 beats per pattern
30-300 BPM
150,000 / 200 (100 user, 100 preset) / 100
100 user, 100 preset
Kit
MIDI Clock with Song Position Pointer
Start / Stop
Count / A / B / Fill
TS 1/4"
Step Editing, Stereo Samples, Reverb and Compressor / EQ effects.
12 VAC External Transformer, UL and CSA Approved
6 AA batteries (not included)
MODEL:
ACD1
Advertisement

Related Manuals for Akai Alesis LD32


Summary of Contents for Akai Alesis LD32
- Page 1 SERVICE MANUAL MODEL: ACD1 SPECIFICATIONS TECHNICAL SPECIFICATIONS Audio Outputs: 1 TRS ¼” (aux) 2 TS ¼” (main) 1 TRS ¼” (phones) Pads: 12 velocity sensitive (w/Dynamic Articulation™) Sample/DAC Bit 16 / 24 Resolution Sounds: 700+ Sounds Accessible via Pads Sounds Accessible via MIDI Polyphony 32 voice...
- Page 2 Diagnostic Specification XR-20 and Alesis LD32 Product Code: ACD1/LD32 Document Version 0.90 Last Revised: 2008/01/01...
- Page 3 1. Memory Test Upon startup, holding down [PLAY] should run the memory test from boot code. The screen will indicate whether the test was successful or a failure. After this test, power down the unit to enter diagnostics mode. RAM Test Wait..
- Page 4 Diags When the test is executed, the LCD should show: All On All LEDs shall turn on. 5. Test 3: Switch Test The LCD should show display the following: Diags Switch When the test is executed, the LCD should show: SWITCH The user will then press the switches one at a time.
- Page 5 RecSet SysSet Copy Erase Once all switches are pressed the LCD will display: SWITCH Passed Pressing [STOP] will then bring the user to the test select page. Pressing [STOP] twice in a row during the test will abort the test, and the LCD will display: SWITCH Abort Pressing [STOP] will then bring the user to the test select page.
- Page 6 The user will then press the pads one at a time. When each pad is pressed, its number and the input velocity shall appear on the second line, such as: PADS 16v127 PADS 1 v001 Once all pads are pressed the LCD will display: PADS Passed Pressing [STOP] will then bring the user to the test select page.
- Page 7 Once all footswitches are pressed the LCD will display: FOOTSW Passed Pressing [STOP] will then bring the user to the test select page. Pressing [STOP] during the test will abort the test, and the LCD will display: FOOTSW Abort Pressing [STOP] will then bring the user to the test select page. If during the test more than one footswitch is detected at a time, the LCD should display: FOOTSW Failed...
- Page 8 In this test the unit should generate a 300 Hz tone and output on all the outputs. If [PAGE >] or [<PAGE] is pressed then the display should cycle through the following outputs in incrementing or decrementing order based on the button (PAGE> is increase and <PAGE will decrease).
- Page 9 FLASH Passed FLASH Failed 12. Test 10: Serial EEPROM Test The LCD should show display the following: Diags EEPROM Upon the user pressing [PLAY] the system will write/read a small reserved section of the EEPROM and verify the results: EEPROM Passed EEPROM Failed...
- Page 10 Audio Spec Test This procedure verifies the audio specifications for mass production.
-
Page 12: Disassembly Procedures
DISASSEMBLY PROCEDURES 1. DISASSEMBLE THE CABINET (Fig1) (A) REMOVE 4 SCREWS FROM BOTTOM PANEL. (B) REMOVE 2 PCS OF CABLE CONNECTOR FROM THE MAIN PCB. (Fig1) - Page 13 2. DISASSEMBLE THE FONCTION PCB ASS’Y. (Fig2) (A) REMOVE THE CABLE FROM LCM (B) REMOVE 26 SCREWS (Fig.2) 3.DISASSEMBLE THE ENCODER PCB ASS’Y. (Fig.3) REMOVE 3 SCREWS (Fig.3)
- Page 14 4.DISASSEMBLE THE MAIN PCB ASS’Y. (Fig.4) (A) REMOVE 1 CABLE CONNECTOR (B) REMOVE 2 SCREWS (Fig.4)
- Page 18 ACD1AKA DESCRIPTION LEVEL TP022620T TAPE D26.5 X d20MM PT1304702 PLATE BA71028-130 BATTERY TERMINAL 71028-130 BA71209-130 BATTERY TERMINAL 71209-130 BA71228-130 BATTERY TERMINAL 71228-130 BAAR-142 RUBBER FEET BAAR-8.7X5 RUBBER GASKET EVA1304434 EVA 29x50x0.5mm EVA1304435 EVA 70x5x0.5mm EVA1304436 EVA 155x28x0.5mm K46-1 CABLE TIE LAC22AKA23 BARCODE LABEL LAC67ALE59...
- Page 19 R158~164 AL0-16-1151 RESISTOR 1.15K(SMD)1%0805 R3,128 AL0-16-3830 RESISTOR R123 AL0-16-8251 RESISTOR R26,52,55,86,87,92 AL1-08-0223 ELECT AL1-51-0475 C.CAP 150P/50V AL1-55-0470 CERMAIC 47PF NPO 50V 0805 C31,32,63,65 AL1-55-0561 CAP 560PF NPO 0805 C76,78 AL1-55-0680 CERAMIC C30,43,48,62 AL1-55-0751 CAP 750PF NPO 0805 C17,34,60,69 AL1-56-0102 CAP 1000PF NPO 100V 0805(SMD) C1,4~6,11,16,18~20,22,35,50 AL1-70-2102 CAP 10UF TANT-A 20% 10V...
- Page 20 ICBF531 IC DSP ADSP-BF531 ICK4S641632E SDRAM IC ICLM317 IC LM317 1.5A SOT-223 ICM25PE80 IC 8Mbit , low-voltage,Page-Er ICMC34074A IC MC34074ADR2G SOIC-14 U6~8 ICMIC809SU RESET IC(2.93V) ICNJM2387 JKDJ-0702B-025 JACK LDLTST-C190KRKT D7,15~18 PT1304702 PLATE (J4) RS00018J05 RES 0 5% SMD 0805 R46,98,108,114,121,140,151 RS001K08J05 RES SMD 1K R15,32,36,41,44,49,56,77...
- Page 21 FCN1R0503001 CONNECTOR LDKPTC2012CGCK GREEN LED KPTC2012 CGCK 0805 LDKPTC2012QBC-C BLUE LED KPTC2012QBC-C 0805 D1~6,9~14,17,18,20~22,55 LDKPTC2012SURCK RED LED KPTC2012 SURCK 0805 RS00018J05 RES 0 5% SMD 0805 R7~13,23~26 RS003608J05 RES 36 5% SMD 0805 R17,20 RS005608J05 RES 56 5% SMD 0805 RS008208J05 RES 82 5% SMD 0805...
-
Page 66: Special Instructions
COMPANY CONFIDENTIAL ENGINEERING CHANGE NOTICE BRAND: _______________________ Akai ECN #: AI14901 PRODUCT(S): [ACD1] XR20 Top Level 28-May-08 DATE: ASSEMBLY(S): CHANGES TO BE MADE BOM CHANGES: DELETE: QUAN PART NUMBER REF DES PART DESCRIPTION MFG PN LCD MODULE CUSTOM LD32 URT...
Need help?
Do you have a question about the Alesis LD32 and is the answer not in the manual?
Questions and answers