
Subscribe to Our Youtube Channel
Related Manuals for INVENTOR INVMS67A


Summary of Contents for INVENTOR INVMS67A
- Page 1 REFRIGERATOR • USER’S MANUAL • ΕΓΧΕΙΡΙΔΙΟ ΧΡΗΣΗΣ • MANUALUL UTILIZATORULUI • BEDIENUNGSANLEITUNG • MANUEL D’UTILISATEUR MODELS: INVMS67A INVMS67A-BS INVMS67AB-BS FRENCH...
-
Page 2: Table Of Contents
Contents SAFETY WARNINGS ......................1 INSTALLTION ........................1 Loca on ........................2 Reversing the Door Swing ..................2 Door Space Requirements ..................3 Leveling the Unit ....................... 3 Cleaning Before Use ....................4 Before Using Your Unit ....................4 Interior Accessories ....................4 PRODUCT OVERVIEW ...................... -
Page 3: Safety Warnings
1. SAFETY WARNINGS WARNING - WARNING - WARNING - Do not damage the cooling circuit. WARNING - Do not use any electrical devices inside the refrigerator unless they are approved by the manufacturer. 5) This appliance should be unplugged before any maintenance is performed or when it is not in use. 6) It is not advised for children under 8 to use this appliance. -
Page 4: Installtion
2. INSTALLATION 2.1 Location ambient temperatures may cause the unit to operate improperly. This unit is not designed for use in When installing the unit be sure to allow enough open area around all sides (20 cm from the top, 15cm from the back and 40 cm from the sides). -
Page 5: Door Space Requirements
4) Slide the appliance door down about 15cm and off the top hinge pin and li away from the appliance. 5) Remove the two screws from top bracket and replace on the other side. You will need to first remove the plas c caps from the other side. -
Page 6: Cleaning Before Use
Cleaning Before Use water using a damp sponge or cloth. The shelves and salad bin can be washed with warm soapy water, be sure they are completely dry before replacing. Clean the exterior of the unit with 2.6 Before Using Your Unit hours to reach the correct temperature and ensure that it is running properly. -
Page 7: Product Overview
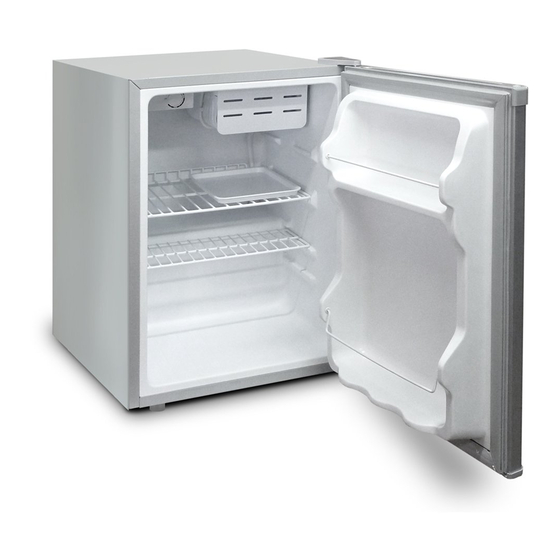
3. PRODUCT OVERVIEW Small door Thermostat Pan drain , Steel wire shelf Wire steel bar Leveling feet *All images in this instruc on manual are for explanatory purposes only, please refer to your individual unit for details. 4. OPERATION 4.1 Adjus ng the Temperature The thermostat is located in the interior of the refrigerator on the ◆... -
Page 8: Cleaning
unit are kept cool. To keep foods flavorful and fresh store them in separate sealed containers. Fruits and vegetables ◆ do not need to be sealed. Fruit and vegetables do not need to be wrapped. Always let cooked food cool down before placing them in the unit. This will help to maintain ◆... -
Page 9: Turning The Unit Off For Extended Periods Of Time
technician. 6.3 Turning the Unit Off for Extended Periods of Time Disconnect the unit from the power outlet. Remove all the items and clean the unit. Be sure to leave the door ajar to prevent unpleasant odors. Is there electrical current being supplied to the outlet? Is the outlet equipped to handle the required voltage? Inopera on Has the fuse burnt out on the circuit breaker? -
Page 10: Disposal
Allow freshly cooked hot foods to come to an ambient temperature before placing them in the refrigerator. consumption Be sure the wall behind the refrigerator remains dirt and dust free, especially for units equipped with an outer condenser. energy ◆ The appliance should be placed in the coolest area of the room. Avoid placing in direct sunlight ◆... - Page 11 Activate your warranty..Connect to the following link https://www.inventorappliances.com/ warranty-card simple steps! Select the product type (airconditioner or appliance) for which the warranty will be activated Choose the warranty that corresponds to your product purchase Fill in the required information (owner, retailer and appliance) Scan here for the and press send...
- Page 12 Περιεχόμενα 1. ΟΔΗΓΙΕΣ ΑΣΦΑΛΕΙΑΣ....................2. ΕΓΚΑΤΑΣΤΑΣΗ......................2.1 Τοποθεσία....................... 2.2 Αλλαγή φοράς πόρτας..................2.3 Εγκατάσταση....................2.4 Ευθυγράμμιση της συσκευής................2.5 Καθαρισμός πριν τη χρήση................2.6 Πριν χρησιμοποιήσετε το ψυγείο..............2.7 Εσωτερικά εξαρτήματα................... 3. ΠΕΡΙΓΡΑΦΗ ΣΥΣΚΕΥΗΣ..................... 4. ΧΡΗΣΗ.......................... 4.1 Ρυθμιση της θερμοκρασίας................4.2 Θόρυβος...
-
Page 13: Οδηγιεσ Ασφαλειασ
1. ΟΔΗΓΙΕΣ ΑΣΦΑΛΕΙΑΣ 1) ΠΡΟΕΙΔΟΠΟΙΗΣΗ - Αφήστε αρκετά ανοίγματα για τον σωστό εξαερισμό της συσκευής. 2) ΠΡΟΕΙΔΟΠΟΙΗΣΗ - Μην χρησιμοποιείτε μηχανικές διατάξεις ή άλλα μέσα για να Μην χρησιμοποιείτε ηλεκτρικές συσκευές στο εσωτερικό του επιταχύνετε την διαδικασία απόψυξης του ψυγείου, εκτός αυτών που προτείνονται από τον κατασκευαστή... -
Page 14: Εγκατασταση
2. ΕΓΚΑΤΑΣΤΑΣΗ 2.1 Τοποθεσία Επιλέξτε ένα χώρο καλά αεριζόμενο με σταθερό και σκληρό πάτωμα. Μην τοποθετείτε τη συσκευή δίπλα σε πηγές θερμότητας όπως φούρνους, καυστήρες και καλοριφέρ. Μην εκθέτετε τη συσκευή απευθείας σε ηλιακό φως. Πολύ χαμηλή εξωτερική θερμοκρασία μπορεί να προκαλέσει... -
Page 15: Εγκατάσταση
4) Τραβήξτε τη πόρτα προς τα κάτω περίπου 15cm. και αφαιρέστε τη από τον πάνω μεντεσέ. Βγάλτε τη πόρτα από τη συσκευή. 5) Αφαιρέστε τις 2 βίδες από τον πάνω βραχίονα και τοποθετήστε τον στην άλλη πλευρά. Πρέπει πρώτα να αφαιρέσετε τα πλαστικά καλύματα... -
Page 16: Πριν Χρησιμοποιήσετε Το Ψυγείο
2.6 Πριν χρησιμοποιήσετε το ψυγείο Πριν τοποθετήσετε τρόφιμα στο ψυγείο, ενεργοποιήστε το και περιμένετε 24 ώρες για να βεβαιωθείτε ότι λειτουργεί σωστά ώστε να φτάσει στην κατάλληλη θερμοκρασία. Δεν πρέπει να βάζετε πολλά τρόφιμα μέσα στο ψυγείο. Πριν την σύνδεση στο ρεύμα! ◆... -
Page 17: Χρηση
4. ΧΡΗΣΗ 4.1 Ρύθμιση της θερμοκρασίας Ο επιλογέας θερμοκρασίας βρίσκεται στο δεξί μέρος του εσωτερικού ◆ του ψυγείου. Επιλογή “Off” : Κλείνει τη συσκευή Επιλογή “Min” : Λιγότερο κρύο στο εσωτερικό Επιλογή “Med”: Κανονική λειτουργία (φυσιολογική χρήση) Επιλογή “Max” : Περισσότερο κρύο στο εσωτερικό Όταν... -
Page 18: Καθαρισμοσ
5. ΚΑΘΑΡΙΣΜΟΣ 5.1 Απόψυξη Μπορεί να σχηματιστεί πάγος στο πίσω μέρος του εσωτερικού του ψυγείου, ο οποίος θα λιώσει αυτόματα κατά την περίοδο κατά την οποία ο συμπιεστής δεν είναι σε λειτουργία. Το νερό θα μεταφερθεί μέσω της οπής αποστράγγισης στον δίσκο συλλογής πάνω από τον συμπιεστή... -
Page 19: Προβληματα Και Αντιμετωπιση
7. ΠΡΟΒΛΗΜΑΤΑ ΚΑΙ ΑΝΤΙΜΕΤΩΠΙΣΗ Τα παρακάτω προβλήματα μπορούν να αντιμετωπιστούν από τον χρήστη. Παρακαλούμε όπως επικοινωνήσετε με το κέντρο εξυπηρέτησης πελατών της εταιρείας μας αν τα προβλήματα δεν εξαλειφθούν. • Ελέγξτε αν η συσκευή είναι συνδεδεμένη στο ρεύμα. • Μήπως η τάση ρεύματος δεν είναι η σωστή; Η... -
Page 20: Απορριψη
Η δημιουργία πάγου αυξάνει την κατανάλωση του ψυγείου. Σε περίπτωση που το στρώμα πάγου φτάσει σε πάχος τα 3-5mm, καθαρίστε τη συσκευή. Διατηρείτε το πίσω τμήμα του ψυγείου καθαρό από σκόνη και βρωμιές. Ακολουθείτε πάντα πιστά τις οδηγίες « Τοποθέτησης » και « Συμβουλές εξοικονόμησης ενέργειας » για... - Page 21 Ενεργοποιήστε την εγγύηση σας... σε Inventor Συνδεθείτε στο site της στον ακόλουθο σύνδεσµο http://www.inventoraircondition.gr/ egiisi-inventor/ απλά Επιλέξτε τον τύπο του προϊόντος (κλιµατιστικό ή συσκευή) για το οποίο θα ενεργοποιηθεί η εγγύηση Επιλέξτε την εγγύηση που αντιστοιχεί στο προϊόν που έχετε στην κατοχή σας...
- Page 22 Cuprins Avertizari cu privire la siguranta..................Instalarea........................Pozitionarea......................Schimbarea directiei de deschidere a usii.............. Distante necesare pentru deschiderea usilor............Asezarea la nivel a unitatii..................Curatarea inaintea folosirii..................Inainte de prima utilizare..................Accesoriile interioare....................Prezentarea produsului....................Folosirea produsului....................... Ajustarea temperaturii..................... Zgomote in interiorul unitatii..................Sfaturi pentru depozitarea alimentelor..............
-
Page 23: Avertizari Cu Privire La Siguranta
1. Avertizari cu privire la siguranta Avertizare-Gurile de ventilatie din interiorul sau structura aparatului trebuie mentinute libere, neobstructionate. Avertizare - Nu folositi dispozitive mecanice sau alte mijloace pentru a accelera procesul de dezghetare. Avertizare - Nu defectati circuitul refrigerantului. Avertizare - Nu folositi dispozitive electrice in interiorul frigiderului decat daca au fost aprobate de catre producator. -
Page 24: Instalarea
2. Instalarea Amplasarea Atunci cand va alegeti locul unde va fi pozitionat aparatul, asigurati-va ca podeaua este dreapta si ca incaperea este bine ventilata. Evitati pozitionarea aparatului langa surse de caldura (aragaz, boiler, radiator, etc.). Pozitionarea aparatului in contact direct cu lumina soarelui poate creste consumul de energie electrica. - Page 25 Trageti usa in jos aproximativ 15 cm si apoi ridicati usor pentru a o scoate. Desurubati suportul superior si montati-l in partea opusa. Inainte de acest proces, asigurati-va ca ati scos capacele de plastic din partea in care se va monta usa. Montati usa in balamaua superioara, asigurandu-va ca este pozitionata corect.
-
Page 26: Inainte De Prima Utilizare
2.5 Curatarea aparatului inainte de prima utilizare Stergeti interiorul aparatului cu o solutie cu o concentratie mica de bicarbonat de sodiu. Curatati folosind o carpa inmuiata in apa calduta. Spalati rafturile si cosul pentru legume in apa calduta cu sapun si uscati complet inainte de a le reintroduce in frigider. Curatati carcasa exterioara a aparatului folosind o carpa umeda. -
Page 27: Prezentarea Produsului
3. Prezentarea generala a produsului Usa mica Termostat Raft metalic Bara metalica de sustinere Picioruse reglabile. *Imaginile sunt cu titlu de prezentare generala. Pentru detalii va rugam sa consultati produsul dvs. 4. Operarea frigiderului 4.1 Reglarea temperaturii Termostatul este pozitionat in interiorul frigiderului in partea ◆... -
Page 28: Dezghetarea
Pentru a evita uscarea produselor si transferul de arome, impachetati fiecare produs individual. ◆ Fructele si legumele nu trebuiesc impachetate. Mancarea proaspat gatita trebuie lasata sa se raceasca inainte de a fi depozitata in frigider. In felul ◆ acesta veti mentine temperatura optima in interiorul frigiderului. Pentru a mentine o temperatura constanta in interiorul frigiderului, va recomandam sa deschideti ◆... -
Page 29: Depanare
Nu incercati sa reparati aparatul de unul singur. Reparatiile facute de persoane fara experienta pot provoca defectarea produsului sau ranirea persoanelor respective. Contactati un tehnician autorizat. 6.3 Oprirea aparatului pentru perioade lungi de timp. In cazul in care nu veti folosi frigiderul pentru o perioada lunga de timp, deconectati-l de la priza, inlaturati mancarea si curatati interiorul frigiderului. - Page 30 In conditii normale de temperatura, setati termostatul pe nivelul mediu (MED). Inainte de depozitarea alimentelor, asigurati-va ca acestea au fost racite la temperatura camerei. Gheata poate duce la un consum ridicat de energie. Curatati aparatul indata ce stratul de gheata ajunge la 3-5 mm.
- Page 31 Activati-va garantia... Accesati link-ul de mai jos: https://www.inventoraerconditionat.ro/ certificatul-de-garantie-inventor- aer-conditionat-si-electrocasnice Pasi Alegeti tipul de produs pentru simpli! care vreti sa activati garantia (aparat de aer conditionat, alt aparat electrocasnic). Alegeti tipul de garantie corespunzator produsului achizitionat. Completati formularul cu informatiile cerute (numele...
- Page 32 Inhaltsverzeichnis Sicherheitshinweise..................1 Installation......................1 Standort......................2 Umkehren des Türanschlags................2 Tür-Platzbedarf....................3 Nivellieren der Einheit..................3 Reinigung vor dem Gebrauch................4 Bevor Sie Ihr Gerät in Betrieb nehmen.............4 Innenausstattungen..................4 Produktübersicht....................4 Betrieb.......................5 Temperatureinstellung..................5 Geräusch im Inneren des Gerätes!..............5 Tipps zum Aufbewahren von Lebensmitteln ............5 Reinigung......................6 Abtauen......................6 Reinigen des Inneren und des Äußeren ............6 Reinigungstipps....................6 Instandhaltung....................6 Vorsicht beim Umgang mit / Verschieben des Gerätes ........6...
-
Page 33: Sicherheitshinweise
1. SICHERHEITSHINWEISE Achten Sie bei der Einbaustruktur darauf, dass Sie die Belüftungsöffnung am Gehäuse des Gerätes frei von Hindernissen lassen. WARNUNG—Verwenden Sie keine mechanischen Vorrichtungen oder andere als die vom WARNUNG—Verwenden Sie keine elektrischen Geräte in den Das Gerät darf während der Reinigung nicht am Stromnetz angeschlossen sein. -
Page 34: Standort
2.1 Standort Wenn Sie eine Position für das Gerät auswählen, so stellen Sie vorher sicher, dass der Boden stabil und fest ist und der Raum gut belüftet ist. Vermeiden Sie das Gerät in der Nähe einer Wärmequelle, wie z.B. Kocher, Kessel oder Heizkörper aufzustellen. Vermeiden Sie auch direkte Sonneneinstrahlung, da sonst der Stromverbrauch erhöht werden könnte. -
Page 35: Reinigung Vor Dem Gebrauch
4) Schieben Sie die Gerätetür ca. 15 cm nach unten, entfernen Sie den oberen Scharnierbolzen und heben Sie ihn weg von dem Gerät ab. 5) Entfernen Sie die beiden Schrauben von der oberen Halterung und ersetzen Sie sie auf der anderen Seite. Sie müssen zuerst die Kunststoffkappen von der anderen Seite entfernen. -
Page 36: Bevor Sie Ihr Gerät In Betrieb Nehmen
2.6 Bevor Sie Ihr Gerät in Betrieb nehmen Wenn Sie den Kühlschrank zum ersten Mal in Betrieb nehmen, muss er zunächst vollständig leer arbeiten, bis sich die Betriebstemperatur automatisch eingestellt hat. • Vor dem Einstecken überprüfen Sie bitte, ob Ihre Steckdose mit dem im Lieferumfang enthaltenen Stecker kompatibel ist. -
Page 37: Betrieb
4. BETRIEB Einstellen der Temperatur ◆ Der Temperaturwahlknopf befindet sich auf der inneren rechten Seitenwand des Kühlschranks Einstellung "Off": schaltet das Gerät aus Einstellung "Min": vermindert die Kühlung der Temperatur Einstellung "Med": Normalbetrieb (ausreichend für die meisten Bedingungen) Einstellung "Max": maximale Kühlung der Temperatur ◆... -
Page 38: Reinigung
5. REINIGUNG Abtauen Frost kann sich auf der inneren Rückseite des Gerätes ansammeln, der automatisch während des Zyklus des Kompressors aufgetaut wird. Das Wasser wird über das Ablaufloch in die Auffangwanne über dem Kompressor geleitet, wo es verdunstet wird. Stellen Sie sicher, dass das Ablaufloch regelmäßig überprüft und gereinigt wird, damit das Wasser in das Ablagefach austreten kann. -
Page 39: Fehlerbehebung
7. Fehlerbehebung Die folgenden einfachen Probleme können durch den Benutzer gehandhabt werden. Bitte rufen Sie die Kundendienstabteilung, wenn die Probleme nicht gelöst werden. Prüfen Sie, ob das Gefriergerät angeschlossen ist und mit Strom versorgt wird; Kein Betrieb Niederspannung; Stromausfall oder Auslöseschaltung Riechende Lebensmittel sollten gut verschlossen gelagert werden. -
Page 40: Entsorgung
Im Falle des äußeren Kondensators sollte der Rückwand immer sauber und frei von Staub oder Verunreinigungen sein. Beachten Sie immer die Anweisungen, die in den Abschnitten zur "Aufstellung und Energiespartipps" angegeben sind, da sonst der Energieverbrauch wesentlich höher sein könnte. ♦... - Page 41 Registrieren Sie Ihre Garantie... Klicken Sie auf den folgenden Link: http://www.inventorappliances. com/garantie einfachen Wählen Sie das Produkt für die Garantieregistrierung aus Schritten! (Klimaanlagen oder Haushaltsgeräte) Wählen Sie die Garantie aus, die Ihrem Kauf entspricht Bitte füllen Sie alle erforderlichen Felder aus (Besitzer, Einzelhändler Hier scannen - und Gerät) und drücken senden Garantieformular...
- Page 42 Sommaire NOTE DE SECURITE ......................1 INSTALLATION ........................1 Emplacement – Localisation ..................2 Inversement de la direction des portes ..............2 Besoins en espace ....................... 3 Nivellement de l’unité ....................3 Nettoyage avant l’utilisation ..................4 Avant d’utiliser l’unité ....................4 Accessoires intérieurs ....................
-
Page 43: Note De Securite
1. NOTES DE SECURITE 1) ALERTE – Gardez toutes les ouvertures de ventilation libres d’obstacles. 2) ALERTE – N’utilisez pas de dispositifs mécaniques ou d’instruments pour accélérer le processus de dégivrage sans consulter premièrement le fabricant. 3) ALERTE – Ne détruisez pas le circuit de refroidissement. 4) ALERTE –... -
Page 44: Installation
2. INSTALLATION 2.1 Emplacement – Localisation Quand vous sélectionnez le lieu où vous placez votre unité, vous devez s’assurer que le sol est plat et solide et que la chambre est bien ventilée. Evitez de placez votre unité près de sources de chauffage, telles que cuiseur, chaudière ou radiateur. -
Page 45: Besoins En Espace
4) Glissez la porte d’appareil environ 15cm vers le bas et retirez la fiche de charnière supérieure. Retirez la porte de l’appareil. 5) Retirez les deux vis de tranche supérieure et replacez – les à l’envers. D’abord, vous nécessiterez de retirer les capuchons plastiques à... -
Page 46: Nettoyage Avant L'utilisation
2.5 Nettoyage avant l’utilisation 2.6 Avant d’utiliser l’unité les objets dans l’unité. Cela lui permet à arriver à la température correcte et vous permet à ◆ Avant de la brancher ◆ Avant de la mettre en marche 2.7 Accessoires intérieurs des modèles différents ont des combinaisons différentes. -
Page 47: Presentation Du Produit
3. PRESENTATION DE PRODUIT Petite porte Thermostat Bac de vidange Etagère en fil d’acier Bar de fil métallique Pied votre unité individuelle pour plus de détails. 4. OPERATION 4.1 Ajustement de la température Le thermostat est situé à l’intérieur de réfrigérateur au côté gauche. ◆... -
Page 48: Nettoyage
Pour garder les aliments frais et savoureux, entreposez-les dans un récipient scellé séparé. Les ◆ fruits et les légumes ne nécessitent pas d’être scellés et emballés. Laissez la nourriture cuisinée à se refroidir avant de les placez dans l’unité. Cela contribue à la ◆... -
Page 49: Conseils De Depannage
L’unité doit être maintenue par un ingénieur autorisé et seulement les pièces de rechange d’origine des blessures. Contactez toujours un technicien qualifié. 6.3 Unités débranchées pour des longues périodes de temps Si l’unité va être débranché pour des longues périodes de temps, assurez-vous de faire les suivants. la porte entrouverte pour prévenir les odeurs désagréables. -
Page 50: Elimination
Laissez les aliments chauds frais cuisinés à arriver à la température ambiante avent de les placer dans le réfrigérateur. dans le cas des unités équipées d’un compresseur externe. basse d’énergie pour cet appareil. ◆ L’appareil doit être placée dans l’endroit le plus froid de la chambre. Evitez de l’exposer directement à... - Page 51 Activez votre plan de garantie… à Suivez le lien suivant : http://www.inventorappliances. com/produits-garantie Choisissez le type de produit simples! (air condition ou appareil) pour lequel la garantie sera activée Choisissez la garantie qui correspond à votre produit Complétez les informations demandées (propriétaire, détaillant et appareil) et Scannez ici pour...
- Page 52 REFRIGERATOR...
Need help?
Do you have a question about the INVMS67A and is the answer not in the manual?
Questions and answers