DeFelsko PosiTest AT-A Quick Manual
Hide thumbs
Also See for PosiTest AT-A:
- Instruction manual (11 pages) ,
- Full manual (22 pages) ,
- Instruction manual (77 pages)
Table of Contents
Advertisement
Quick Links
Advertisement
Table of Contents

Related Manuals for DeFelsko PosiTest AT-A


Summary of Contents for DeFelsko PosiTest AT-A
- Page 1 Quick Guide v. 5.0 PosiTest AT-A (automatic) PosiTest AT-M (manual)
- Page 2 4. Pull-Off Test a) PosiTest AT-M (manual) (see pg. 5) b) PosiTest AT-A (automatic) (see pg. 7) 5. Analysis of Test Results The dolly and the coating are examined and evaluated to determine the nature of the coating failure (see pg. 4).
- Page 3 Dolly & Coating Preparation Dolly Preparation 1. To remove oxidation and contaminants, place the included abrasive pad on a flat surface and rub the base of the dolly across the pad 4-5 times. 2. As required, remove residue left from the abrading process using a dry cloth or paper towel.
- Page 4 Dolly Application Mix the glue per manufacturer’s instructions and apply a uniform film of glue on the base of the dolly Attach the dolly to the prepared coating test area. NOTE: If the coated surface to be tested is overhead or vertical, a means to hold the dolly in place during the cure time may be required, i.e.
- Page 5 Glue failures typically occur when the glue is improperly mixed or the coated surface has not been adequately prepared (see pg.2). The PosiTest AT-A model provides an interface to document the nature of the fracture for each pull-off test (see pg. 10). Fracture...
- Page 6 PosiTest AT-M Manual Actuator Handle Pump Handle Hose Display Pump Actuator USB Data Transfer /Power Port Assembly Quick Coupling The PosiTest AT-M powers-up and displays dashes when the button is pressed. To preserve battery life, the instrument powers-down after 5 minutes of no activity. Quick Guide (1) Open pressure relief valve completely (turn counter clockwise)
- Page 7 PosiTest AT-M 3. Close the pressure relief valve on the pump completely (turn clockwise). CLOSE As required, verify and adjust the dolly size by pressing the button. Select the pressure units by pressing the button. The instrument will maintain these settings even after the button is pressed.
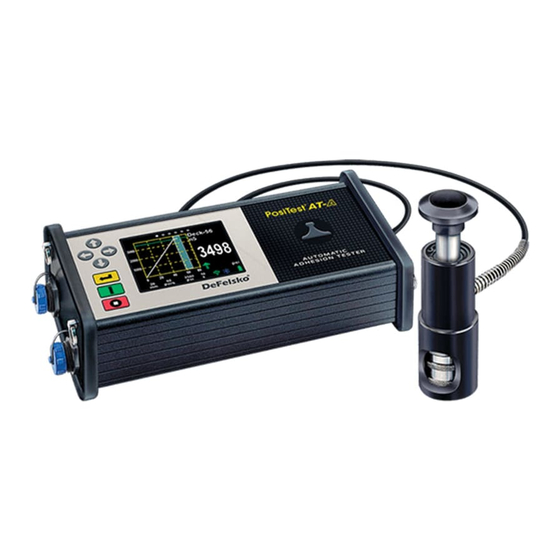
- Page 8 Actuator USB Port Assembly Quick Coupling The PosiTest AT-A powers-up when the button is pressed. To preserve battery life, the instrument powers-down after 5 minutes of no activity. Alternatively, press and hold the button for 5 seconds or select Power Off from the menu.
-
Page 9: How To Measure
PosiTest AT-A Touch Screen Display Use the touch screen to interact with menu options. Swipe horizontally to navigate between views or vertically to move between batch readings. Alternatively, the directional buttons can be used for navigation. Main View (shown with memory batch open) Carousel: indicates the current view. - Page 10 PosiTest AT-A Perform the Test 4. Press the button to initiate the test. The instrument begins building pressure (priming stage) and a green animated arrow (up) appears on the display. When the priming pressure is achieved the LCD starts displaying pressure over time on the pull chart.
- Page 11 PosiTest AT-A Memory Views (carousel) When a memory batch (pg. 11) is open, a carousel appears at the top of the display. Views are represented by dots, the solid dot indicates the current view. Swipe horizontally to navigate between views or vertically to move between batch readings.
-
Page 12: Memory Menu
PosiTest AT-A Memory Menu The PosiTest AT-A stores 100,000 readings in up to 1,000 batches. Stored measurements can be reviewed on-screen or accessed via computers, tablets and smart phones. New Batch Closes any currently opened batch and creates a new memory batch, named using the lowest available number (example: B2). - Page 13 PosiTest AT-A Hold Time: Hold Time is (up to 60 seconds) displayed on pressure is the pull chart maintained (held) (shaded area). at defined Limit. Default: 0 seconds. Defined Hold Time Orientation Rotates display between landscape (default) or portrait views.
-
Page 14: Connect Menu
WiFi Allows wireless communication with devices such as tablets, smart phones and computers connected to your local wireless network or portable mobile hot spot. See www.defelsko.com/WiFi Updates Determines if a software update is available for your instrument. See www.defelsko.com/update WARNING: The instrument will perform a Reset after an update (pg. -
Page 15: Accessing Stored Measurement Data
(drag and drop), change headings and more. Save your custom layouts as templates for future use. PosiTest AT-A In addition to PosiSoft 3.0, the PosiTest AT-A is also compatible with the following solutions... PosiSoft USB Drive - connect to a PC/Mac using the supplied USB cable to access and print stored readings, graphs, notes and screen captures. -
Page 16: Power Supply / Charging
When fully charged the icon will appear. NOTE: The PosiTest AT-A internal NiMH battery pack is user replaceable. In the unlikely event power issues are experienced, please contact our technical support or your local dealer for OEM battery pricing, availability and detailed replacement instructions. -
Page 17: Calibration And Verification
For organizations with re-certification requirements, the PosiTest AT may be returned at regular intervals for calibration. DeFelsko recommends that our customers establish their instrument calibration intervals based upon their own experience and work environment. Based on our... -
Page 18: Returning For Service
All Rights Reserved This manual is copyrighted with all rights reserved and may not be reproduced or transmitted, in whole or part, by any means, without written permission from DeFelsko Corporation. DeFelsko, PosiTector, PosiTest and PosiSoft are trademarks of DeFelsko Corporation registered in the U.S.
Need help?
Do you have a question about the PosiTest AT-A and is the answer not in the manual?
Questions and answers