Table of Contents
Advertisement
Advertisement
Table of Contents

Subscribe to Our Youtube Channel
Related Manuals for Cuisinart DGB900BCU Grind & Brew Plus


Summary of Contents for Cuisinart DGB900BCU Grind & Brew Plus
- Page 1 Grind & Brew Plus DGB900BCU...
-
Page 2: Important Safeguards
Do not use if damaged, or if the appliance has been dropped. Do not use this appliance if the lead is damaged. In the event of damage, or if the appliance develops a fault, contact the Cuisinart Customer Care Line (refer to “UK After Sales Service“ section for... - Page 3 Congratulations on your purchase of the Cuisinart Grind & Brew Plus. For over 30 years Cuisinart’s aim has been to produce the very finest kitchen equipment. All Cuisinart products are engineered for exceptionally long life, and designed to be easy to use as well as to give excellent performance day after day.
-
Page 4: Table Of Contents
CONTENTS Product Description ......Safety Cautions ......Instructions for Use . -
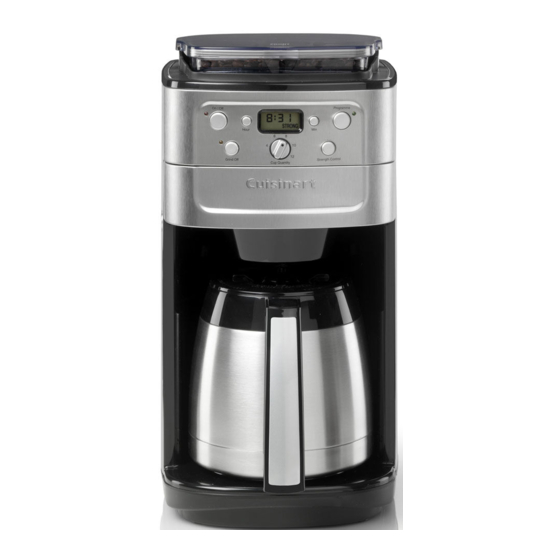
Page 5: Product Description
Product Description Water Reservoir Lid Bean Hopper Lid Bean Hopper Water Reservoir (not shown) Control Panel Coffee Filter Compartment Coffee Filter Compartment Release Button 12 Cup Thermal Carafe Housing Unit... -
Page 6: Safety Cautions
Do not use if damaged, or if the appliance has been dropped. In the event of damage, remove the plug from the mains then contact the Cuisinart Customer Care Line (see “UK After Sales Service” section). Do not use this appliance if the lead is damaged. In the event of a damaged lead discontinue use immediately. - Page 7 Do not leave the lead hanging over the edge of a kitchen table or worktop. Avoid contact between the lead and hot surfaces. For indoor use only. For domestic use only. Do not exceed the maximum capacity of this appliance. (See page ...
- Page 8 Do not place a cloth or otherwise restrict airflow beneath the coffee maker. Use only the Cuisinart Gold Tone® Commercial Style Filter with this unit. These are available to purchase by contacting the Cuisinart Helpline (see UK After Sales Service section). Other Gold Tone® permanent filters or normal paper filters may cause the unit to overflow.
-
Page 9: Instructions For Use
Instructions for Use Control Panel Programme 1. On/Off button with LED Indicator Featuring an audible tone which beeps 5 times after the coffee has finished brewing. 2. Grind Off Button with LED Indicator Use to turn off the grinder when using pre-ground coffee. 3 &... -
Page 10: B Setting The Clock
Setting the Clock When the unit is plugged in, the screen will show 12:00AM. Press and hold either the ‘Hour’ or the ‘Min’ button until the numbers start to flash. Then press the ‘Hour’ and ‘Min’ buttons to scroll through the numbers. When the numbers stop flashing, the time has been set. -
Page 11: D Inserting The Charcoal Water Filter
Inserting the Charcoal water filter Your appliance comes with two charcoal water filters that eliminate chlorine, bad tastes and odours from tap water. It is recommended that you change your water filter every 90 days or after 90 uses and more often if you have hard water. Replacement filters can be purchased directly from the manufacturer, (see “UK After Sales Service”... -
Page 12: E Preparing To Brew
N.B. Caution must be used when inserting the charcoal filter. Improper placement in the holder can cause tearing of the filter skin. Hold the filter under cold running tap water for 10 seconds to flush. Hold the water filter holder vertically, directly under the water stream so that the water flows through the filter compartment. -
Page 13: Removing And Replacing The Bean Hopper
Removing and Replacing the Bean Hopper • The hopper can be completely removed by lifting the hopper lid and turning the hopper release knob to the unlock position (see picture below). This is ideal for filling and cleaning. 1. Bean Hopper release knob 2. -
Page 14: Preparing The Carafe
• Remove the filter basket cover • Scoop the desired amount of coffee into the Gold Tone® filter. Ensure the handle of the gold tone filter is facing away from the main body of the appliance. If the handle is not facing away, it may interfere with the flow of ground coffee into the filter basket. -
Page 15: Programmed Brewing
Programmed Brewing To set the appliance to start at a programmed time, refer to “Set Programme Time” section C. Turn the ‘Cup Quantity’ knob to set the number of cups you want to brew, this will grind enough coffee beans to suit your requirement. ... -
Page 16: Cleaning & Maintenance
Cleaning & Maintenance Completely clean and dry all parts after every use. Always turn coffee maker off and remove the plug from the electrical outlet before cleaning. Do not use scouring agents or harsh cleaning agents on any part of the appliance. ... - Page 17 N.B. If the filter basket cover is not in place or the filter door is not shut properly, a safety interlock system will prevent operation. If you try to turn the unit on when parts are not in place, the appliance will beep continuously until the missing parts are installed and the filter door is closed.
-
Page 18: Descaling
IMPORTANT: Do not put any water in the unit once the hopper container has been removed as this may cause damage to the appliance. Wipe the area under the hopper container with a damp cloth. The coffee channel cover can be flipped back for easy cleaning of the coffee chute. Push the coffee channel cover tab away from you and lift up. -
Page 19: Troubleshooting
Troubleshooting PROBLEM CAUSE SOLUTION Continuous Bean Hopper not locked • Check to see if the Bean Hopper release beeping in place (when brewing knob is in the unlocked position with whole beans) • Place the Bean Hopper on the unit •... - Page 20 Coffee is Coffee chute is clogged • Remove the Bean Hopper from the unit weaker • Lift coffee channel cover than usual • Clean out coffee chute • Replace channel cover and hopper • Your Grind & Brew Plus is now ready to brew again Not enough beans in •...
-
Page 21: Uk Guarantee & After Sales Service
UK Guarantee This Cuisinart appliance is guaranteed for consumer use for 3 years. This guarantee covers defects under normal use from date of purchase and ceases to be valid in the event of alteration or repairs by unauthorised persons. If the appliance does not perform satisfactorily due to defects in materials or manufacture, it will be repaired or replaced through Conair UK After Sales Service. -
Page 22: Wiring Instructions
UK Wiring Instructions The wires in the mains lead are coloured in accordance with the following code: BLUE = NEUTRAL BROWN = LIVE YELLOW & GREEN = EARTH As the colours of the wire in the mains lead of this appliance may not correspond with the colour marking identifying the terminals on your plug, proceed as follows: The wire which is coloured BLUE must be connected to the terminal which is marked with the letter N... - Page 24 IB-7/369F...
Need help?
Do you have a question about the DGB900BCU Grind & Brew Plus and is the answer not in the manual?
Questions and answers