Table of Contents
Advertisement
Advertisement
Table of Contents

Related Manuals for Sun Microsystems Sun Fire V880z


Summary of Contents for Sun Microsystems Sun Fire V880z
-
Page 1: Graphics Accelerator
Sun Fire V880z Server and ™ XVR-4000 ™ Graphics Accelerator Installation and User’s Guide Sun Microsystems, Inc. 4150 Network Circle Santa Clara, CA 95054 U.S.A. 650-960-1300 Part No. 817-2400-10(v2) May 2003, Revision A Submit comments about this document at: http://www.sun.com/hwdocs/feedback... - Page 2 LOOK GUIs and otherwise comply with Sun’s written license agreements. OpenGL is a registered trademark of Silicon Graphics, Inc. Use, duplication, or disclosure by the U.S. Government is subject to restrictions set forth in the Sun Microsystems, Inc. license agreements and as provided in DFARS 227.7202-1(a) and 227.7202-3(a) (1995), DFARS 252.227-7013(c)(1)(ii) (Oct.
-
Page 3: Table Of Contents
Installing the Sun XVR-4000 Graphics Accelerator Software 15 Software Requirements 15 Sun XVR-4000 Graphics Accelerator Software Packages 16 Installing the Software 18 Installing the Sun XVR-4000 Graphics Accelerator Hardware 19 Before Installation 19 Installing the Hardware in the Sun Fire V880z Server 20... - Page 4 Enabling Framelocking on Graphics Accelerators 59 Disabling Framelock 61 Framelock Cable 61 Genlocking Sun XVR-4000 Graphics Accelerators 63 Sun XVR-4000 Graphics Accelerator Genlock 63 Connecting the Genlock Cable 64 Sun Fire V880z Server and Sun XVR-4000 Graphics Accelerator Installation and User’s Guide • May 2003...
- Page 5 Setting the Default Console Display 73 Setting Up S-Video 77 Installing the OpenBoot PROM Upgrade 85 Sun Fire V880z Server Upgrade 87 Installing Solaris 8 2/02 Software on the Sun Fire V880z Server 93 Sun XVR-4000 Graphics Accelerator I/O Port Specifications 103 Index 109 Contents...
- Page 6 Sun Fire V880z Server and Sun XVR-4000 Graphics Accelerator Installation and User’s Guide • May 2003...
- Page 7 Sun XVR-4000 Graphics Accelerator With Air Guide Cover 7 FIGURE 2-2 Sun XVR-4000 Graphics Accelerator Without Air Guide Cover 7 FIGURE 2-3 Sun Fire V880z Server Back Panel Covers for Slots B and C 20 FIGURE 4-1 Opening the Sun Fire V880z Server Enclosure Door 21 FIGURE 4-2...
- Page 8 FIGURE F-3 Sun XVR-4000 Graphics Accelerator Back Panel S-Video Connector 106 FIGURE F-4 Sun XVR-4000 Graphics Accelerator Back Panel BNC Connector 107 FIGURE F-5 viii Sun Fire V880z Server and Sun XVR-4000 Graphics Accelerator Installation and User’s Guide • May 2003...
- Page 9 Tables Sun XVR-4000 Graphics Accelerator Screen Resolutions 10 TABLE 2-1 Sun XVR-4000 Graphics Accelerator CD Directories 16 TABLE 3-1 Location of Sun XVR-4000 Graphics Accelerator Software Packages 16 TABLE 3-2 Sun XVR-4000 Graphics Accelerator Software Package Names 17 TABLE 3-3 Sun XVR-4000 Graphics Accelerator Patch Directories 17 TABLE 3-4 Sun XVR-4000 Graphics Accelerator Patches 17...
- Page 10 Sun Fire V880z Server and Sun XVR-4000 Graphics Accelerator Installation and User’s Guide • May 2003...
-
Page 11: Preface
V880z server. It also includes the procedure for upgrading a Sun Fire V880 server to a Sun Fire V880z server. Note – The Sun Fire XVR-4000 graphics accelerator and Sun Fire V880z server must be administered and serviced by qualified service personnel. - Page 12 See one or more of the following for this information: Solaris Handbook for Sun Peripherals AnswerBook2™ online documentation for the Solaris™ software environment Other software documentation that you received with your system xii Sun Fire V880z Server and Sun XVR-4000 Graphics Accelerator Installation and User’s Guide • May 2003...
-
Page 13: Typographic Conventions
Typographic Conventions Typeface or Symbol Meaning Examples The names of commands, files, Edit your .login file. AaBbCc123 and directories; on-screen Use ls -a to list all files. computer output % You have mail. What you type, when AaBbCc123 % su contrasted with on-screen Password: computer output... -
Page 14: Related Documentation
Contacting Sun Technical Support If you have technical questions about this product that are not answered in this document, go to: http://www.sun.com/service/contacting xiv Sun Fire V880z Server and Sun XVR-4000 Graphics Accelerator Installation and User’s Guide • May 2003... -
Page 15: Sun Welcomes Your Comments
You can submit your comments by going to: http://www.sun.com/hwdocs/feedback Please include the title and part number of your document with your feedback: Sun Fire V880z Server and Sun XVR-4000 Graphics Accelerator Installation and User’s Guide, part number 817-2400-10 Preface... - Page 16 Sun Fire V880z Server and Sun XVR-4000 Graphics Accelerator Installation and User’s Guide • May 2003...
-
Page 17: Sun Xvr-4000 Graphics Accelerator Installation Overview
For an overview of the Sun XVR-4000 graphics accelerator, Sun Fire V880z server, and installation kit contents, see Chapter 2. Note – The Sun Fire XVR-4000 graphics accelerator and Sun Fire V880z server should be administered and serviced by qualified service personnel. - Page 18 2. Perform the Sun Fire V880z server upgrade (Appendix D). 3. Configure the software through the Xservers file (Chapter 5), if necessary, and through fbconfig (Chapter 6). Sun Fire V880z Server and Sun XVR-4000 Graphics Accelerator Installation and User’s Guide • May 2003...
-
Page 19: Software Patches
Software Patches Be sure that you have the proper patches for your installation. Chapter 3 lists the product software packages and patches. Always check, however, for the latest software patches at: http://sunsolve.sun.com/ Chapter 1 Sun XVR-4000 Graphics Accelerator Installation Overview... - Page 20 Sun Fire V880z Server and Sun XVR-4000 Graphics Accelerator Installation and User’s Guide • May 2003...
-
Page 21: Sun Xvr-4000 Graphics Accelerator Overview
Sun Fire V880z Operating Environment Installation DVD 13W3 to HD15 monitor cable adapter Antistatic wrist strap Sun Fire V880z Server and Sun XVR-4000 Graphics Accelerator Installation and User’s Guide, this document See “Sun XVR-4000 Graphics Accelerator Cables” on page 32 for additional cable... -
Page 22: Sun Xvr-4000 Graphics Accelerator Overview
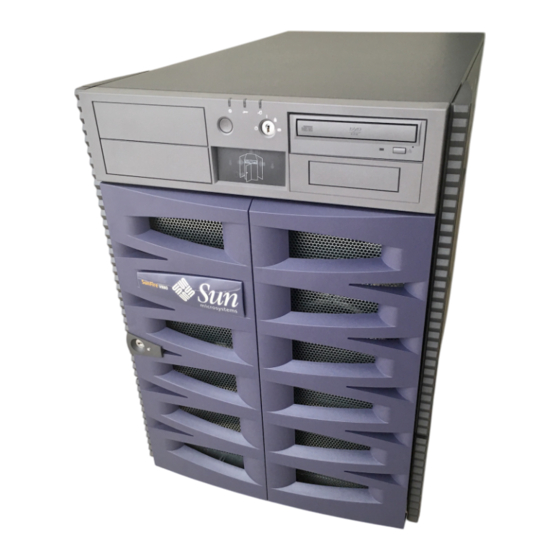
“on-the-fly” such that high-quality antialiased rendering becomes expected. ir e ic ro Sun Fire V880z Server FIGURE 2-1 Sun Fire V880z Server and Sun XVR-4000 Graphics Accelerator Installation and User’s Guide • May 2003... -
Page 23: Figure 2-2 Sun Xvr-4000 Graphics Accelerator With Air Guide Cover
shows the graphics accelerator with and Sun XVR-4000 FIGURE 2-2 FIGURE 2-3 without the air guide cover, respectively. Appendix F describes the back panel I/O ports. Sun XVR-4000 Graphics Accelerator With Air Guide Cover FIGURE 2-2 Sun XVR-4000 Graphics Accelerator Without Air Guide Cover FIGURE 2-3 Chapter 2 Sun XVR-4000 Graphics Accelerator Overview... - Page 24 Support for nonfiltered X-windows pixels on the same screen with filtered, antialiased pixels Scalability Hardware geometry acceleration using four parallel graphics processing engines (four Cafe processors and four FBC3 ASICs) Sun Fire V880z Server and Sun XVR-4000 Graphics Accelerator Installation and User’s Guide • May 2003...
-
Page 25: Video Output
Standards (X-Windows, OpenGL) Viewport clipping Window ID (WID) clipping. Auxiliary clipping hardware for over eight overlapping windows 64 primary X Windows window IDs, 15 overlay window IDs Four 3 × 256 10-bit color maps (pseudo or direct color) in each video stream One 3 ×... -
Page 26: Screen Resolutions
SUNW_DIG_1600x1024x60 or SUNW_STD_1600x1024x60 1600 × 1000 16:10 13W3 SUNW_STD_1600x1000x66 SUNW_STD_1600x1000x76 1440 × 900 16:10 13W3 SUNW_STD_1440x900x76 1280 × 1024 Sun stereo 13W3 SUNW_STEREO_1280x1024x96 SUNW_STEREO_1280x1024x112 Sun Fire V880z Server and Sun XVR-4000 Graphics Accelerator Installation and User’s Guide • May 2003... - Page 27 Sun XVR-4000 Graphics Accelerator Screen Resolutions (Continued) TABLE 2-1 Refresh Display rate Aspect Output resolution (Hz) Standard format port Video format 1280 × 1024 108d Sun stereo 13W3 SUNW_STEREO-DIG_1280x1024x108 1280 × 1024 VESA 13W3 VESA_STD_1280x1024x60 VESA_STD_1280x1024x75 VESA_STD_1280x1024x85 1280 × 1024 13W3 SUNW_STD_1280x1024x67 SUNW_STD_1280x1024x76...
- Page 28 While the Sun XVR-4000 graphics accelerator supports both tethered and wireless stereo glasses, wireless stereo glasses without an external power supply are not supported. See “Connecting the Framelock Cable” on page 56. Sun Fire V880z Server and Sun XVR-4000 Graphics Accelerator Installation and User’s Guide • May 2003...
-
Page 29: Accessing Field Replaceable Unit Information
Accessing Field Replaceable Unit Information You can obtain Sun XVR-4000 graphics accelerator subcomponent version numbers and other data using fbconfig. To obtain FRU ID (field replaceable unit identifier) information, type: host% fbconfig -dev zulu0 -prconf --- Hardware Configuration for /dev/fbs/zulu0 --- Type: XVR-4000 Graphics Accelerator Part:... -
Page 30: Technical Support
For assistance and other information not found in this document concerning the Sun XVR-4000 graphics accelerator, see Support Services at: http://www.sun.com/service/online/ For the most up-to-date version of the installation and user’s guide, go to: http://www.sun.com/documentation Sun Fire V880z Server and Sun XVR-4000 Graphics Accelerator Installation and User’s Guide • May 2003... -
Page 31: Installing The Sun Xvr-4000 Graphics Accelerator Software
If you are installing the Solaris 9 4/03 operating environment, it already has the software needed for the Sun Fire V880z server including the Sun XVR-4000 graphics accelerator. After installing that Solaris release (or a subsequent release), install OpenGL 1.3, Sun XVR-4000 graphics accelerator patches, and extra value... -
Page 32: Sun Xvr-4000 Graphics Accelerator Software Packages
TABLE 3-2 Location of Sun XVR-4000 Graphics Accelerator Software Packages TABLE 3-2 Software packages Directory location Solaris 8 software /cdrom/cdrom0/XVR-4000/Solaris_8/Packages Solaris 9 software /cdrom/cdrom0/XVR-4000/Solaris_9/Packages Sun Fire V880z Server and Sun XVR-4000 Graphics Accelerator Installation and User’s Guide • May 2003... -
Page 33: Table 3-3 Sun Xvr-4000 Graphics Accelerator Software Package Names
Software Packages lists the Sun XVR-4000 graphics accelerator software package names and TABLE 3-3 descriptions. Sun XVR-4000 Graphics Accelerator Software Package Names TABLE 3-3 Package name Description Configuration utility for the Sun XVR-4000 graphics accelerator SUNWzuluc Boot-time device initialization support for the Sun XVR-4000 graphics accelerator SUNWzulur X Windows system loadable module for the Sun XVR-4000 graphics accelerator SUNWzuluw... -
Page 34: Installing The Software
6. Configure the software through the Xservers file (Chapter 5), if necessary, and through fbconfig (Chapter 6). To remove the software, use the ./remove command, and respond to the remove prompts. Sun Fire V880z Server and Sun XVR-4000 Graphics Accelerator Installation and User’s Guide • May 2003... -
Page 35: Installing The Sun Xvr-4000 Graphics Accelerator Hardware
Sun Fire V880z server. “Before Installation” on page 19 “Installing the Hardware in the Sun Fire V880z Server” on page 20 “Removing the Hardware From the Sun Fire V880z Server” on page 29 “Sun XVR-4000 Graphics Accelerator Cables” on page 32 “Changing the Monitor Screen Resolution”... -
Page 36: Installing The Hardware In The Sun Fire V880Z Server
The Sun XVR-4000 graphics accelerators are installed in the Sun Fire V880z CPU slots (B and C). A Sun Fire V880z server with one Sun XVR-4000 graphics accelerator may have up to six CPUs. A Sun Fire V880z with two Sun XVR-4000 graphics accelerators may have up to four CPUs. -
Page 37: Figure 4-2 Opening The Sun Fire V880Z Server Enclosure Door
4. Open the Sun Fire V880z server enclosure door ( FIGURE 4-2 a. Unlock the side door using the system key. b. Swing the side door open. c. To remove the door from the chassis, open the door 90 degrees and pull it up until its mounting pins clear the brackets on the rear panel. -
Page 38: Figure 4-3 Locating Slots B And C Of The Sun Fire V880Z Server
5. Locate slots B and C ( FIGURE 4-4 If you are installing a single Sun XVR-4000 graphics accelerator, you can use either slot B or C. The Sun Fire V880z server motherboard slots are identified from A to D, from bottom to top. Slot C... - Page 39 6. Remove the air baffle from the CPU bracket and remove the dust cover from the motherboard VHDM connector (slot B for one Sun XVR-4000 graphics accelerator, slots B and C for two graphics accelerators). ( FIGURE 4-4 Air baffle Bus slot cover Removing the Fire V880z Motherboard Bus Slot Cover From Slot B...
-
Page 40: Figure 4-5 Installing The Sun Xvr-4000 Graphics Accelerator Into Slot B Connectors
Guide rail Step 11 Phillips captive screw Step 12 Ejector lever Installing the XVR-4000 Graphics Accelerator Into Slot B Connectors FIGURE 4-5 Sun Fire V880z Server and Sun XVR-4000 Graphics Accelerator Installation and User’s Guide • May 2003... -
Page 41: Figure 4-6 Installing The Back Panel Emi Adapter On The Server Back Panel I/O Slot B
12. Grasp both ejector levers and rotate them inward simultaneously. Avoid rocking the board in the card guides. The board has a tendency to pull to the left (front) side of the chassis (as viewed from the CPU module/Sun XVR-4000 graphics accelerator side). -
Page 42: Figure 4-7 Sun Xvr-4000 Graphics Accelerator Power And Temperature Leds
LED indicator is lit; that is, the green power LED indicator on each Sun XVR-4000 graphics accelerator and the chassis centerplane CPU slot indicator. Sun Fire V880z Server and Sun XVR-4000 Graphics Accelerator Installation and User’s Guide • May 2003... -
Page 43: Figure 4-8 Sun Xvr-4000 Graphics Accelerator Power Led Indicator
The CPU indicator LEDs are located on the centerplane bar between slots B and C of the system ( ). On the centerplane bar, you will see icons to the left of the FIGURE 4-8 LEDs that indicate that slot “D” is the topmost slot. CPU power LED Icons indicate slot D is topmost... - Page 44 Make sure that the door is firmly seated in its frame. c. Lock the side door with the system key. 21. Boot the system to the ok prompt and see if the Sun Fire V880z server detects the Sun XVR-4000 graphics accelerator.
-
Page 45: Removing The Hardware From The Sun Fire V880Z Server
3. Open the Sun Fire V880z server enclosure door ( FIGURE 4-2 a. Unlock the side door using the system key. -
Page 46: Figure 4-9 Removing The Sun Xvr-4000 Graphics Accelerator
For more information, see “Environmental Monitoring and Control” in the Sun Fire V880 Server Owner’s Guide. Sun Fire V880z Server and Sun XVR-4000 Graphics Accelerator Installation and User’s Guide • May 2003... -
Page 47: Figure
Air baffle Bus slot cover Replacing the Sun Fire V880z Motherboard Bus Slot Cover FIGURE 4-10 10. Close the Sun Fire V880z server enclosure door. 11. Replace the system back panel covers for the slots used for the Sun XVR-4000... -
Page 48: Sun Xvr-4000 Graphics Accelerator Cables
Sun graphics accelerators. SUNWzulu_config(1M) contains Sun XVR-4000 device-specific configuration information. To access the SUNWzulu_config man page, type: # man SUNWzulu_config Sun Fire V880z Server and Sun XVR-4000 Graphics Accelerator Installation and User’s Guide • May 2003... -
Page 49: Configuring Multiple Frame Buffers Through The Xservers File
C H A P T E R Configuring Multiple Frame Buffers This chapter describes procedures for setting up multiple frame buffers. “Configuring Multiple Frame Buffers Through the Xservers File” on page 33 “Xinerama” on page 35 Configuring Multiple Frame Buffers Through the Xservers File To run more than one frame buffer, you must modify your /etc/dt/config/Xservers file. - Page 50 See the reboot(1) and shutdown(1M) man pages for more information. Note – Refer to the proper Xservers(1) man page for more Xservers information. Sun Fire V880z Server and Sun XVR-4000 Graphics Accelerator Installation and User’s Guide • May 2003...
-
Page 51: Xinerama
Xinerama inerama is an X Window system feature available in Solaris 8 system software and subsequent compatible releases for Sun graphics boards including the Sun XVR-4000 graphics accelerator. Using Xinerama When the window system is started in Xinerama mode, all windows can be seamlessly moved across screen boundaries, thus creating one large, super high- resolution, virtual display. - Page 52 Xinerama. Two screens that the X Window system thinks are above and below must have the same width to be combined using Xinerama. Sun Fire V880z Server and Sun XVR-4000 Graphics Accelerator Installation and User’s Guide • May 2003...
-
Page 53: Using Sun Xvr-4000 Graphics Accelerator Features
C H A P T E R Using Sun XVR-4000 Graphics Accelerator Features This chapter provides Sun XVR-4000 graphics accelerator feature information. “Man Pages” on page 37 “-outputs Port Mapping” on page 38 “Streaming Methods” on page 40 “Setting Up Streaming Methods” on page 42 “Multicard Setup”... -
Page 54: Outputs Port Mapping
13W3A 13W3B Sun XVR-4000 Graphics Accelerator Back Panel FIGURE 6-1 shows the four -outputs options: direct, swapped, Stream A, and FIGURE 6-2 Stream B. Sun Fire V880z Server and Sun XVR-4000 Graphics Accelerator Installation and User’s Guide • May 2003... - Page 55 (default) -outputs direct -outputs swapped Direct Swapped Stream A Stream A Stream B (if any) Stream B (if any) 13W3B 13W3B 13W3A 13W3A -outputs streamB -outputs streamA Stream A Stream B Stream A Stream B 13W3B 13W3A 13W3B 13W3A Output Port Mapping (-outputs) FIGURE 6-2 The X Window system screen locations determine the side of the monitor the cursor must be moved to in order to cause it to appear on a second monitor.
-
Page 56: Streaming Methods
Drawbacks – Fewer samples per pixel are available when the frame buffer memory is used to support twice as many pixels. Both resolutions and sample densities must be identical. Sun Fire V880z Server and Sun XVR-4000 Graphics Accelerator Installation and User’s Guide • May 2003... - Page 57 Note – See “Xinerama” on page 35 for more information. Frame buffer Stream B Stream A Selected -outputs Two Independent Video Streams Two outputs are active and independent. Benefits – Support for two monitors. The resolutions and sample densities need not be identical. Each stream has 64 dedicated window IDs (WIDs) and four color maps.
-
Page 58: Setting Up Streaming Methods
-dev zulu0 -doublewide enable -samples max Use the -doublehigh option for displays that are set one above the other (rather than side-by-side as for the -doublewide option). Sun Fire V880z Server and Sun XVR-4000 Graphics Accelerator Installation and User’s Guide • May 2003... - Page 59 2. Set the desired screen resolution: host% fbconfig -dev zulu0 -res SUNW_STD_1280x1024x76 Setting Up Two Independent Video Streams This procedure enables independent resolution and sample density for each stream. Note – This streaming method is not supported in Xinerama. X Window system and Sun OpenGL for Solaris performance might be noticeably degraded in this mode.
-
Page 60: Multicard Setup
Without top included, the X Window system FIGURE 6-3 arranges the monitors linearly, left to right, as shown below on the right: Sun Fire V880z Server and Sun XVR-4000 Graphics Accelerator Installation and User’s Guide • May 2003... -
Page 61: Multisample Antialiasing
Monitors arranged above each other Monitors arranged linearly zulu1 zulu1 left zulu1 right zulu1 right zulu1 left zulu0 left zulu0 right zulu0 zulu0 left zulu0 right zulu0 zulu1 Multicard Setup Example FIGURE 6-3 Multisample Antialiasing Multisampling (full-scene multisample antialiasing) removes the jagged edges on 3D data. -
Page 62: Table 6-1 Multisample Option Descriptions
× 1600 1200 2 and 3 (2 at 75 hz) × 1600 1000 × 1280 1024 (7 at 85 hz) (3 at 85 Hz) Sun Fire V880z Server and Sun XVR-4000 Graphics Accelerator Installation and User’s Guide • May 2003... - Page 63 Representative Multisampling Support (Continued) TABLE 6-2 Resolution Single Display Dual Display Stereo Stereo (Dual) × 1152 5 and 4 × 1024 × 4 and 3 × × Enabling Multisampling for All OpenGL Applications 1. Use fbconfig to enable all OpenGL application windows for multisampling. host% fbconfig -dev zulu0 -multisample forceon -samples max This option enables multisampling for all OpenGL applications.
- Page 64 1 is still subject to filtering and jitter, where disabling multisampling is not. 2. Log out, then log back in to restart the X Window system for the changes to take effect. Sun Fire V880z Server and Sun XVR-4000 Graphics Accelerator Installation and User’s Guide • May 2003...
-
Page 65: Controlling Jitter And Filtering
Controlling Jitter and Filtering The following briefly describes jitter and filtering, which are set through fbconfig. See the SUNWzulu_config(1M) man page for more details. Jitter Jitter indirectly determines the subpixel (X,Y) locations of the samples stored in the sample buffer. The sample density also affects the sample locations. TABLE 6-3 describes the fbconfig -jitter options. -
Page 66: Filter Options
7.5%. (For the Catmull example, if the maximum color component used in the scene is 1.0, no significant area should have a color component less than .075.) Sun Fire V880z Server and Sun XVR-4000 Graphics Accelerator Installation and User’s Guide • May 2003... -
Page 67: Checking Device Configuration
Checking Device Configuration Use fbconfig to check the X Window system (-propt) and the Sun XVR-4000 graphics accelerator (-prconf) device configuration values. The fbconfig -propt option displays the values of all options (for the specified device) saved in the OWconfig file. These are the values the X Window system uses the next time it starts on that device. - Page 68 Monitor/EDID data (13W3) Monitor Manufacturer: SUN EDID: Version 1, Revision 3 Stream B: Current resolution setting: Flags: None Monitor/EDID data (13W3) EDID Data: Not Available Sun Fire V880z Server and Sun XVR-4000 Graphics Accelerator Installation and User’s Guide • May 2003...
-
Page 69: Framelocking Sun Xvr-4000 Graphics Accelerators
C H A P T E R Framelocking Sun XVR-4000 Graphics Accelerators This chapter describes framelocking multiple Sun XVR-4000 graphics accelerators and buffer swap synchronization. “Sun XVR-4000 Graphics Accelerator Framelock System” on page 53 “Buffer Swap Synchronization” on page 54 “Creating a Multiscreen Application”... -
Page 70: Buffer Swap Synchronization
The software Buffer Swap Synchronization algorithm shown on page 55 is implemented by Sun’s Xinerama support. Applications opening a window on a Xinerama virtual frame buffer need not be concerned with this synchronization. Sun Fire V880z Server and Sun XVR-4000 Graphics Accelerator Installation and User’s Guide • May 2003... -
Page 71: Creating A Multiscreen Application
Creating a Multiscreen Application The following is a programming example of how to create a Buffer Swap Synchronization (multiscreen) application. Creating the Main Program 1. Create n full screen windows, one per screen. 2. Create n rendering threads and associate one thread per screen. 3. -
Page 72: Connecting The Framelock Cable
If the framelock cable is not long enough, you can use a standard 7-pin DIN extender cable between the slave connector of the framelock cable and the DIN7 connector on the slave system. Sun Fire V880z Server and Sun XVR-4000 Graphics Accelerator Installation and User’s Guide • May 2003... - Page 73 Sun XVR-4000 graphics accelerator in slot B of the Sun FIGURE 7-2 Fire V880z server. The first slave Sun XVR-4000 graphics accelerator is in slot C. The second slave is in Slot B of another Sun Fire V880z server Chapter 7 Framelocking Sun XVR-4000 Graphics Accelerators...
-
Page 74: Figure 7-2 Sun Xvr-4000 Graphics Accelerator And Framelock Cable
Transmitter Transmitter (Wireless glasses External with no power supply power supply supported.) Framelock Sun XVR-4000 Graphics Accelerator and Cable FIGURE 7-2 Sun Fire V880z Server and Sun XVR-4000 Graphics Accelerator Installation and User’s Guide • May 2003... -
Page 75: Enabling Framelocking On Graphics Accelerators
Enabling Framelocking on Graphics Accelerators This example uses the Sun XVR-4000 graphics accelerator and the device names zulu0 and zulu1. When framelocking with other graphics accelerators such as Sun XVR-500 and/or Sun XVR-1000 graphics accelerators, use the appropriate device names. 1. - Page 76 The video output from zulu1 might glitch when framelock is enabled. zulu1 output will then be framelocked. It will start frames when the framelock master does. Sun Fire V880z Server and Sun XVR-4000 Graphics Accelerator Installation and User’s Guide • May 2003...
-
Page 77: Disabling Framelock
Disabling Framelock Note – Disable framelock on all slave devices before removing the framelock cables. To disable framelock, type: host% fbconfig -dev zulu1 -stream a -slave disable Framelock Cable The framelock cable, , is a Y-shaped cable with three connectors. Use this FIGURE 7-3 cable to daisy-chain multiple Sun XVR-4000 graphics accelerators within a computer system. -
Page 78: Table 7-1 Framelock Cable Connections
Note – There can only be one master Sun XVR-4000 graphics accelerator device. You must configure all other Sun XVR-4000 graphics accelerator devices as slaves. See the section “Enabling Framelocking on Graphics Accelerators” on page 59. Sun Fire V880z Server and Sun XVR-4000 Graphics Accelerator Installation and User’s Guide • May 2003... -
Page 79: Genlocking Sun Xvr-4000 Graphics Accelerators
C H A P T E R Genlocking Sun XVR-4000 Graphics Accelerators This chapter describes genlocking multiple Sun XVR-4000 graphics accelerators. “Sun XVR-4000 Graphics Accelerator Genlock” on page 63 “Connecting the Genlock Cable” on page 64 “Enabling Genlocking for Graphics Accelerators” on page 67 “Disabling Genlock”... -
Page 80: Connecting The Genlock Cable
Genlock LED indicator 13W3 A 13W3 B Stereo/framelock (DIN7) Genlock input (BNC) S-video (DIN4) Sun XVR-4000 Graphics Accelerator 13W3 and Genlock Connectors FIGURE 8-1 Sun Fire V880z Server and Sun XVR-4000 Graphics Accelerator Installation and User’s Guide • May 2003... -
Page 81: Table
2. Connect the 13W3 connector end of the genlock cable to the Sun XVR-4000 graphics accelerator 13W3 monitor connector selected for genlocking ( FIGURE 8-2 3. Attach a BNC-T connector to the slave back panel genlock/BNC connector of the Sun XVR-4000 graphics accelerator ( FIGURE 8-2 Repeat for each additional slave device to be genlocked. -
Page 82: Figure 8-2 Sun Xvr-4000 Graphics Accelerator Genlock Cabling
Slave 3 BNC-BNC cable Genlock cable (see Step 4) To master display device (projector or monitor) Sun XVR-4000 Graphics Accelerator Genlock Cabling FIGURE 8-2 Sun Fire V880z Server and Sun XVR-4000 Graphics Accelerator Installation and User’s Guide • May 2003... -
Page 83: Enabling Genlocking For Graphics Accelerators
Enabling Genlocking for Graphics Accelerators This example uses the Sun XVR-4000 graphics accelerator and the device names zulu0 and zulu1. When genlocking with other graphics accelerators, use the appropriated device names. 1. Designate a Sun XVR-4000 graphics accelerator as the master. You may use the Sun XVR-4000 graphics accelerator that serves as the boot/console head for that system. - Page 84 The vertical phase allows a scanline offset between the external video format and the stream output. Sun Fire V880z Server and Sun XVR-4000 Graphics Accelerator Installation and User’s Guide • May 2003...
- Page 85 Refer to “Man Pages” on page 37 to access detailed descriptions of the -genlock suboptions through the SUNWzulu_config man page. This section also describes how to invoke fbconfig -dev zulu0 -help. You can use other -genlock suboptions to adapt genlocking to special (non Sun) video formats whose timing exactly matches that of a Sun video format.
-
Page 86: Table
60, 75 Fast Separate VESA_STD_1600x1200x60 VESA_STD_1600x1200x75 1600 × 1024 Slow Separate SUNW_DIG_1600x1024x60 SUNW_DIG_1600x1024x60 1600 × 1000 Fast Composite SUNW_STD_1600x1000x76 1600 × 1000 Slow Composite SUNW_STD_1600x1000x66f Sun Fire V880z Server and Sun XVR-4000 Graphics Accelerator Installation and User’s Guide • May 2003... - Page 87 Screen Resolution Synchronization Attributes (Continued) TABLE 8-1 Display Refresh Pixel Clock Synchronization Acceptable for resolution rate (Hz) Speed Attribute Genlock Alone Video Format 1440 × 900 Slow Composite SUNW_STD_1440x900x76 1280 × 1024 96, 108d, Fast Separate SUNW_STEREO_1280x1024x96 SUNW_STEREO-DIG_1280x1024x108 SUNW_STEREO_1280x1024x112 1280 × 1024 Fast Separate VESA_STD_1280x1024x85...
-
Page 88: Disabling Genlock
• Changing the video format for either the master or slave devices To disable genlock (and framelock, if using bothlock) from a device, type: host% fbconfig -dev zulu1 -stream a -slave disable Sun Fire V880z Server and Sun XVR-4000 Graphics Accelerator Installation and User’s Guide • May 2003... -
Page 89: Setting The Default Console Display
A P P E N D I X Setting the Default Console Display These instructions describe how to set the Sun XVR-4000 graphics accelerator as the default monitor console display: 1. At the ok prompt, type: ok show-displays Information similar to the text below is displayed: a) /pci@1f,0/SUNW,m64B@13 b) /pci@1f,0/pci@5/SUNW,XVR-4000@1 q) NO SELECTION... - Page 90 4. Reset the output-device environment: ok reset-all 5. Connect your monitor cable to the Sun XVR-4000 graphics accelerator on your system back panel. Sun Fire V880z Server and Sun XVR-4000 Graphics Accelerator Installation and User’s Guide • May 2003...
- Page 91 × × 6. To set a resolution (for example, 1600 1000 76), type: ok setenv output-device mydev:r1600x1000x76 output-device=mydev:r1600x1000x76 Reset the system: ok reset-all You can get a list of available resolutions for your display device by typing the following: ok cd /SUNW,zulu@1,0 ok .screen-resolutions The following lists the supported resolutions: r640x480x60...
- Page 92 Sun Fire V880z Server and Sun XVR-4000 Graphics Accelerator Installation and User’s Guide • May 2003...
-
Page 93: Setting Up S-Video
A P P E N D I X Setting Up S-Video This appendix provides information for setting up S-video (NTSC and PAL video formats) on the Sun XVR-4000 graphics accelerator. “S-Video Graphical User Interface” on page 77 “S-Video Output Only” on page 78 “S-Video Along With Normal Video”... -
Page 94: Figure B-1 Sun Xvr-4000 Graphics Accelerator S-Video Din4 Connector
-dev zulu0 -res SUNW_PAL_640x480x50 -doublewide disable -samples max 2. Log out to restart the X Window system and verify the configuration data. Sun Fire V880z Server and Sun XVR-4000 Graphics Accelerator Installation and User’s Guide • May 2003... - Page 95 S-Video Along With Normal Video This option allows S-video on one video data stream and a normal screen on the other stream. There can only be two active video outputs at any given time: Either two 13W3 outputs, or one 13W3A output and one S-video output with 13W3B unused. This setup shares the memory and video resources between the two streams.
- Page 96 This format is required by the S-video encoder. Unfortunately, this cannot be disabled. Any display device attached to 13W3B could be turned off. Sun Fire V880z Server and Sun XVR-4000 Graphics Accelerator Installation and User’s Guide • May 2003...
- Page 97 Using Two Sun XVR-4000 Graphics Accelerators In this example, the first board (zulu0) is used for S-video exclusively and the second board (zulu1) is used normally. 1. As superuser, create the /etc/dt/config/Xservers file: # cd /etc/dt/config # vi + Xservers 2.
- Page 98 Framelock: Framelock/Stereo Port: Output from Stream A Stream A Sync: Free Run (no frame sync) Stream B Sync: Free Run (no frame sync) Sun Fire V880z Server and Sun XVR-4000 Graphics Accelerator Installation and User’s Guide • May 2003...
- Page 99 5. Check the configuration status of the zulu0 device: host% fbconfig -dev zulu0 -propt --- OpenWindows Configuration for /dev/fbs/zulu0 --- OWconfig File: machine Card: Double(wide/high): disable Stream to Port Mapping: direct (Stream A to Port A; B to B) Clearpixel Value: Managed Area: Resolution: SUNW_NTSC_640x480x60...
- Page 100 Sun Fire V880z Server and Sun XVR-4000 Graphics Accelerator Installation and User’s Guide • May 2003...
-
Page 101: Installing The Openboot Prom Upgrade
A P P E N D I X Installing the OpenBoot PROM Upgrade This appendix describes how to install the OpenBoot PROM 4.7.0 upgrade. 1. Log in as superuser. 2. Insert the Sun XVR-4000 graphics accelerator CD into the DVD-ROM drive and go to the following directory: # cd /cdrom/cdrom0/ 3. - Page 102 The system’s Flash PROM firmware has been updated. Note – System power off, and power on, is required for the OpenBoot PROM upgrade to take effect. Rebooting alone is not sufficient. Sun Fire V880z Server and Sun XVR-4000 Graphics Accelerator Installation and User’s Guide • May 2003...
-
Page 103: Sun Fire V880Z Server Upgrade
“Upgrade Kit” on page 87 “Upgrade Process” on page 88 “Upgrade Configuration Requirements” on page 88 “Installing the Sun Fire V880z Server Panel Doors and RME Bezel” on page 89 “Upgrade Technical Support” on page 91 Upgrade Kit The Sun Fire V880z server upgrade kit includes:... -
Page 104: Upgrade Process
4. Install the Sun Fire V880z front panel doors and RME bezel (page 89). 5. Repower the system, and reboot (boot -r) for reconfiguration (page 91). Sun Fire V880z Server and Sun XVR-4000 Graphics Accelerator Installation and User’s Guide • May 2003... -
Page 105: Figure D-1 Removing The Sun Fire V880 Server Front Bezel
Panel Doors and RME Bezel After installing the Sun XVR-4000 graphics accelerator hardware according to Chapter 4, install the Sun Fire V880z server panel doors and RME bezel. 1. Remove the Sun Fire V880 server Removable Media (RME) console bezel... -
Page 106: Figure D-2 Installing The Sun Fire V880Z Server Front Bezel
5. Position and slide the new Sun Fire V880z server front panel door into the chassis FIGURE D-2 6. Secure the panel door to the chassis center post by replacing the five Phillips screws ( FIGURE D-2 7. Replace the system RME console bezel (... - Page 107 9. Close the Sun Fire V880z server enclosure door. a. If you removed the side door, remount it to the chassis. Position the side door mounting pins over the corresponding holes in the chassis rear panel and lower the side door into place.
- Page 108 Sun Fire V880z Server and Sun XVR-4000 Graphics Accelerator Installation and User’s Guide • May 2003...
-
Page 109: Installing Solaris 8 2/02 Software On The Sun Fire V880Z Server
This appendix provides information about using the DVD titled Operating Environment Installation DVD. This DVD is only required for the Solaris 8 2/02 operating environment (for a Sun Fire V880z server with a Sun XVR-4000 graphics accelerator). “Who Should Use This Software” on page 93 “About the Installation DVD That Shipped With Your System”... - Page 110 By initiating installation with this DVD0, the Solaris Operating Environment is installed along with the packages and patches to enable Sun XVR-4000 Graphics Accelerator support. Sun Fire V880z Server and Sun XVR-4000 Graphics Accelerator Installation and User’s Guide • May 2003...
- Page 111 OpenBoot command reference manuals. The tip connection must be established before you use the DVD0. Note – OpenBoot PROM version 4.7.0 is required on the Sun Fire V880z server before installing Solaris 8 2/02 using the DVD0. If you need to perform an upgrade, appropriate firmware is provided on the Sun XVR-4000 Graphics Accelerator CD.
- Page 112 Note – For installations through a command line rather than a graphical user interface, the installation process is in English only. 5. Answer the installation questions when prompted. Sun Fire V880z Server and Sun XVR-4000 Graphics Accelerator Installation and User’s Guide • May 2003...
- Page 113 Note – Refer to the Solaris 8 2/02 installation documentation for more information about making these System Identification choices. 7. Review the Confirm Information panel to make sure that all the installation information is correct. Appendix E Installing Solaris 8 2/02 Software on the Sun Fire V880z Server...
- Page 114 Solaris 8 2/02 operating environment. Do not use any other release of the Solaris operating environment. 11. Verify that the information listed in the Ready to Install panel is correct and select Install Now. Sun Fire V880z Server and Sun XVR-4000 Graphics Accelerator Installation and User’s Guide • May 2003...
- Page 115 Step 7. 1. Become superuser. 2. Insert the Solaris 8 2/02 DVD in a DVD-ROM drive used by the installation server. 3. Type this command: # cd /cdrom/cdrom0/s0/Solaris_8/Tools Appendix E Installing Solaris 8 2/02 Software on the Sun Fire V880z Server...
- Page 116 2. Insert the Solaris 8 2/02 Software 1 of 2 CD in a CD-ROM drive used by the installation server. 3. Type this command: # cd /cdrom/cdrom0/s0/Solaris_8/Tools Sun Fire V880z Server and Sun XVR-4000 Graphics Accelerator Installation and User’s Guide • May 2003...
- Page 117 11. Eject the Solaris 8 2/02 Software 2 of 2 CD. # eject 12. Insert the DVD0 that came with these instructions. 13. Type this command: # cd /cdrom/cdrom0/s0 Appendix E Installing Solaris 8 2/02 Software on the Sun Fire V880z Server...
- Page 118 4. Set auto-boot to TRUE. To do this, at the ok prompt type: ok setenv auto-boot? = TRUE Press Return. 5. Boot your system at the ok prompt. Type: ok boot Press Return. Sun Fire V880z Server and Sun XVR-4000 Graphics Accelerator Installation and User’s Guide • May 2003...
-
Page 119: Sun Xvr-4000 Graphics Accelerator I/O Port Specifications
A P P E N D I X Sun XVR-4000 Graphics Accelerator I/O Port Specifications This appendix provides I/O port pinout specifications for the Sun XVR-4000 graphics accelerator. “Pinout for the 13W3 Connector” on page 104 “Pinout for Stereo/Framelock DIN7 Connector” on page 105 “Pinout for S-Video Connector”... -
Page 120: Figure F-2 Sun Xvr-4000 Graphics Accelerator Back Panel 13W3 Connector
VSYNC Vsync Unused Unused Ground H/Csync return (return for pin 5) Ω Blue Blue coax receptacle Ω Green Green coax receptacle Ω coax receptacle Sun Fire V880z Server and Sun XVR-4000 Graphics Accelerator Installation and User’s Guide • May 2003... -
Page 121: Figure F-3 Sun Xvr-4000 Graphics Accelerator Back Panel Stereo/Framelock Din7 Connector
Pinout for Stereo/Framelock DIN7 Connector show the Sun XVR-4000 graphics accelerator FIGURE F-3 TABLE F-2 stereo/framelock DIN7 connector and pinout signals. Sun XVR-4000 Graphics Accelerator Back Panel Stereo/Framelock DIN7 FIGURE F-3 Connector Sun XVR-4000 Graphics Accelerator Stereo/Framelock Connector Pinout TABLE F-2 Pin Number Signal Ground... -
Page 122: Figure F-4 Sun Xvr-4000 Graphics Accelerator Back Panel S-Video Connector
Twisted-pair return for Y signal (pin 3) C_GROUND Twisted-pair return for C signal (pin 4) Luminance Y signal Twisted pair Chrominance C signal Twisted pair Shell Chassis ground Sun Fire V880z Server and Sun XVR-4000 Graphics Accelerator Installation and User’s Guide • May 2003... -
Page 123: Figure F-5 Sun Xvr-4000 Graphics Accelerator Back Panel Bnc Connector
Pinout for Genlock BNC Connector show the Sun XVR-4000 graphics accelerator BNC FIGURE F-5 TABLE F-4 connector and pinout signals. GENLOCK_IN GENLOCK_RETURN Sun XVR-4000 Graphics Accelerator Back Panel BNC Connector FIGURE F-5 Sun XVR-4000 Graphics Accelerator BNC Connector Pinout TABLE F-4 Pin Number Signal Description... - Page 124 Sun Fire V880z Server and Sun XVR-4000 Graphics Accelerator Installation and User’s Guide • May 2003...
-
Page 125: Index
Index NUMERICS 13W3 connector, 104 default console display, setting, 73 13W3 to HD15 monitor cable adapter, 5, 32 device configuration Sun XVR-4000 graphics accelerator fbconfig -prconf command, 52 X window system fbconfig -propt command, 51 air baffle, 23, 30, 31 DIN connectors air guide cover, 7 DIN4 S-video, 78, 106... - Page 126 44 glasses, stereo, 57, 58 multiple frame buffers configuring, 33 configuring, Xinerama, 35 multisample antialiasing, 46 multisampling, 45, 46 hardware installation, 19, 22 Sun Fire V880z Server and Sun XVR-4000 Graphics Accelerator Installation and User’s Guide • May 2003...
- Page 127 40 patches, software, 17 Sun Fire V880 documentation, 19 permuted jitter, 49 Sun Fire V880z Operating Environment -prconf, 52 Installation DVD, 1, 5, 18, 87, 94 PROM update, 85 Sun Fire V880z server, 6...
- Page 128 - See also framelock and genlock bothlock, 69 buffer swap synchronization, 54 creating multiscreen application, 55 framelock, 53 framelock and genlock, 63 genlock, 63 Sun Fire V880z Server and Sun XVR-4000 Graphics Accelerator Installation and User’s Guide • May 2003...
Need help?
Do you have a question about the Sun Fire V880z and is the answer not in the manual?
Questions and answers