Honeywell PRO 2000 Series Operating Manual
Hide thumbs
Also See for PRO 2000 Series:
- User manual ,
- Installation, operation and maintenance manual (130 pages) ,
- Operating manual (72 pages)
Chapters
Table of Contents

Related Manuals for Honeywell PRO 2000 Series


Summary of Contents for Honeywell PRO 2000 Series
-
Page 1: Operating Manual
Honeywell Operating Manual Mode d’emploi Manual de Uso P R O 2000 S é rie S e rie s Program m able Therm ostats T h e r m o s ta ts p r o g r a m m a b le s... - Page 3 50 °F (10 °C). Need Help? For assistance with this product please visit http://yourhom e.honeyw ell.com or call Honeywell Custom er Care toll-free at 1-800-468-1502. Read and save these instructions. ® U.S. Registered Trademark. Patents pending.
-
Page 4: Table Of Contents
Operating Manual Table of contents Overview Appendices Therm ostat fe a tu re s ....... 1 Battery re p la ce m e n t......14 Quick s ta rt..........2 In case o f d iffic u lty......... 15 Quick reference to c o n tro ls ... -
Page 5: About Your New Thermostat
PRO 2000 Series About your new thermostat Your new Honeywell therm ostat has been designed to give you many years o f reliable service and easy-to-use, push-button climate control. Features • Backlit display is easy to read • Displays am bient (measured) tem perature at all tim es •... -
Page 6: This Thermostat Is Ready To Go
Operating Manual This thermostat is ready to go Simply perform the three steps below and the therm ostat is in operation: Set the c lo c k ........................See page 5 © Select w hether to heat or c o o l..................See page 6 ©... -
Page 7: Quick Reference To Controls
PRO 2000 Series Quick reference to controls Screen Lit for 12 seconds when you press any button. Fan Switch (see page 7) On: Fan runs all the time. Auto: Fan runs only when heating or cooling is taking place. System switch (see page 6) •... -
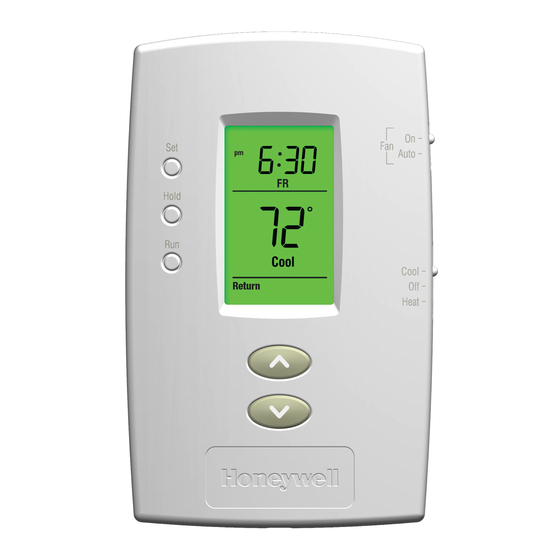
Page 8: Quick Reference To Display
Operating Manual Quick reference to display Clock Temporary schedule override (see page 11) Temperature D n n " The ambient (measured) temperature Setpoint indicator D-UU is normally displayed. To view the Appears when the setpoint setpoint temperature, press either of temperature is displayed. -
Page 9: Set The Clock
PRO 2000 Series Set the clock Press the Set button. Set Tim e will appear on the screen and the time Set Time display will flash. I — la n m — © Press the or V button to set the time. -
Page 10: System Switch (H E At/C O O L)
Operating Manual System switch Use the System switch to place the system in one of the following modes: • Cool: System is in Cooling mode. • Off: System is off. • Heat: System is in Heating mode. • Em Heat: System is in Emergency Heat mode. Only auxiliary heating can be activated. -
Page 11: Fan Switch (A Uto/O N)
PRO 2000 Series Fan switch Use the Fan switch to select the fan operation. • Auto: The fan runs only when heating or cooling is activated (commonly used setting). • On: The fan runs all the time. -
Page 12: Using The Schedule
Operating Manual Using the schedule Press the Run button to follow the programm ed schedule. For m aximum energy savings while m aintaining com fort, you can program the schedule such that the tem perature is at an econom ical level when you sleep or leave for w ork and at a comfortable level when you are awake and at home. - Page 13 PRO 2000 Series Preprogrammed schedule settings The therm ostat is preprogram m ed with the following settings. Weekdays Weekends Period Start time Heat Cool Start time Heat Cool Wake 6:00 am 70 °F (21 °C) 75 °F (24 °C) 6:00 am 70 °F (21 °C)
-
Page 14: Modifying The Schedule
Operating Manual Modifying the schedule W a k e Press the Set button 3 times until Set Schedule appears. The start time of ■ 6-DO period for the the first period (Wake) of the week days (Mon-Fri) will flash. weekdays is set to 6 a.m. -
Page 15: Temporary Override Of Schedule
PRO 2000 Series Temporary override of schedule To tem porarily ignore the schedule, press /S or V until the desired i j n n tem perature is displayed. The word Tem porary will appear on the i C u u screen and the period display will flash to indicate that the current period has been overridden. -
Page 16: Permanent Override Of Schedule
Operating Manual Permanent override of schedule To perm anently ignore the schedule, press ^ or V until the desired tem perature is displayed. Then, press the Hold button to maintain the new tem perature indefinitely. The word Hold will appear on the screen. -
Page 17: Adaptive Intelligent Recovery
PRO 2000 Series Adaptive Intelligent Recovery (AIR) Adaptive Intelligent Recovery™ allows the thermostat to “learn” how long your furnace or air conditioner takes to reach the set temperature. Simply program the desired times and desired temperatures into the schedule. The thermostat will determine when to activate heating or cooling so that the desired temperature is attained at the desired time. -
Page 18: Battery Replacement
Operating Manual Battery replacement NOTE: Batteries are optional (serving as backup power) only if your thermostat is connected to 24 VAC. Set the System switch to Off before removing the batteries. Otherwise, the heating/cooling system could remain activated even when batteries are removed. Install two fresh AAA batteries when Lo Batt (low batteries) flashes on the screen. -
Page 19: In Case Of Difficulty
PRO 2000 Series In case of difficulty Screen is blank. • Check circuit breaker and reset if necessary. • Ensure the heating/cooling system is powered up. • Ensure the furnace door is properly closed. • Ensure two fresh AAA alkaline batteries are correctly installed. -
Page 20: Customer Assistance
Operating Manual Customer assistance F o r assistance with this product, p lease visit http://yourhome.honeywell.com O r call H o neyw ell C u s to m e r C a re toll-free at 1-800-468-1502 To s ave tim e, p lease note your m odel n um ber and... -
Page 21: 2-Year Limited Warranty
This warranty does not cover removal or reinstallation costs. This warranty shall not apply if it is shown by Honeywell that the defect or malfunction was caused by damage which occurred while the product was in the possession of a consumer. - Page 22 Operating Manual Honeywell's sole responsibility shall be to repair or replace the product within the terms stated above. HONEYWELL SHALL NOT BE LIABLE FOR ANY LOSS OR DAMAGE OF ANY KIND, INCLUDING ANY INCIDENTAL OR CONSEQUENTIAL DAMAGES RESULTING, DIRECTLY OR INDIRECTLY, FROM ANY BREACH OF ANY WARRANTY, EXPRESS OR IMPLIED, OR ANY OTHER FAILURE OF THIS PRODUCT.
- Page 23 à la clientèle en com posant sans frais le 1-800-468-1502. Veuillez lire le mode d’emploi et le conserver en lieu sûr. ® Marque de commerce enregistrée aux États-Unis. Brevets en instance. © 2013 Honeywell International Inc. Tous droits réservés.
- Page 24 Mode d’emploi Table des matières Aperçu Annexes Caractéristiques du therm ostat... .. 1 Remplacement des piles...... 14 Démarrage rap ide........2 En cas de difficulté......... 15 Coup d'œil rapide sur les contrôles..3 Service à la clientèle......16 Coup d'œil rapide sur l'affichage..4 Garantie limitée de 2 a n s .....
- Page 25 Série PRO 2000 A propos du thermostat Votre nouveau therm ostat Honeywell a été conçu pour vous procurer de nom breuses années de service fiable et assurer la régulation de la tem pérature ambiante avec facilité, par sim ple bouton-poussoir.
- Page 26 Mode d’emploi Votre thermostat est prêt à fonctionner! suffit de faire les trois étapes suivantes et votre therm ostat sera fonctionnel : Régler l'h o rlo g e ......................Voir la page 5 © Sélectionner le chauffage ou le re fro id isse m e n t..........Voir la page 6 ©...
-
Page 27: Coup D'œil Rapide Sur Les Contrôles
Série PRO 2000 Coup d’œil rapide sur les contrôles Écran S’illumine pendant 12 secondes quand on appuie sur un bouton Bouton-sélecteur du ventilateur (voir la page 7) • On : Le ventilateur fonctionne sans arrêt. • Auto : Le ventilateur fonctionne uniquement lorsque le chauffage ou le refroidissement est activé. -
Page 28: Coup D'œil Rapide Sur L'affichage
Mode d’emploi Coup d’œil rapide sur l’affichage Horloge Dérogation temporaire à l’horaire (voir la page 11) Température La température ambiante (mesurée) est Indication de la consigne normalement affichée. Pour voir la Apparaît lorsque la température température de consigne, appuyer une fois de consigne est affichée. -
Page 29: Réglage De L'horloge
Série PRO 2000 Réglage de l’horloge Appuyer sur le bouton S e t. Set Time apparaîtra à l'écran et l'heure Régler l'heure clignotera. —tttTIn* — - 6:3D © Appuyer sur le bouton ^ ou V pour régler l'heure. © Appuyer sur le bouton Set de nouveau. Set Day clignotera à l'écran. ©... - Page 30 Mode d’emploi Bouton-sélecteur du système Utiliser le bouton-sélecteur System pour placer le système dans l’un des modes suivants : • Cool : Le système est en mode Refroidissement. • Off : Le système est arrêté. • Heat : Le système est en mode Chauffage. •...
- Page 31 Série PRO 2000 Bouton-sélecteur du ventilateur Utiliser le bouton-sélecteur Fan pour choisir le mode de fonctionnement du ventilateur. • Auto : Le ventilateur fonctionne uniquement lorsque le chauffage ou le refroidissement est activé (réglage habituel). • On : Le ventilateur fonctionne sans arrêt.
-
Page 32: Utilisation De L'horaire
Mode d’emploi Utilisation de l’horaire Appuyer sur le bouton Run pour utiliser l’horaire. Pour réaliser des économies maximales tout en gardant le confort, vous pouvez programmer l’horaire de sorte que la température soit à un niveau économique quand vous dormez ou êtes absent et à un niveau confortable quand vous êtes à la maison et réveillé. Vous pouvez programmer jusqu'à... - Page 33 S é rie P R O 2 0 0 0 Horaire préprogrammé Votre therm ostat est préprogram mé avec l'horaire suivant. lundi - vendredi samedi - dimanche Période Début Chauffage Refroidissement Début Chauffage Refroidissement 21 °C (70 °F) 24 °C (75 °F) 21 °C (70 °F) 24 °C (75 °F) Wake...
- Page 34 Mode d’emploi Modification de l’horaire La période Appuyer sur le bouton Set 3 fois jusqu’à que Set Schedule soit affiché. L’heure du Wake (réveil) ■ -'OO ë début de la première période (W ake) du lundi au vendredi (Mon-Fri) clignotera. du lundi au vendredi est ©...
-
Page 35: Dérogation Temporaire À L'horaire
Série PRO 2000 Dérogation temporaire à l’horaire Pour ignorer tem porairem ent l'horaire, appuyer sur le bouton i j n n V jusqu'à ce que la tem pérature désirée soit affichée. La mention Tem porary s'affichera et la période en cours clignotera pour indiquer sa dérogation. -
Page 36: Dérogation Permanente À L'horaire
Mode d’emploi Dérogation permanente à l’horaire Pour ignorer l'horaire de façon perm anente, appuyer sur le bouton jusqu'à ce que la tem pérature désirée soit affichée. Ensuite, appuyer sur le bouton Hold pour garder la nouvelle tem pérature jusqu'à ce que vous la changiez de nouveau. La m ention Hold s'affichera. -
Page 37: Adaptive Intelligent Recovery
Série PRO 2000 Adaptive Intelligent Recovery (AIR) La fonction permet au thermostat « d'apprendre » combien de Adaptive Intelligent Recovery ™ temps il faut au système de chauffage ou de refroidissement pour atteindre la température programmée. Il suffit de programmer les heures et les températures désirées dans l'horaire. Le thermostat démarrera le chauffage ou le refroidissement à... -
Page 38: Remplacement Des Piles
Mode d’emploi Remplacement des piles NOTA : Les piles sont facultatives (elles servent d’alimentation de secours en cas de panne de courant) lorsque le thermostat est raccordé au 24 V c.a. Placer le bouton-sélecteur System à Off avant d’enlever les piles. -
Page 39: En Cas De Difficulté
Série PRO 2000 En cas de difficulté Rien n’apparaît à l’écran. Vérifier si le disjoncteur est déclenché. Le réenclencher au besoin. S’assurer que le système de chauffage/refroidissement est alimenté. S’assurer que la porte de la fournaise est bien fermée. S’assurer que deux piles AAA neuves sont bien installées. La température ne peut être modifiée. -
Page 40: Service À La Clientèle
S erv ic e s à la clientèle de 1 800 468-1502 H o neyw ell en com po sant le P o u r g a g n e r du tem ps, ve u ille z prendre en note le num éro de m o d èle et le num éro de code de date... -
Page 41: Garantie Limitée De 2 Ans
Garantie limitée de 2 ans Honeywell garantit ce produit, à l’exception de la pile, contre tout vice de fabrication ou de matière dans la mesure où il en est fait une utilisation et un entretien convenables, et ce, pour deux (2) ans à partir de la date d’achat par le consommateur. - Page 42 Mode d’emploi La responsabilité de Honeywell se limite à réparer ou à remplacer le produit conformément aux modalités susmentionnées. HONEYWELL N'EST EN AUCUN CAS RESPONSABLE DES PERTES OU DOMMAGES, Y COMPRIS LES DOMMAGES INDIRECTS OU ACCESSOIRES DÉCOULANT DIRECTEMENT OU INDIRECTEMENT D'UNE VIOLATION QUELCONQUE D'UNE GARANTIE, EXPRESSE OU TACITE, APPLICABLE AU PRÉSENT PRODUIT NI DE TOUTE AUTRE...
- Page 43 ¿Asistencia? Para obtener asistencia relacionada con este producto, se recomienda visitar http://yourhom e.honeyweM .com o comunicarse con el número gratuito del servicio de atención al cliente de Honeywell, llamando sin cargo al 1-800-468-1502 Estas instrucciones deben leerse y conservarse ® Marca registrada de los EE. UU. Patentes en trámite.
- Page 44 Manual de Uso Índice G eneralidades Apéndices Características del termostato....1 Reemplazo de las p ilas......14 Puesta en marcha rápida......2 En caso de inconvenientes ....15 Referencia rápida para los controles..3 Asistencia al cliente......16 Referencia rápida para la pantalla..
-
Page 45: G Eneralidades Características Del Termostato
Serie PRO 2000 Información sobre el termostato Este term ostato ha sido diseñado para brindar m uchos años de funcionam iento fiable y para perm itir un control climático fácil de usar con sólo apretar un botón. Características • Pantalla con luz de fondo de lectura fácil. •... -
Page 46: Puesta En Marcha Rápida
Manual de Uso ¡El termostato está listo para funcionar! Basta con llevar a cabo las tres etapas siguientes para que el term ostato esté en marcha: Ajustar el reloj........................página 5 © Seleccionar calefacción o e n friam iento............... página 6 ©... -
Page 47: Referencia Rápida Para Los Controles
Serie PRO 2000 Referencia rápida para los controles Pantalla Se ilumina durante 12 segundos cuando se oprime un botón. Ajuste del reloj y del horario (ver las páginas 5 y 10) Botón selector del ventilador (ver la página 7). • On: el ventilador funciona continuamente. Cancelación •... -
Page 48: Referencia Rápida Para La Pantalla
Manual de Uso Referencia rápida para la pantalla Reloj Cancelación temporal del horario (ver la página 11). Temperatura Se indica normalmente la temperatura Indicación del punto de ajuste ambiente (medida). Para ver la temperatura Aparece cuando se visualiza la del punto de ajuste, presionar una vez uno temperatura del punto de ajuste>... -
Page 49: Ajuste Del Reloj
Serie PRO 2000 Ajuste del reloj Presionar el botón S e t. En la pantalla aparecerá Set Tim e y la hora Ajustar la hora parpadeará. - 6:3D © Presionar el botón /V o V para ajustar la hora. © Presionar el botón Set otra vez. -
Page 50: Selector Del Sistema (Heat/Cool)
Manual de Uso Botón selector del sistema Utilizar el botón selector System para poner el termostato en uno de los modos siguientes: • Cool: el sistema está en modo Enfriamiento. • Off: el sistema está apagado. • Heat: el sistema está en modo Calefacción. •... -
Page 51: Selector Del Ventilador (Auto/O N)
Serie PRO 2000 Botón selector del ventilador Utilizar el botón selector Fan para elegir el modo de funcionamiento del ventilador. • Auto: el ventilador funciona únicamente cuando la calefacción o el enfriamiento están en marcha (ajuste común). • On: el ventilador funciona continuamente. -
Page 52: Uso Del Horario
Manual de Uso Uso del horario Presionar el botón Run para usar el horario. Para obtener una economía máxima conservando el confort, se puede programar el horario de manera que la temperatura esté en el nivel de Economía durante la noche y en un nivel confortable cuando los habitantes de la casa están despiertos y en casa. - Page 53 Serie PRO 2000 Preprogramar la configuración del horario El termostato viene preprogramado con las siguientes configuraciones. lunes - viernes sábado - domin go Comienzo Calefacción Enfriamiento Comienzo Calefacción Enfriamiento Despertar 6:00 am 21 °C (70 °F) 24 °C (75 °F) 6:00 am 21 °C (70 °F) 24 °C (75 °F)
- Page 54 Manual de Uso Modificación del horario El período Wake Presionar el botón Set (3 veces) hasta que aparezca Set Schedule. La hora ■ S'DO de lunes a de inicio del primer período (Wake) de lunes a viernes parpadeará. viernes está programado a las ©...
-
Page 55: Cancelación Temporaria Del Horario
Serie PRO 2000 Cancelación temporal del horario Para ignorar temporalmente el horario, presionar el botón ^ i j n n hasta que la temperatura deseada aparezca en pantalla. Aparecerá I L ' U U el mensaje Tem porary y la pantalla de período parpadeará para indicar que el período en curso ha sido anulado. -
Page 56: Cancelación Permanente Del Horario
Manual de Uso Cancelación permanente del horario Para ignorar el horario de manera permanente, presionar el botón ^ o V hasta que la temperatura deseada aparezca. Presionar luego el botón Hold para conservar la nueva temperatura hasta que se la desee cambiar nuevamente. -
Page 57: Adaptive Intelligent Recovery
Serie PRO 2000 Adaptive Intelligent Recovery (AIR) permite al termostato «aprender» el tiempo que necesita el Adaptive Intelligent Recovery ™ sistema de calefacción o de enfriamiento para llegar a la temperatura programada. Es suficiente programar las horas y las temepraturas deseadas en el horario. El termostato determinará a qué hora encenderá... -
Page 58: Reemplazo De Las Pilas
Manual de Uso Reemplazo de las pilas NOTA: las pilas son opcionales (sirven de alimentación de urgencia en caso de corte de corriente) cuando el termostato está conectado a 24 V C.A. Colocar el botón selector System en Off antes de retirar las pilas. -
Page 59: En Caso De Inconvenientes
Serie PRO 2000 En caso de inconvenientes No aparece nada en la pantalla. Verificar el interruptor automático y reconectarlo si fuera necesario. Verificar que el sistema de calefacción/enfriamiento esté conectado. Verificar que la puerta del calefactor esté bien cerrada. Verificar que las dos pilas AAA cargadas estén bien instaladas. No puede modificarse la El botón selector System está... -
Page 60: Asistencia Al Cliente
, se reco m iend a visitar el sitio http://yourhome.honeywell.com O com un icarse con el núm ero gratuito del servicio de 1-800-468-1502 asistencia al cliente, llam ando al P a ra a h o rra r tiem po, se reco m iend a te n e r a m ano el núm ero de m odelo y el código de fe c h a a ntes de... -
Page 61: Garantía Limitada De 2 Años
Garantía limitada de 2 años Honeywell garantiza este producto, a excepción de la batería, por el término de dos (2) años contra cualquier defecto de fabricación o de los materiales, a partir de la fecha de compra por parte del consumidor, en condiciones normales de uso y servicio. - Page 62 Manual de Uso La única responsabilidad de Honeywell será reparar o reemplazar el producto dentro de los plazos establecidos anteriormente. HONEYWELL NO RESPONDERÁ POR LA PÉRDIDA O DAÑO DE NINGÚN TIPO, INCLUIDO EL DAÑO INCIDENTAL O INDIRECTO DERIVADO, DIRECTA O INDIRECTAMENTE, DEL INCUMPLIMIENTO DE LAS GARANTÍAS, EXPRESAS O IMPLÍCITAS, O DE OTRAS FALLAS DE...
- Page 64 Automation and Control Systems Solutions d’automatisation et de contrôle Sistemas para automatización y control Honeywell International Inc. ® U.S. Registered Trademark. © 2013 Honeywell International Inc. 1985 Douglas Drive North Patents pending. All rights reserved. Golden Valley, MN 55422 Printed in USA http://yourhome.honeywell.com...
Need help?
Do you have a question about the PRO 2000 Series and is the answer not in the manual?
Questions and answers