Table of Contents
Advertisement
Available languages
Available languages
Quick Links
Advertisement
Chapters
Table of Contents

Subscribe to Our Youtube Channel
Related Manuals for Celestron starsense autoalign


Summary of Contents for Celestron starsense autoalign
- Page 1 M A N U A L...
-
Page 3: Table Of Contents
TABLE OF CONTENTS INTRODUCTION . . . . . . . . . . . . . . . . . . . . . . . . . . . . . . . . . . . . . . . . . . . . . . . . . . . . . . . . . . . . . . . . . . . . . . . . . 5 Warning . -
Page 5: Introduction
StarSense™ is patented technology that allows your telescope to determine its position and align itself with the night sky automatically . StarSense AutoAlign’s internal camera captures an image of the sky, and then analyzes it to identify the stars in the image . Based on this information, StarSense can determine the coordinates of the center of the image . -
Page 6: System Requirements
CG-5 Computerized (with Aux . splitter) CGEM, CGEM DX NexStar SLT LCM (with Aux . splitter) Mounts with only one port for the hand control, such as the CG-5 Computerized Mount, require an Auxiliary Port Splitter, item #93919, available from Celestron . -
Page 7: Optical Tube Compatibility
NexStar 102SLT Refractor NexStar 4SE Maksutov-Cassegrain NexStar 127SLT Maksutov-Cassegrain NexStar 130SLT Reflector All Celestron Reflectors and Refractors Packaged with the Advanced VX Mount All Celestron Reflectors and Refractors Packaged with the Advanced CG-5 Mount All NexStar GT optical tube assemblies Several other optical tubes from other manufacturers which use a similar finder dovetail base . -
Page 8: Assembly
ASSEMBLY 3. Slide the StarSense camera onto the camera ATTACHING THE STARSENSE CAMERA TO YOUR TELESCOPE base and secure it with the thumbscrew(s) . The camera slides on the large base front to back, 1. Remove the fi nderscope and bracket from your and slides on the small base back to front . -
Page 9: Changing Brackets
Note: If your telescope does not have an auxiliary port, the Auxiliary Port Splitter, (item #93919 available from Celestron), is required . First, plug the splitter into the auxiliary port . Then, plug the hand control into one port and the cable into the other . -
Page 10: Using With A Finder
. tab on the cable faces outward . The large accessory dovetail bar that is used for guide scopes on Celestron 8” Schmidt-Cassegrains and EdgeHD telescopes will obstruct the Star- Sense’s Large Camera Bracket . The CPC 800 fork arm also obstructs with the StarSense camera . -
Page 11: Quick Start: Aligning Starsense
QUICK START: ALIGNING STARSENSE Set up your telescope in a relatively unobstructed EQ mounts) . You only need to enter this information area that shows most of the sky . If you have once for a given observing location . obstructions like buildings or trees, StarSense will 6. -
Page 12: First Time Setup: Calibrate Center
FIRST TIME SETUP: CALIBRATE CENTER fine adjustments by looking through the eyepiece . Use the lowest power/widest-angle The first time you use StarSense AutoAlign, eyepiece available . StarSense needs to know the center of the telescope’s field of view in relation to its camera . This 5. -
Page 13: Starsense Manual Align
STARSENSE MANUAL ALIGN again, use the UP and RIGHT direction buttons to finish slewing the telescope . Press ENTER . StarSense Manual alignment allows you to point the telescope in the part of the sky you wish to use for 6. -
Page 14: Improving Pointing Accuracy With Starsense
IMPROVING POINTING ACCURACY WARNING WITH STARSENSE • Place cap over the camera lens! Since you may wish to use the Sun for your Once your alignment is complete, StarSense can alignment, remember to place the cap over the further enhance the pointing accuracy of your camera lens to protect the imaging sensor . -
Page 15: Tips For Using Solar System Align
. or Solar System database and slew to it . 4. Press OPTION (Celestron logo key on bottom 2. Press the ALIGN button on the hand control . left) and ALIGN simultaneously to load the alignment . -
Page 16: Sync
SYNC 3. The controller will prompt you to add a Cal Star to improve the accuracy, or you may press Syncing on a star will shift the mount model to the BACK to skip this step . star position . It will improve GoTo pointing in the region of sky close to the star you synced on . -
Page 17: Starsense Overview
4. Catalog Buttons: StarSense has a key on the STARSENSE HAND CONTROL hand control to allow direct access to each of StarSense AutoAlign’s hand control gives you the main catalogs in its 40,000+ object database . instant access to the night sky . With automatic... -
Page 18: Object Catalog
Selecting an Object objects, and others . Now that the telescope is properly aligned, you 7. Option (Celestron Logo): Can be used in can choose an object from any of the catalogs in combination with other keys to access more the StarSense’s database . -
Page 19: Slewing To An Object
SLEWING TO AN OBJECT object is located, you may press ENTER to proceed to the next object . Once the desired object is displayed on the hand control screen, you have two options: IDENTIFY BUTTON • Press the OBJECT INFO Key . This will display Pressing the I D E NTI FY button will search information about the selected object such as StarSense’s database and display the name and... -
Page 20: Motor Speed Button
MOTOR SPEED BUTTON HELP BUTTON The telescope can be controlled at nine different The HELP button gives you instant access to speed rates . Pressing the MOTOR SPEED button helpful information and utilities that can improve allows you to instantly change the speed of the the pointing accuracy of your telescope . -
Page 21: Database Setup
DATABASE SETUP Allow Sun: Enable the Sun under the Solar System object catalog and as an alignment object in Solar SkyTour Filters: Allows you to set the minimum System Align . Use the UP and DOWN scroll keys magnitude limit (brightness) for objects that will be to toggle between “yes”... - Page 22 • R.A. Limits (For equatorial mounts only): To change the GoTo approach direction, simply Sets the limits that the telescope can slew choose GoTo Approach from the Scope Setup or track in Right Ascension (R .A .) before menu, select either Altitude or Azimuth approach, stopping .
- Page 23 - Negative is the amount of compensation The hand control will sync on the star by asking applied when you release the button, winding you to center the star in the eyepiece and pressing the motors back in the other direction to the Align button .
-
Page 24: Time And Location
TIME AND LOCATION Get Version Info: Displays the current version for the StarSense Hand Controller, StarSense View / Modify Time: Allows you to view and Camera, and the telescope’s motor control board . make changes to the date, time, time zone offset, Restore Defaults: This factory reset restores all and Daylight Savings Time . -
Page 25: Specifications
Objective Lens Focal Ratio/F-stop Control Board 32-bit processor with embedded Linux Operating System USB Port USB 2 .0 Auxiliary Port Connects to Celestron telescopes Hand Controller Specifications Object Database 45,178 Red backlit 4 Line LCD STMicro ARM 32-bit Cortex™-M3 CPU... -
Page 26: Menu Tree
MENU TREE Menu Database Setup StarSense Sky Tour Filters Get Status Catalog Filters Calibrate Identify Filters Reset AIS Camera Filter Limits User Auto Align Allow Sun Time and Location Telescope View/Mode Time Tracking Rate View/Mode Location Sidereal, Solar, Lunar, Off Time/Loc. - Page 27 Align StarSense Auto Add Cal Reference StarSense Manual Review Cal Reference Solar Sys. Align Model Status Quick Align Polar Align Save/Load Align Reset Alignment...
- Page 28 Tel . (310) 328-9560 Fax . (310) 212-5835 Website: www .celestron .com Copyright 2016 Celestron All rights reserved. (Products or instructions may change without notice or obligation.) Designed and intended for those 14 years of age and older. This device complies with Part 15 of the FCC Rule. Operation is subject to the following two conditions: 1) This device may not cause harmful interference, and 2) This device must accept any interference received, including interference that may cause undesired operations.
- Page 29 M O D E D ’ E M P L O I...
- Page 31 SOMMAIRE : . . . . . . . . . . . . . . . . . . . . . . . . . . . . . . . . . . . . . . . . . . . . . . . . . . . . . . . . . INTRODUCTION Avertissements .
-
Page 33: Introduction
INTRODUCTION StarSense™ est une technologie brevetée qui permet à votre télescope de déterminer sa posi- tion et de s’aligner automatiquement sur des objets célestes . La caméra intégrée de StarSense AutoAlign capture une image du ciel puis l’analyse pour identifier les étoiles qu’elle contient . En utilisant ces informations, StarSense peut déterminer les coordonnées du centre de l’image . -
Page 34: Configuration Système
CG-5 électronique (avec séparateur Aux .) CGEM, CGEM DX NexStar SLT LCM (avec séparateur Aux .) Les montures qui ne comportent qu’un port pour la commande à main, comme la monture électronique CG-5, nécessiente un séparateur auxiliaire, article N° . 93919, disponible chez Celestron . -
Page 35: Compatibilité De Tube Optique
Consultez le tableau ci-dessous pour déterminer quel support est compatible avec quel tube . GRAND SUPPORT PETIT SUPPORT Tous les télescopes Schmidt-Cassegrains Les télescopes réfracteurs Celestron 6” f/8 .3 de Celestron Tous les Celestron EdgeHD Télescope réfracteur NexStar 102SLT Télescope Maksutov-Cassegrain NexStar Télescope Maksutov-Cassegrain NexStar 127SLT... -
Page 36: Assemblage
ASSEMBLAGE 3. Faites glisser la caméra StarSense dans la base FIXER LA CAMÉRA STARSENSE À VOTRE TÉLESCOPE et sécurisez-la avec les vis à main . La caméra se glisse d’arrière en avant dans la grande base, et 1. Retirez le chercheur et son support du tube d’avant en arrière dans la petite base . -
Page 37: Changer Les Supports
Note: Si votre télescope n’est pas équipé d’un port auxiliaire, vous devrez faire l’achat du Séparateur de port auxiliaire (article N° . 93919 chez Celestron) . Branchez le séparateur dans le port Auxiliaire . Branchez ensuite la commande à main dans un port et le câble auxiliaire dans l’autre . -
Page 38: Utilisation Avec Un Chercheur
. l’installation de la base de chercheur . La barre en queue d’aronde pour grands acces- soires présentes sur les télescopes Celestron de 8” Schmidt-Cassegrains et EdgeHD bloque l’installation du grand support pour la caméra StarSense . Le bras en fourche CPC 800 ne permet également pas l’installation de la caméra... -
Page 39: Démarrage Rapide : Aligner Starsense
DÉMARRAGE RAPIDE : ALIGNER STARSENSE Installez votre télescope dans un espace dégagé des montures EQ) . Il n’est nécessaire de saisir ces informations qu’une fois par site d’observation . offrant la plus large vue possible du ciel . Si la zone sélectionnée contient des bâtiments ou des arbres, 6. -
Page 40: Configuration Initiale : Calibration Du Centre
Fixez votre oculaire de l’angle le plus large et de vous pouvez retirer le système StarSense AutoAlign la plus basse puissance disponible . Regardez du télescope et le remettre en place sans recalibrer. -
Page 41: Alignement Manuel De Starsense
ALIGNEMENT MANUEL STARSENSE 6. Une fois la seconde image prise et traitée, uti- lisez les boutons de direction pour faire pivoter L’alignement manuel StarSense vous permet de le télescope de nouveau vers une région du pointer le télescope vers n’importe quelle partie ciel aussi éloignée que possible de la position du ciel pour effectuer des prises d’image d’aligne- initiale . -
Page 42: Améliorer La Précision De Pointage Avec Starsense
AMÉLIORER LA PRÉCISION DE POINTAGE AVERTISSEMENT AVEC STARSENSE • Placez le capuchon sur la lentille de caméra! Si vous souhaitez utiliser le Une fois l’alignement terminé, StarSense peut Soleil comme point d’alignement, souvenez-vous améliorer encore la précision de pointage de de replacer le capuchon sur la lentille de la votre télescope en ajoutant de multiples points caméra pour protéger le capteur d’imagerie . -
Page 43: Conseils D'utilisation De L'alignement Système Solaire
CONSEILS POUR L’UTILISATION DE Celestron dans le coin inférieur gauche) et ENTRÉE simultanément pour sauvegarder . L’ALIGNEMENT SYSTÈME SOLAIRE Le nom de la sauvegarde est le code date au Une fois le télescope aligné à l’aide de alignement format AAMMJJ HHMMSS . -
Page 44: Synchronisation
SYNCHRONISATION 3 . La commande à main vous demande d’ajouter une étoile cal pour améliorer la précision . Vous La synchronisation sur une étoile déplacera le pouvez aussi appuyez sur RETOUR pour ignor- modèle de la monture sur la position de l’étoile . er cette étape . -
Page 45: Présentation De Starsense
COMMANDE À MAIN STARSENSE à chacun des catalogues dans sa base de données de plus de 40 000 objets . Votre téle- La commande à main StarSense Autoalign vous scope contient les catalogues suivants dans permet d’accéder instantanément à tous les objets sa base de données: Système Solaire, Étoiles... -
Page 46: Catalogue Des Objets
Sélectionner un objet définis par l’utilisateur et autres . Maintenant que le télescope est aligné correctement, 7. Options (logo Celestron) : En combinaison vous pouvez sélectionner un objet de tout catalogue avec d’autres touches, permet d’accéder à des de la base de données de StarSense . La commande à... -
Page 47: Orientation Vers Un Objet
ORIENTATION VERS UN OBJET StarSense orientera le télescope sur le premier objet .Une fois l’objet trouvé, appuyez sur ENTRÉE Une fois l’objet voulu affiché sur l’écran du bloc de commande, vous avez deux choix : pour vous rendre à l’objet suivant . •... -
Page 48: Bouton De Vitesse Des Moteurs
BOUTON VITESSE DU MOTEUR BOUTON AIDE La vitesse de mouvement peut être définie selon 9 Le bouton AIDE vous donne un accès instantané à vitesses . Le bouton VITESSE DU MOTEUR vous des informations et outils vous permetant d’amélior- permet de modifier immédiatement la vitesse de er la précision de pointage de votre télescope . -
Page 49: Configuration De La Base De Données
CONFIGURATION DE LA BASE DE DONNÉES Activer le Soleil : Permet d’afficher le soleil dans le catalogue des objets du Système Solaire et d’ef- Filtres SkyTour : Vous permet de définir la limite fectuer un alignement sur lui . Utilisez les boutons de de magnitude minimum (luminosité) des objets défilement HAUT et BAS pour basculer entre «... - Page 50 • A.D. Limites (pour monture équatoriales son . La déclinaison Approche GoTo ne sera valable seulement) : Permet de définir les limites que si le tube du télescope est d’un côté du méri- du télescope au sein desquelles le télescope dien .
- Page 51 montant de compensation nécessaire dépend de la mode d’emploi de votre télescope pour en savoir plus vitesse de rotation sélectionnée; plus la vitesse de sur la Correction d’erreur périodique . rotation est lente plus cela prendra de temps pour Définir position d’axe : Se réfère à l’alignement que l’étoile apparaisse dans l’oculaire .
-
Page 52: Heure Et Position
Astuce : Appuyer sur RETOUR sur l’écran Réveil VOIR/POSITION GOTO vous permettra d’explorer les différentes fonctions Pour définir des coordonnées personnalisées, ap- de la commande à main sans avoir à sortir le puyez sur ENTRÉE, saisissez-les puis appuyez sur télescope de son mode d’hibernation . Pour réveiller ENTRÉE pour pivoter vers ces coordonnées . -
Page 53: Caractéristiques
Carte de contrôle Processeur 32 bit avec système Linux intégré Port USB USB 2 .0 Port auxiliaire Pour connecter à un télescope Celestron Caractéristiques de la commande à main Base de données des objets . 45,178 LCD 4 lignes à rétroéclairage DEL Processeur : Processeur STMicro ARM 32-bit Cortex™-M3... -
Page 54: Organisation Du Menu
ORGANISATION DU MENU Menu Configuration De La Base De Données StarSense Filtres de Sky Tour Obtenir État Filtres de Catalogue Calibrer Filtres d'Identification Réinitialiser Caméra AIS Limites de Filtre Connexion Auto Utilisateur Activer le Soleil Heure et Localisation Télescope Afficher/Mode Heure Vitesse de Suivi Afficher/Mode Localisation Sidéral, Solaire, Lunaire, Désactivé... - Page 55 Aligner Auto StarSense Ajouter Référence Cal Manuel StarSense Consulter Référence Cal Système Solaire Aligner État du Modèle Alignement Rapide Alignement Polaire Sauvegarder/Charger Alignement Réinitialiser l'alignement...
- Page 56 Torrance, CA 90503 U .S .A . Tel . (310) 328-9560 Fax . (310) 212-5835 Site web : www .celestron .com Copyright 2016 Celestron Tous droits réservés. (Les produits ou instructions pourraient changer sans préavis.) Ce produit est conçu pour et destiné aux personnes de 14 ans et plus.
- Page 57 H A N D B U C H...
- Page 59 INHALTSVERZEICHNIS . . . . . . . . . . . . . . . . . . . . . . . . . . . . . . . . . . . . . . . . . . . . . . . . . . . . . . . . . . . EINLEITUNG Warnung .
-
Page 61: Einleitung
EINLEITUNG StarSense™ ist eine patentierte Technologie zur automatischen Standortbestimmung und Ausrichtung des Teleskops am Nachthimmel . Die interne Kamera der automatischen Ausrichtung des StarSense macht ein Bild vom Himmel und identifiziert die darin enthaltenen Sterne . Basierend auf diesen Daten kann dasStarSense die Koordinaten des Bildzentrums ermitteln . -
Page 62: Systemvoraussetzungen
SYSTEMVORAUSSETZUNGEN Wird das StarSense zum ersten Mal aufgebaut, Das StarSense AutoAlign ist mit den meisten com- empfehlen wir ein Weitwinkel-Okular mit niedriger puterisierten Celestron-Teleskopen und mehreren Vergrößerung und ein Okular mit hoher Vergrößerung . unterschiedlichen optischen Tuben kompatibel . Beginnen Sie mit dem Weitwinkel-Okular mit nied- Siehe die untenstehende Kompatibilitätstabelle . -
Page 63: Kompatibilität Des Optischen Tubus
Alle Celestron-EdgeHDs NexStar 102SLT Refraktor NexStar 4SE Maksutov-Cassegrain NexStar 127SLT Maksutov-Cassegrain NexStar 130SLT Reflektor Alle Celestron-Reflektoren und im Lieferumfang der Advanced VX-Montierung enthaltene Refraktoren Alle Celestron-Reflektoren und im Lieferumfang der Advanced CG-5-Montierung enthaltene Refraktoren Alle optische Tubenbaugruppen des NexStar GT Mehrere andere optische Tuben anderer Hersteller mit ähnlicher... -
Page 64: Montage
MONTAGE 3. Schieben Sie die StarSense-Kamera auf den DIE STARSENSE-KAMERA AN IHR TELES- KOP ANSCHLIESSEN Kamerasockel und ziehen Sie die Flügelschrau- be(n) an . Auf den großen Sockel wird die 1. Sucherfernrohr und Halterung vom Teleskoptu- Kamera von hinten, auf den kleinen von vorne bus abnehmen . -
Page 65: Halterungen Austauschen
4. Das enthaltene Hilfskabel wird mit dem einen 2. Schrauben Sie das Objektiv ab . ende an die Rückseite der StarSense-Kamera und mit dem anderen Ende an den Hilfsanschluss Ihrer Montierung angeschlossen . 3. Schieben Sie die Halterung von der Kameraf- ront herunter . -
Page 66: Ein Sucherfernrohr Verwenden
Positionen . Die große Schwalbenschwanzführung für das 8-Zoll-Schmidt-Cassegrain und EdgeHD von Celestron verhindert die Montage der großen Halterung für die StarSense-Kamera . Das gleiche gilt für den CPC 800-Gabelarm . Um die Kamera in diesen Fällen anzubringen, werden Sockel und große Kamera-Halterung wie dargestellt rück-... -
Page 67: Schnellstart: Das Starsense Ausrichten
SCHNELLSTART: DAS STARSENSE AUSRICHTEN Stellen Sie Ihr Teleskop in einem Bereich mit vor allem zum Auffinden von Objekten im Son- möglichst freier Sicht auf den Himmel auf . Wäh- nensystem und zum Ermitteln des Horizonts rend der automatischen Ausrichtung ignoriert bei Äquatorialmontierungen benötigt) einzuge- das StarSense etwaige Hindernisse wie Gebäu- ben . -
Page 68: Erstmaliges Einrichten: Das Zentrum Kalibrieren
Es handelt sich dabei zum hellsten Stern in nicht angestoßen, geschüttelt oder gedreht wird, diesem Himmelsbereich . können Sie das StarSense AutoAlign ohne erneute Kalibrierung vom Teleskop abnehmen. 3. Bringen Sie Ihren weitesten Winkel bzw . das Okular mit niedrigster Vergrößerung am Teleskop Nachdem dieser Schritt abgeschlossen ist, erscheint an . -
Page 69: Manuelle Ausrichtung Des Starsense
MANUELLE AUSRICHTUNG DES STARSENSE Erneut wird mithilfe der Richtungstasten AUF- WÄRTS und RECHTS der Teleskopschwenk Mit der manuellen StarSense-Ausrichtung kann der beendet . Drücken Sie ENTER . Benutzer das Teleskop auf den Teil des Himmels ausrichten, den er zum Aufnehmen der Ausrich- 6. -
Page 70: Verbesserte Ausrichtungsgenauigkeit Mit Dem Starsense
VERBESSERTE AUSRICHTUNGSGENAUIGKEIT WARNUNG MIT DEM STARSENSE • Setzen Sie die Kappe auf das Kame- Nach abgeschlossener Justierung kann das Star- raobjektiv! Da Sie u . U . die Sonne für Sense die Ausrichtungsgenauigkeit noch weiter Ihre Ausrichtung verwenden möchten, denken verbessern, indem es mehrere Ausrichtungsrefe- Sie daran, die Kappe auf die Kameralinse zu renzpunkte hinzufügt . -
Page 71: Tipps Zur Verwendung Von Solar System Align (Sonnensystemausrichtung)
Tipps Zur Verwendung Von Solar System 4. Auf OPTION (das Celestron-Logo unten links) und gleichzeitig auf ENTER drücken , um die Align (Sonnensystemausrichtung) Ausrichtung zu speichern . Nachdem das Teleskop mit Solar System Align (Sonnensystemausrichtung) ausgerichtet wurde, Die Datei wird unter einem Namen im Format haben Sie die Möglichkeit, zusätzliche Aus-... -
Page 72: Synchronisierung
SYNCHRONISIEREN 3. Die Steuerung fordert Sie auf, einen Cal Star hinzuzufügen, um die Genauigkeit zu erhöhen . Bei der Synchronisierung mit einem Stern Wenn Sie diesen Schritt überspringen möch- wechselt die Montierung zur Sternenposition . Die ten, einfach auch ZURÜCK drücken . Himmelsregion in der Nähe des synchronisierten Sterns kann nun präziser anvisiert werden . -
Page 73: Starsense Im Überblick
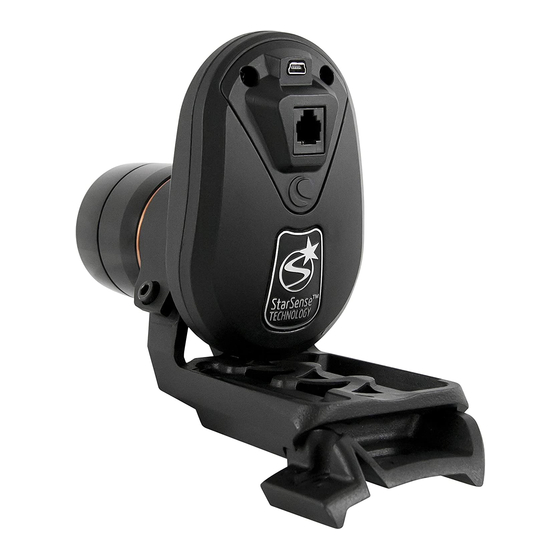
STARSENSE IM ÜBERBLICK USB Port for future upgrades Lens shroud and development Modular Jack Connection to mount Camera Lens Large Bracket (pre-installed on camera in box) Attachment Screws STARSENSE-KAMERA Modulanschluss: Mithilfe des enthaltenen Kabels wird die StarSense-Kamera an Ihr Teleskop angeschlossen . USB-Anschluss: Für künftige Software-Entwick- lungen und Upgrades der Kamera-Firmware . -
Page 74: Objektkatalog
Objekte und vieles mehr . Nun da das Teleskop richtig ausgerichtet ist, können Sie ein Objekt aus einem der Kataloge 7. OPTION (Celestron-Logo): Kann in Kombi- in der StarSense-Datenbank auswählen . Die nation mit anderen Tasten verwendet werden, Handsteuerung verfügt über eine Taste, die jeder... -
Page 75: Zu Einem Objekt Schwenken
ZU EINEM OBJEKT SCHWENKEN Das StarSense schwenkt auf das erste Objekt . Nachdem das erste Objekt aufgefunden wurde, Nachdem das gewünschte Objekt auf dem Dis- können Sie auf ENTER drücken, um auf das play der Handsteuerung angezeigt wird, haben nächste Objekt zu schwenken . Sie zwei Möglichkeiten: •... -
Page 76: Motordrehzahltaste
MOTORDREHZAHLTASTE Richtungstaste drücken, um das Teleskop in die richtige Richtung zu bewegen . Das Teleskop kann mit neun verschiedenen Geschwindigkeitsraten gesteuert werden . Wenn HILFE-TASTE Sie die MOTORDREHZAHL-Taste drücken, Die Taste HELP (Hilfe) gibt Ihnen sofortigen Zugriff können Sie die Drehzahl der Motoren sofort auf hilfreiche Informationen und nützliche Dienst- von einer Schwenkrate bei hoher Drehzahl auf programme, mit denen Sie die Visierpräzision Ihres... -
Page 77: Datenbank-Setup
DATENBANK-SETUP Übernehmen Sie mit ENTER den Wert . Allow sun (Sonne erlauben) Hier können Sie die Himmelstour-Filter: Hier können Sie die Sonne als Objekt im Sonnensystemkatalog sowie minimale Magnitudenbegrenzung für Objekte als Ausrichtungsobjekt in der Sonnensystemausrich- einstellen, die angezeigt wird, wenn die Taste tung aktivieren . - Page 78 die AUF/AB-Scrolltasten und drücken Sie können Sie den Getriebespieleffekt minimieren, wenn von einem Objekt zum nächsten geschwenkt zum Übernehmen eines Werts auf ENTER . wird . Genauso wie bei den Richtungstasten nähert • R.A. Grenzwerte (nur für Äquatoriale sich das Teleskop bei einer GoTo-Automatik, die auf Montierung): Hier werden die Grenzwerte positiv eingestellt ist, in gleicher Richtung wie bei eingestellt, die das Teleskop beim Schwenk...
- Page 79 Getriebespielausgleich: Alle mechanischen anzuzeigen und den gewünschten Wert einzugeben . Getriebe weisen einen gewissen Nachlauf oder Zum Bestätigen erneut auf ENTER drücken . ein Spiel zwischen den Gängen auf . Der Getriebe- PEC (Periodische Fehlerkorrektur für spielausgleich lässt die Motoren so weit rückwärts Äquatorialmontierungen): Die Periodische laufen, dass das Spiel zwischen den Gängen elimi- Fehlerkorrektur, oder kurz PEC, ist ein in manchen...
-
Page 80: Uhrzeit Und Standort
1. Im Teleskopmenü den Ruhemodus auswählen . eine Echtzeituhr (RTC) . Andere, wie das CPC/ CPC DX sind mit einem GPS ausgestattet, 2. Das Teleskop in die gewünschte Position welches die Uhrzeit speichert und mitverfolgt . Bei bringen und ENTER drücken . Teleskopen ohne solche Funktionen muss die Zeit 3. -
Page 81: Spezifikationen
Brennweite des Objektivs 40 mm Objektiv-Öffnungsverhältnis/F-Stopp Steuerplatine 32-Bit-Prozessor mit eingebettetem Linux-Betriebssystem USB-Port USB 2 .0 Hilfsanschlüsse Für die Verbindung zu Celestron-Teleskopen Technische Daten der Handsteuerung Objektdatenbank 45 .178 Rote Hintergrundbeleuchtung mit 4-Line-LCD STMicro ARM 32-Bit Cortex™-M3-CPU Software und Firmware Voll aufrüstbar RS-232-Buchse Für die Verbindung zum PC für... -
Page 82: Menübaum
MENÜBAUM Menü Datenbank-Setup StarSense Sky Tour Filter Status Ermitteln Katalogfilter Kalibrieren Identifizierungsfilter AIS-Kamera Zurücksetzen Filtergrenzen Automatische Ausrichtungdurch den Benutzer Sonne Erlauben Uhrzeit und Ort Teleskop Anzeigen/Modus Zeit Nachführungsgeschwindigkeit Anzeigen/Modus Standort Siderisch, Solar, Lunar, Aus Zeit/Sta. Modus RA nur, RA und DEK Anzeigen/Goto-Position Einrichtung Schwenkgrenzen... - Page 83 Ausrichten StarSense Auto Cal-Referenz Hinzufügen StarSense Manual Cal-Referenz überprüfen Sonnensys. Ausrichten Modellstatus Schnelle Ausrichtung Polar-Ausrichtung Ausrichtung Speichern/Laden Ausrichtung Rücksetzen...
- Page 84 Tel . (310) 328-9560 Fax: (310) 212-5835 Website: www .celestron .com Copyright 2016 Celestron Alle Rechte vorbehalten. (Produkte oder Anleitung können ohne Mitteilung oder Verpflichtung geändert werden.) Entworfen und vorgesehen für Personen von 14 Jahren und älter. Dieses Gerät entspricht Teil 15 der FCC-Bestimmungen. Der Betrieb unterliegt folgenden zwei Einschränkungen: 1) Dieses Gerät darf keine störenden Interferenzen verursachen, und 2) dieses Gerät muss jegliche empfangene Interferenz tolerieren, einschließlich solcher, die zu einem unerwünschten Betrieb führen.
- Page 85 M A N U A L...
- Page 87 ÍNDICE INTRODUCCIÓN . . . . . . . . . . . . . . . . . . . . . . . . . . . . . . . . . . . . . . . . . . . . . . . . . . . . . . . . . . . . . . . . . . . . . . . . 89 Advertencia .
-
Page 89: Introducción
. La cámara interna StarSense AutoAlign captura una imagen del firmamento, y a continu- ación la analiza para identificar las estrellas de la imagen . Basándose en esta información, StarSense puede determinar las coordenadas del centro de la imagen . -
Page 90: Requisitos Del Sistema
CG-5 informatizado (con divisor Aux .) CGEM, CGEM DX NexStar SLT LCM (con divisor Aux .) Soportes con un solo puerto para el mando manual, como el soporte informatizado CG-5, precisan de un divisor de puerto auxiliar, producto #93919 disponible en Celestron . -
Page 91: Compatibilidad Con Tubos Ópticos
NexStar 102SLT Refractor NexStar 4SE Maksutov-Cassegrain NexStar 127SLT Maksutov-Cassegrain NexStar 130SLT Reflector Todos los reflectores y refractores de Celestron con soporte Advanced VX Todos los reflectores y refractores de Celestron con soporte Advanced CG-5 Todas las estructuras de tubo óptico NexStar GT Diversos otros tubos ópticos de otros fabricantes que usen... -
Page 92: Montaje
MONTAJE 3. Deslice la cámara StarSense sobre la base de la INSTALACIÓN DE LA CÁMARA STARSENSE AL TELESCOPIO cámara y asegúrela con los tornillos manuales . La cámara se desliza sobre la base grande de 1. Saque el localizador y el soporte del tubo adelante hacia atrás, y de atrás hacia adelante del telescopio . -
Page 93: Cambio De Soportes
Nota: Si el telescopio no dispone de puerto auxiliar es necesario el divisor de puerto auxiliar (producto #93919, disponible en Celestron) . Conecte primero el divisor en el puerto auxiliar . A continuación, conecte el mando manual a un puerto y el cable en el otro extremo . -
Page 94: Usar Un Localizador
. orientada hacia fuera . La barra entrelazada de accesorios usada para guiar los telescopios Celestron de 8” Schmidt-Cassegrain y EdgeHD obstruirá el soporte grande de cámara de StarSense . El brazo en horquilla CPC 800 también obstruirá... -
Page 95: Inicio Rápido: Alinear El Starsense
INICIO RAPIDO: ALINEACIÓN DE STARSENSE Coloque el telescopio en una zona relativamente Si no está disponible la información, StarSense despejada que muestre la mayor parte del firma- solicitará la hora y fecha (esta información es mento . Si existen obstrucciones como edificios necesaria fundamentalmente para localizar ob- o árboles, StarSense se los saltará... -
Page 96: Primera Instalación: Calibrar El Centro
Mientras la brillante de esa región del firmamento . cámara no se golpee, agite ni gire, podrá sacar el StarSense AutoAlign del telescopio y volver a 3. Instale el ocular de mayor ángulo/menor aumento instalarlo sin recalibrar. -
Page 97: Alineación Manual De Starsense
9. Realice otra alineación automática StarSense . 5. Cuando la imagen se haya capturado y proc- Cuando termine la alineación el telescopio esado, la pantalla le solicitará seleccionar el estará listo para observar objetos y StarSense siguiente punto de alineación . Use los botones los localizará... -
Page 98: Mejorar La Precisión De Apuntado Con Starsense
MEJORAR LA PRECISIÓN DE APUNTADO ADVERTENCIA CON STARSENSE • Coloque la tapa sobre la lente de la cámara . Dado que puede querer usar Cuando la alineación haya terminado, StarSense el Sol para la alineación, recuerde poner puede mejorar aún más la precisión de apuntado la tapa sobre la lente de la cámara para proteger del telescopio añadiendo múltiples referencias de el sensor de imagen . -
Page 99: Recomendaciones Para Usar La Alineación Del Sistema Solar
RECOMENDACIONES PARA USAR LA 4. Pulse OPCIONES (tecla del logo de Celestron en la esquina inferior izquierda) e INTRO ALINEACIÓN DEL SISTEMA SOLAR simultáneamente para guardar la alineación . Cuando el telescopio esté alineado usando la alineación del sistema solar, puede añadir objetos El nombre guardado es un código de fecha en... -
Page 100: Sincronizar
para determinar la posición de objetos en el el modelo de soporte, mejorando así la alineación firmamento basada en la información de ubicación polar cuando se realicen ajustes en el soporte . dada . Use Alineación rápida para una alineación 1. -
Page 101: Resumen Del Starsense
4. Botones de catálogo: StarSense tiene una MANDO MANUAL STARSENSE tecla en el mando manual que permite acceder El mando manual StarSense AutoAlign le ofrece directamente a cada uno de los catálogos prin- un acceso instantáneo al fi rmamento nocturno . -
Page 102: Catálogo De Objetos
Ahora que el telescopio está correctamente usuario y otros . alineado, puede elegir un objeto de cualquiera de 7. Opciones (logo de Celestron): Puede us- los catálogos de la base de datos de StarSense . arse con otras teclas para acceder a funciones El mando manual tiene una tecla designada para y características más avanzadas . -
Page 103: Desplazarse A Un Objeto
DESPLAZARSE A UN OBJETO BOTÓN IDENTIFICAR Cuando se muestre el objeto deseado en la pan- Pulsar el botón IDENTIFICAR buscará en talla del mando manual tiene dos opciones: la base de datos de StarSense y mostrará el • Pulse la tecla INFORMACIÓN DE OBJETO . Le nombre y distancias angulares a los objetos mostrará... -
Page 104: Botón De Velocidad Del Motor
BOTÓN DE VELOCIDAD DEL MOTOR BOTÓN AYUDA El telescopio puede controlarse a nueve velocid- El botón AYUDA le ofrece acceso inmediato a ades distintas . El botón VELOCIDAD DE MOTOR información útil y utilidades que pueden ayudar le permite cambiar inmediatamente la velocidad de a mejorar la precisión de apuntado de su tele- los motores de una velocidad de desplazamiento scopio . -
Page 105: Configuración De Base De Datos
CONFIGURACIÓN DE BASE DE DATOS Permitir Sol: Habilita el Sol en el catálogo de ob- jetos del sistema solar y como objeto de alineación Filtros de SkyTour: Permite establecer el límite en Alineación del sistema solar . Use los botones de de magnitud (brillo) mínimo para los objetos que se desplazamiento ARRIBA y ABAJO para cambiar mostrarán cuando se pulse el botón SKY TOUR . - Page 106 • R.A. Límites (solo para soportes ecuatoriales): El acercamiento “GoTo” de declinación solamente Establece los límites de ascensión derecha (R . A . ) a será aplicable mientras el tubo del telescopio esté los que se puede desplazar el telescopio o realizar en un lado del meridiano .
- Page 107 engranajes . La cantidad de compensación nece- para mantener una estrella de guía centrada en el saria depende de la velocidad de desplazamiento ocular . El PEC está diseñado para mejorar la calidad seleccionada; cuanto más lenta sea la velocidad de imagen reduciendo la amplitud de los errores .
-
Page 108: Hora Y Ubicación
Cuando el telescopio se encienda de nuevo VER / POSICIÓN DE “GOTO” la pantalla mostrará Activar . Tras pulsar Intro tiene Para desplazarse a una coordenada personalizada, la opción de desplazarse por la información de pulse INTRO, introduzca las coordenadas y pulse hora/lugar para confirmar la configuración actual . -
Page 109: Especificaciones
Procesador de 32 bits con sistema operativo Linux incorporado Puerto USB USB 2 .0 Puerto auxiliar Conecta con telescopios Celestron Especificaciones del mando manual Base de datos de objetos 45,178 LCD de 4 líneas con iluminación roja CPU STMicro ARM 32-bit Cortex™-M3... -
Page 110: Árbol De Menú
ÁRBOL DE MENÚ Menú Configuración de Base de Datos StarSense Filtros de Sky Tour Obtener Estado Filtros de Catálogo Calibrar Identificar Filtros Reiniciar Cámara AIS Límites de Filtro Alineación Automática del Usuario Permitir Sol Hora y Ubicación Telescopio Ver/Modo hora Velocidad de Seguimiento Ver/Modo Ubicación Sideral, Solar, Lunar, Apagado... - Page 111 Alinear Automático StarSense Añadir Referencia de Calibración Manual StarSense Revisar Referencia de Calibración Alineación de Sistema Solar Estado de Modelado Alineación Rápida Alineación Polar Guardar/Cargar Alineación Restablecer Alineación...
- Page 112 Tel . (310) 328-9560 Fax . (310) 212-5835 Sitio web: www .celestron .com Copyright 2016 Celestron Todos los derechos reservados. (Los productos o instrucciones pueden modificarse sin previo aviso u obligación). Diseñado y pretendido para personas de 14 o más años de edad.
- Page 113 M A N U A L E...
- Page 115 INDICE INTRODUZIONE . . . . . . . . . . . . . . . . . . . . . . . . . . . . . . . . . . . . . . . . . . . . . . . . . . . . . . . . . . . . . . . . . . . . . .117 Avvertenza .
-
Page 117: Introduzione
INTRODUZIONE StarSense™ è una tecnologia brevettata che consente al telescopio di determinare la propria posizione e di allinearsi automaticamente al cielo notturno . La fotocamera interna di StarSense AutoAlign cattura un’immagine del cielo e la analizza per identificare le stelle presenti nell’immagine . -
Page 118: Requisiti Di Sistema
CG-5 Computerizzato (con separatore aus .) CGEM, CGEM DX NexStar SLT LCM (con separatore aus .) Le montature con un’unica porta sul comando manuale, come la montatura computerizzata CG-5, richiedono un separatore di porte ausiliario, codice n . 93919, disponibile da Celestron . -
Page 119: Compatibilità Del Tubo Ottico
Rifrattore 102SLT NexStar Maksutov-Cassegrain 4SE NexStar Maksutov-Cassegrain 127SLT NexStar Riflettore 130SLT NexStar Tutti i riflettori e rifrattori Celestron dotati di montatura Advanced VX Tutti i riflettori e rifrattori Celestron dotati di montatura Advanced CG-5 Tutti i gruppi tubi ottici GT NexStar . -
Page 120: Montaggio
MONTAGGIO 3. Far scorrere la fotocamera StarSense sull’apposita FISSAGGIO DELLA FOTOCAMERA STARSENSE AL TELESCOPIO base e fi ssarla con le viti . La fotocamera scorre sulla base grande da davanti verso dietro, mentre 1. Rimuovere il cercatore e la staffa dal tubo del sulla base piccola scorre da dietro verso avanti . -
Page 121: Sostituzione Delle Staffe
. Nota: Se il telescopio non è dotato di porta ausiliaria, è necessario un separatore di porte ausiliario (n . articolo 93919 disponibile da Celestron) . Montare innanzitutto il separatore sulla porta ausiliaria . Quindi collegare il comando manuale su una porta e il cavo sull’altra . -
Page 122: Utilizzo Con Un Cercatore
. La barra grande a coda di rondine utilizzata per i telescopi Schmidt-Cassegrain e EdgeHD da 8” Celestron ostruisce la staffa grande della fotocamera StarSense . Anche il braccio a forcella CPC 800 ostruisce la fotocamera StarSense . Per... -
Page 123: Avvio Rapido: Allineamento Di Starsense
AVVIO RAPIDO: ALLINEAMENTO DI STARSENSE Configurare il telescopio in un’area relativamente salvati da un orologio in tempo reale . Se non è dis- sgombra, dove è visibile gran parte della sfera celeste . ponibile alcuna informazione, StarSense richiederà Nel caso siano presenti ostacoli come edifici o l’inserimento di data e ora (ciò... -
Page 124: Prima Configurazione: Calibrazione Del Centro
. Utiliz- DEL CENTRO zando tale linea di visione, puntare il telescopio Al primo utilizzo di StarSense AutoAlign, StarSense approssimativamente verso la stella ed effettuare ha bisogno di conoscere il centro del campo visivo regolazioni di precisione guardando attraverso del telescopio in relazione alla fotocamera . -
Page 125: Allineamento Manuale Starsense
Al termine di questo passaggio, appare il messaggio manuale . (Ciò corregge eventuali errori dovuti ai contraccolpi meccanici della montatura . ) Nuovo allineamento richiesto (Realignment Required) . È possibile iniziare un nuovo alline- StarSense inizia quindi ad acquisire la prima immagine amento nella posizione corrente del telescopio . -
Page 126: Migliorare La Precisione Di Puntamento Con Starsense
È ora possibile utilizzare l’allineamento automatico (Sole, Luna e pianeti) per allineare il telescopio personalizzato StarSense e il telescopio ruota al cielo . L’allineamento per il sistema solare è automaticamente verso le zone del cielo selezionate un ottimo modo per allineare il telescopio per durante l’allineamento manuale . -
Page 127: Suggerimenti Per L'utilizzo Della Procedura Di Allineamento Per Il Sistema Solare
PROCEDURA DI ALLINEAMENTO PER IL SISTEMA SOLARE 4. Premere contemporaneamente OPZIONI (OPTION) (il tasto del logo Celestron in basso a Una volta allineato il telescopio utilizzando l’allinea- sinistra) e INVIO (ENTER) per salvare l’allineamento . mento per il sistema solare, vi è la possibilità di aggiungere ulteriori oggetti all’allineamento (altri... -
Page 128: Sincronizzazione
7. Ruotare il telescopio su una zona sgombra del L’allineamento polare deve essere eseguito dopo cielo . Ricordarsi di ultimare il movimento con i un allineamento automatico o manuale StarSense . tasti direzionali SU e DESTRA . Al termine ap- Si consiglia di aggiungere inoltre diversi punti pare un piccolo segno di spunta in alto a destra . -
Page 129: Panoramica Di Starsense
COMANDO MANUALE STARSENSE l’accesso diretto a ciascuno dei cataloghi Il comando manuale StarSense AutoAlign fornisce principali nel suo database contenente più di accesso immediato al cielo notturno . Con una 40 .000 oggetti . StarSense contiene nel proprio rotazione automatica a oltre 40 .000 oggetti e... -
Page 130: Catalogo Degli Oggetti
Selezione di un oggetto oggetti definiti dall’utente e molto altro . Ora che il telescopio è allineato correttamente, è 7. Option (logo Celestron): Può essere utilizzato possibile scegliere un oggetto da uno qualsiasi in combinazione con altri tasti per accedere a dei cataloghi presenti nel database StarSense . -
Page 131: Rotazione Verso Un Oggetto
ROTAZIONE VERSO UN OGGETTO Appare il messaggio Ricerca SkyTour in corso (SkyTour Searching) . Una volta che l’oggetto desiderato viene visualiz- StarSense ruota verso il primo oggetto . Dopo aver zato sullo schermo del comando manuale, sono localizzato l’oggetto, premere INVIO (ENTER) possibili due azioni: per passare all’oggetto successivo . -
Page 132: Tasto Velocità Motore
TASTO VELOCITÀ MOTORE TASTO AIUTO Il telescopio può essere controllato a nove diverse Il tasto AIUTO (HELP) offre un accesso istantaneo velocità . Premere il tasto VELOCITÀ MOTORE a informazioni di supporto utili che possono (MOTOR SPEED) consente di modificare istan- contribuire a migliorare la precisione di puntamento taneamente la velocità... -
Page 133: Impostazione Del Database
IMPOSTAZIONE DEL DATABASE impercettibili) . Il filtro del raggio di ricerca può essere impostato da 0° a 25,5° . Premere INVIO Filtri Sky Tour : Consentono di impostare il limite (ENTER) per accettare il valore . minimo di grandezza (luminosità) per gli oggetti che saranno visualizzati una volta premuto il tasto Consenti Sole: Abilitare il Sole nel catalogo SKY TOUR . - Page 134 tasti di scorrimento SU/GIÙ per aumentare e ridurre al minimo gli effetti del contraccolpo durante premere il tasto INVIO (ENTER) per accet- la rotazione da oggetto a oggetto . Proprio come tare i valori . accade per i Tasti direzionali, l’impostazione dell’Ap- proccio VaiA al positivo farà...
- Page 135 I valori 7-9 corrispondono alla direzione che si osserva Quindi premere nuovamente INVIO (ENTER) per normalmente in un cercatore StarPointer, altro cercatore confermare . senza ingrandimento o cercatore ottico per il corretto PEC (Correzione dell’errore periodico per orientamento . montature equatoriali): La Correzione dell’errore Compensazione contraccolpi: Tutti gli ingranaggi periodico, anche nota con l’abbreviazione PEC, è...
-
Page 136: Ora E Luogo
1. Selezionare Ibernazione (Hibernate) dal menu di StarSense, ma è possibile scegliere manual- Telescopio (Telescope) . mente di modificare queste impostazioni, se neces- sario . Alcuni telescopi, come Advanced VX, sono 2. Muovere il telescopio nella posizione desiderata dotati di un orologio in tempo reale, altri, come e premere INVIO (ENTER). -
Page 137: Specifiche
Scheda di controllo Processore 32 bit con sistema operativo Linux integrato Porta USB USB 2 .0 Porta ausiliaria Per il collegamento ai telescopi Celestron Specifiche comando manuale Database oggetti 45,178 LCD a 4 linee con retroilluminazione rossa CPU STMicro ARM 32-bit Cortex™-M3... -
Page 138: Struttura Menu
STRUTTURA MENU Menu Impostazione del database StarSense Filtri di Sky Tour Ottieni Stato Filtri di Catalogo Calibra Filtri di Identificazione Ripristino Fotocamera AIS Limiti Filtro Allineamento Automatico Personalizzato Consenti Sole Ora e Luogo Telescopio Visualizza/Modalità Ora Velocità di Tracciatura Visualizza/Modalità Luogo Siderale, Solare, Lunare, Off Modalità... - Page 139 Allinea StarSense Automatico Aggiungi Riferimento Cal StarSense Manuale Rivedi Riferimento Cal Allineamento Sist. Solare Stato Modello Allineamento Rapido Allineamento Polare Salva/Carica Allineamento Ripristina Allineamento...
- Page 140 Fax . (310) 212-5835 Sito web: www .celestron .com Copyright 2016 Celestron | Tutti i diritti riservati. (I prodotti o le istruzioni possono cambiare senza previa notifica o obbligo). Questo dispositivo non è destinato all’uso da parte di minori di 14 anni.
Need help?
Do you have a question about the starsense autoalign and is the answer not in the manual?
Questions and answers