Advertisement
Quick Links
Advertisement

Related Manuals for Celestron NexImage 93708


Summary of Contents for Celestron NexImage 93708
- Page 1 NexImage USER’S MANUAL Model 93708, 93711 95518, 95519 ENGLISH...
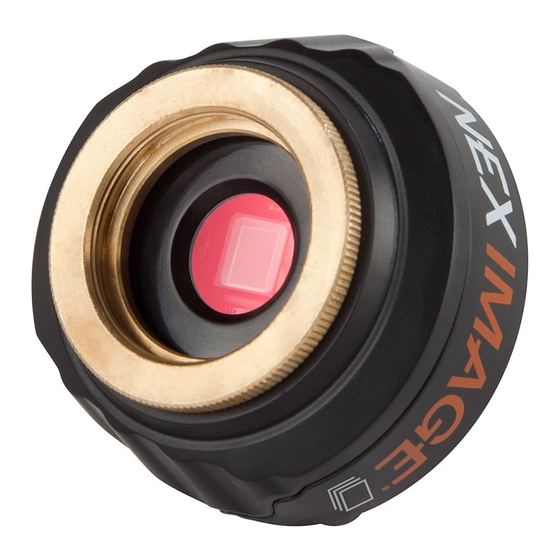
- Page 2 Congratulations on your purchase of the Celestron NexImage Solar System imaging camera. Your NexImage camera comes with the following: + NexImage Camera + 1.25” nose piece + CD including NexImage iCap and RegiStax processing software + USB Cable Fig 1 NexImage Camera 1.25”...
-
Page 3: Quick Start
Quick Start 1. Place the CD into your computer’s CD-ROM drive. 2. Install both the NexImage iCap and RegiStax software onto your computer. 3. Thread the 1.25” nose piece into the body of the NexImage camera. See Fig 2. 4. Slide the 1.25” nose piece of the camera Fig 2 into the eyepiece barrel of your telescope. -
Page 4: Capturing Images
Capturing Images 1. Double-click the NexImage iCap icon on your computer’s desktop to start the program. See Fig 4. Fig 4 2. If the NexImage camera is not already detected, select the camera and press OK. See Fig 5. 3. Select an easy target like the Moon to begin with. - Page 5 6. Use the Gain (A) and Exposure (B) settings to make sure that the image is not underexposed or overexposed . 7. Select the video format (C). For the highest Fig 7 resolution, select 1280x960. 8. Select the frames per second (FPS) for your video.
- Page 6 10. Press the Video File (E) to select the destination location for your video. 11. Click on the Advanced tab. You can either select the amount of time or number of frames you wish to record. See Fig 9. 12. Press the Record button (F) when ready to begin recording video.
-
Page 7: Processing Images
Processing Images 4. Press the Align button (C) to begin the 1. Double-click the RegiStax icon on your alignment process. computer’s desktop to start the program. See Fig 11. 5. Select the Best Frame option under the Limit Setup box (D) and enter a number 2. - Page 8 6. You will automatically advance to the Stack screen. Accept the default settings and press the Stack button (F). See Fig 13. Fig 13 7. Next, move to the wavelet processing screen by clicking on the Wavelet tab (G). See Fig 14. 8.
- Page 9 To explore the many other features of RegiStax and view helpful tutorials, visit the RegiStax homepage at: http://www.astronomie.be/registax/index.html How NexImage Works NexImage uses a light-sensitive imaging sensor to capture streaming video of any Solar System object. Using the included software, you can separate the video into hundreds of individual images (frames) and digitally stack them to significantly reduce the electric “noise”...
- Page 10 Focusing Tips To achieve best focus, concentrate on a high contrast feature of the object you are imaging. Focusing on small features such as a moon’s shadow on Jupiter or Cassini’s division in the rings of Saturn will guarantee best focus across the entire image. Once the frames of your video are stacked, the overall brightness of the composite (stacked) image is usually brighter than its individual component frames.
- Page 11 Since the NexImage will combine as many sharp frames as possible to achieve one high-quality image, you don’t want to take so many images that you start to detect the rotation of the planet, especially on Jupiter which makes one complete rotation in under 10 hours! Individual frames of a high-resolution video can have large file sizes.
- Page 12 • Consult the dealer or an experienced radio/TV technician for help. This product is designed and intended for use by those 14 years of age and older. ©2016 Celestron. Celestron and Symbol are trademarks of Celestron, LLC. All rights reserved.
Need help?
Do you have a question about the NexImage 93708 and is the answer not in the manual?
Questions and answers