Table of Contents
Advertisement
Advertisement
Table of Contents

Related Manuals for Audiovox AVXMTG9B/P/S


Summary of Contents for Audiovox AVXMTG9B/P/S
-
Page 1: Operation Manual
9-inch Roof-Mount DVD Player With DVD/CD/MP3 System AVXMTG9B/P/S OPERATION MANUAL... - Page 2 This page intentionally left blank.
-
Page 3: Table Of Contents
TABLE OF CONTENTS Important Notices....... . . 2 Congratulations ........3 Features . -
Page 4: Important Notices
System adjustments can be accomplished using the remote control, while seat-belts remain fastened. Enjoy your AUDIOVOX entertainment system but remember that the safety of all passengers remains the number one priority. -
Page 5: Congratulations
CONGRATULATIONS Congratulations on your purchase of the AUDIOUVOX AVXMTG9B/P/S DVD player with Drop-Down Video/Monitor. The AVXMTG9/B/P/S DVD player has been designed to give you and your family many years of video entertainment in the mobile environment. Please read the directions that follow in order to familiarize yourself with the product to ensure that you obtain the best results from your equipment. -
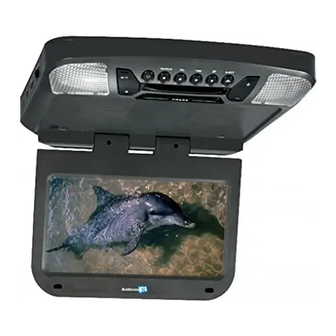
Page 6: Controls And Indicators Diagram
CONTROLS AND INDICATORS DIAGRAM Front View 1. EJECT( ) Button - Press this button to eject discs from the disc compartment. 2. SCREEN MODE ) Button - Press this button to select Normal (4:3) aspect ratios. 3. FMM Button - Used to select the frequency in sequence rotation: FM OFF 88.1 Mhz 88.3 Mhz... - Page 7 Side Views 1. DVD disc insertion slot - For loading and removing disks. Unit will turn on and load a disk when a disk is inserted. Insert a disk with the label facing up towards the headliner. 2. Disc indicator light - Illuminates green when a disk is inserted. Illuminates red when a disk is not present.
-
Page 8: Remote Control Operation
REMOTE CONTROL OPERATION Battery Installation Before attempting to operate your remote control, install the battery as described below: Using your finger, press the tab (1) down in the direction of the arrow. Slide the battery holder (2) out in the direction of the arrow. Install one CR2025 battery. - Page 9 A-B Button - Allows the user to repeat the playback from point A to point B. Press: DVD Player Once Repeat A - Marks the beginning of the section to repeat (set point A). Twice Repeat AB - Marks the end of the section to repeat (set point B).
-
Page 10: Channel Select
20. ZOOM Button - Press to change picture size when playing a DVD disc. Press: DVD player performs: Once - Enlarges the picture to 2 times the original size. Twice - Enlarges the picture to 3 times the original size. - Page 11 Button - Press this button to display the setup menu menu allows the user to change DVD player options such as OSD LANGUAGE, P RE TAL CONTROL etc. 26. RETURN Button: Press Return once: Go to disc menu. Press Return twice: Go to movie playback.
-
Page 12: Dvd Basics
DVD Region Code The DVD player is preset to a region code at the factory depending on where the unit is sold. DVDs are also coded by region. These region codes must match in order for the disc to play. If the region codes don’t match, the disc won’t play. - Page 13 Types of Discs Your System Will Play Your system will play the following types of discs: DVD disc - DVD discs that contain video. Audio discs - Audio CDs that contain musical or sound content only. MP3 discs - A disc that contains audio files (for example, a CD-R with downloaded MP3 files). This unit is capable of playing most recordable DVD formats.
-
Page 14: Loading And Playing Discs
6. Remember to turn the unit off and pivot the screen to the locked position when not in use. SETTINGS AND ADJUSTMENTS The setup menu contains features and options that let you customize your DVD player. For example, you can set a language for the On Screen Display (OSD) or control DVD playback content for children. - Page 15 General Setup Page TV Display This function allows you to set the screen display format. Optional Settings: Normal/PS, Normal/LB, Wide The default setting is Wide Note: This function depends on the aspect ratio with which the DVD disc is recorded. TV Type This function allows you to select TV type.
- Page 16 This function allows you to turn the screen saver on or off. Optional Settings: On, Off The default setting is On. Note: The DVD player will enter screen saver mode if the unit is inactive for approximately four minutes. Preference Page Audio This function allows an user to select an audio language for DVD playback.
- Page 17 Preference Page Disc Menu This function allows you to choose the menu language stored on the disc. Optional Settings: English, Spanish, French, Italian The default setting is English. Note: This function is only available for DVD playback. Parental This function prevents children from watching unsuitable DVD content. You can limit the content of movie playback from 1.
-
Page 18: Playing Jpg Files
PLAYING JPG FILES 1. Place a JPG disc into the disc insertion slot, the unit will start reading the disc and play. 2. Press the “MENU” button to browse JPG files. 3. Press the “ ” or “ ” cursor button to select a JPG file and press the “OK” button to confirm. 4. -
Page 19: Playing Mp3 Files
CD-R discs that have been encoded in MP3 format can be played on a DVD player. The DVD player plays the songs in the order they were burned on to the disc. When playback is started, the elapsed time of the track that is playing will be displayed. -
Page 20: Source Features
SOURCE FEATURES 1. Press the “SOURCE” button on the unit or remote control. The following menu will appear on the screen: 2. Press the “ ” or “ ” cursor button to choose an item. 3. Press the “OK” button. If a disc is loaded into the unit when the source is set to AV1, SD or USB, the unit will automatically switch the source over to DVD. -
Page 21: Overhead Dome Lights
OVERHEAD DOME LIGHTS The Dome Lights integrated into the unit are controlled by a three position slide switch. Sliding the switch to the ON position will turn the light ON. The OFF position will prevent the lights from turning ON with the vehicle interior lighting. The AUTO position will allow the lights to turn ON and OFF with the vehicle interior lighting. -
Page 22: Troubleshooting
TROUBLE SHOOTING PROBLEM SOLUTION IR remote is inoperative. Disc will not play or wrong region is displayed. No Disc error message appears. 1. Insert a disc with the label side facing up towards the headliner. Play starts, but then stops immediately. 1. - Page 23 PROBLEM SOLUTION The icon ( ) appears on screen. The feature or action cannot be completed at this time because: 1. The disc’s software restricts it. 2. The disc’s software doesn’t support the feature (for example, angles). 3. The feature is not available at the moment. 4.
-
Page 24: Specifications
SPECIFICATIONS Screen Type: TFT Active Matrix LCD Screen Resolution: 640 x 220 Operation Temperature: 32 - 122 °F (0 - 50 °C) Storage Temperature: -4 - 158 °F (-20 - 70 °C) Backlight: Power Source: 12 VDC Video Display System: NTSC/PAL Headphone Audio Output: 5 mw @ 32 ohms... -
Page 25: Notes
NOTES... - Page 26 NOTES...
-
Page 27: 12 Month Limited Warranty
Applies to Movies To Go Mobile Video Products AUDIOVOX ELECTRONICS CORP. (the Company) warrants to the original retail purchaser of this product that should this product or any part thereof, under normal use and conditions, be proven defective in material or workmanship within 12 months from the date of original purchase, such defect(s) will be repaired or replaced with reconditioned product (at the Company's option) without charge for parts and repair labor. - Page 28 © 2010 A UDIOVOX ,150 Marcus Blvd. Hauppauge, NY 11788 128-8884...
Need help?
Do you have a question about the AVXMTG9B/P/S and is the answer not in the manual?
Questions and answers