Table of Contents
Advertisement
Quick Links
Advertisement
Table of Contents

Related Manuals for Audiovox MMDV3


Summary of Contents for Audiovox MMDV3
- Page 1 MMDV3 SLOT-IN DVD Player Owner’s Manual...
- Page 2 A . Welcome Thank you for choosing the MMDV3 DVD Player. The MMDV3 is de- signed to optimize the enjoyment of your favorite DVDs in the mobile environment. This DVD Player is constructed to provide years of reli- able, trouble-free service. Please read this manual thoroughly prior to operating the player and retain it for future reference.
-
Page 3: Important Notice
When cleaning, make sure the system is unplugged from the power source. Do not use any solvents or cleaning materials (liquid, abra- sive or aerosol). Clean the DVD player using only a lightly damp- ened lint free cloth to wipe the unit if it is dirty. - Page 4 When the temperature rises dramatically from a very low tempera- ture, moisture may condense inside the MMDV3 and cause the DVD player to malfunction. If the MMDV3 does not operate properly under these conditions, leave the MMDV3 turned on for about half an hour until the moisture evaporates.
-
Page 5: Table Of Contents
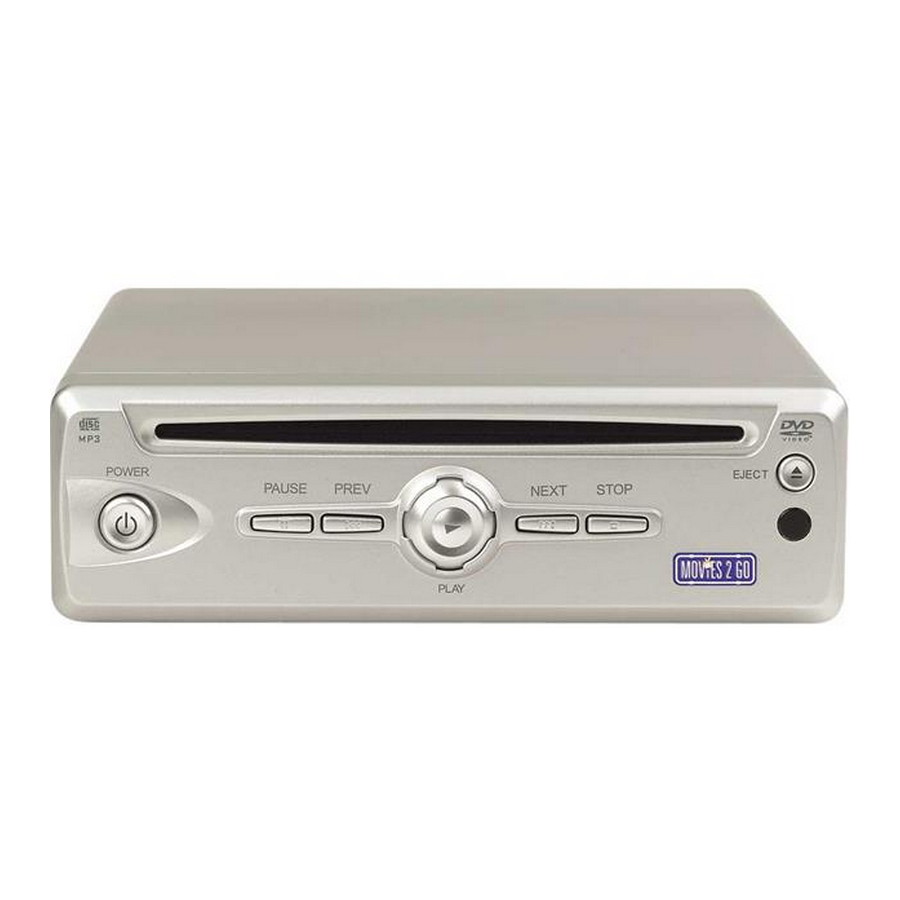
C. Contents 1. Main Unit 2. Remote control with one CR2025 Battery 3. Cigarette Lighter Adaptor Power Cable 4. Two (2) Brackets with four (4) Screws 5. Owner's Manual 6. RCA Cables ( Red, Yellow, and White) D. Controls Main Unit (Refer to Figure 1) 1. -
Page 6: Power Button
E. Remote Control View (Refer to Figure 2) 1) Power Button 2)Display Button 3) Angle Button 4) Subtitle Button 5) Audio Button 6) Zoom Button 7) Up/Down/Left/Right / Enter Buttons 8) Menu Button 9) Return Button 10) A-B Button 11) Forward Button 12) Reverse Button 13) Slow Button 14) Stop Button... - Page 7 2. Remote IR Receiver ( Refer to Figure 3) Plug the 1/8” jack on the remote IR cable into the IR IN jack on the rear of the DVD player. Place the IR receiver anywhere in the vehicle to allow remote control in any location.
- Page 8 AUDIOVOX * Optional With the MMDV3 3. Connecting to an Audiovox Overhead Monitor a. The MMDV3 can be connected to Audiovox Overhead monitors by purchasing an adaptor ( Part Number DVRCA). when using an Audiovox accessory cable (part number 8010730). Plug in the 3 RCA jacks, white (left audio) to white, red (right audio) to red, and yellow (video) to yellow.
- Page 9 b. Connect any of the two monitor ports on the back of the DVD player directly to the Movies To Go headrest hoods Model MMH56 B/T/G. This is plug and play, power, audio, video and IR signals are supplied in one DIN cable. c.
-
Page 10: Basic Operation
1. Basic Operation POWER EJECT PLAY SLOW PAUSE STOP NEXT PREVIOUS FORWARD REVERSE UP/DOWN/LEFT RIGHT ENTER NUMBERS RETURN MENU REPEAT DISPLAY ANGLE SUBTITLE AUDIO ZOOM SETUP Turn the unit on/off Eject/load the disc Start Playback Play at 1/2, 1/4, or 1/8 times speed Still Picture (1 time) Stop at the present playing point / (2 times) Stop playing... - Page 11 2. MENU A DVD is divided into sections called titles and chapters. When you play a DVD, a root menu of the disc will appear on the screen of your TV or Monitor. The contents of the menu vary from disc to disc.
- Page 12 c. Press ‘DISPLAY’ the 3rd time to display the Elapsed Time for the chapter. The heading will disappear automatically in about 3 seconds. Chapter Elapsed Time Screen Display d. Press ‘DISPLAY’ the 4th time to display the Remaining Time for the chapter. The heading will disappear automatically after 3 seconds.
- Page 13 Angle Screen Display 3) SUBTITLE During disc playback press ‘SUBTITLE’ to select the subtitle lan- guage you desire*, with the current Subtitle Language Number (1) and the total Number of Subtitle Languages (2) displayed. If there are multiple languages press ‘SUBTITLE’ again to select another subtitle language.
- Page 14 4) AUDIO During playback press ‘AUDIO’ to select the audio language you desire*, with the current Audio Channel Number (1) and the total number of Audio Channels (2) displayed. Press AUDIO again to select another audio language. The audio display will disappear automatically if the ‘AUDIO’...
- Page 15 6) A-B REPEAT a. During playback press ‘A-B’ to set the Starting Point A. A-B Repeat Starting Point Screen Display b. Press ‘A-B’ to set the Ending Point B and the player will re- peatedly play the part between Point A and Point B. A-B Repeat Ending Point Screen Display c.
- Page 16 7) REPEAT a. During playback press ‘REPEAT’ once to repeatedly play the current chapter. Chapter Repeat ON Screen Display b. During playback press ' REPEAT' again to repeatedly play the current title. Title Repeat ON Screen Display c. During playback press 'REPEAT' a 3rd time to cancel the re- peat playback function and resume normal play back.
-
Page 17: Playing Audio Cds
4. PLAYING AUDIO CDS When playing an audio CD, the DISPLAY Banner appears automatically. It displays the current track and the amount of the time for that track playing, the total amount of time on the disc and the current time running on the disc. Press the DISPLAY button on the remote to display the DISPLAY Banner. -
Page 18: Using The Repeat Feature
c. Press ‘DISPLAY’ three times and TOTAL ELAPSED appears along with the current track playing and the total time that the CD has been playing. TOTAL ELAPSED 00:00:00 TOTAL ELAPSED Screen Display d. Press ‘DISPLAY’ four times and TOTAL REMAIN appears along with the current track playing and the amount of time remaining on the CD. -
Page 19: Selecting Folders And Songs
CD-R discs that have been encoded in MP3 format can be played on your DVD player. SELECTING FOLDERS AND SONGS When an MP3 disc is inserted in the player, the SMART NAV screen will appear automatically. -
Page 20: Selecting A Play Mode
3) USING THE REPEAT FEATURE The default mode for the Repeat feature is OFF. Pressing REPEAT consecutively changes the repeat options: • REP-ONE - repeats the songs that is playing. • FOLDER REP- repeats the folder that is playing. FOLDER- turns off repeat and returns to regular play •... -
Page 21: Program Play
5) PROGRAM PLAY To use the program play option, you must create a playlist of songs in the order you want them to play. Note: Once you begin adding songs from a folder to create your play list, you cannot add songs from a different folder. - Page 22 Press ‘DISPLAY’ once, and “CHAPTER ELAPSED” will appear along with the amount of time the song has been playing. The of actual amount of time the disc has been playing, will be displayed on-screen. TIME ELAPSED Screen Display Press ‘DISPLAY’ a Second time and “CHAPTER REMAIN”...
- Page 23 6. SETUP (The contents vary from disc to disc.) Press ‘SETUP ‘to display the Main screen of the SETUP Menu on the screen. Press ‘SETUP ‘again to exit the SETUP Menu and the unit will resume it’s last playback or stop mode. 1) Select ‘GENERAL SETUP’...
- Page 24 * WIDE: When the player is connected to a wide screen TV, a wide picture is shown on the full screen. b. Select ‘ANGLE MARK’ using UP/DOWN, and then press the RIGHT button to enter the submenu. Choose Angle Mark on or off using the UP/DOWN and then press ENTER to confirm the setting.
- Page 25 2) When there’s no disc inside the player, select ‘PREFERENCES’ using UP/DOWN, and then press ‘ENTER’ to enter the prefer- ences page. AUDIO Preference Screen Display a. Select ‘AUDIO’ using UP/DOWN, and then press ‘RIGHT’ to enter the submenu. Select the audio language you desire using UP/DOWN, and then press ‘ENTER’...
- Page 26 c. Select ‘DISC MENU’ using UP/DOWN, and then press ‘RIGHT’ to enter the submenu. Select the Disc Menu Language you desire using UP/DOWN, then press ‘ENTER’ to confirm the setting. Press ‘LEFT’ to return. DISC MENU Preference Screen Display Note: Language and subtitle selection is only available for discs that are recorded in the above listed languages.
- Page 27 PASSWORD VERIFY Input Screen Display Enter a 4 digit password, then press ‘ENTER’ to confirm the parental level setting. NOTE: For 1st time use, the default password is 3308. e. Select ‘PASSWORD’ using UP/DOWN, and then press RIGHT to enter the submenu. PASSWORD CHANGE Screen Display Press ‘ENTER’...
- Page 28 NOTE: The Default Password is 3308 . This password is al- ways effective even after you have selected your own pass- word and changed it. To avoid others from using the default password to set the parental level and change the password, you can record this default password in another area and delete it from this manual.
- Page 29 I. Specification Compatible with disc format DVD / CD / MP3 Signal format system DVD Video format Video output Audio output Signal-to-noise ratio Harmonic distortion Dynamic range Wow and flutter Power source Power consumption Operating temperature Storage temperature Operating humidity Dimensions (W x H x D) Weight NTSC...
-
Page 30: 12 Month Limited Warranty
12 MONTH LIMITED WARRANTY Applies to AEC Mobile Video Products AEC (the Company) warrants to the original retail purchaser of this product that should this product or any part thereof, under normal use and conditions, be proven defective in material or workmanship within 12 months from the date of original purchase, such defect(s) will be repaired or replaced with reconditioned product (at the Company's option) without charge for parts and repair labor. - Page 31 For Customer Service Visit Our Website At .audiovox.com Product Information, Photos, FAQ’s Owner’s Manuals © 2003 Audiovox Electronics Corp., 150 Marcus Blvd., Hauppauge, N.Y. 11788 128-6681...
Need help?
Do you have a question about the MMDV3 and is the answer not in the manual?
Questions and answers