Table of Contents
Advertisement
Advertisement
Table of Contents

Related Manuals for Geonav 4C


Summary of Contents for Geonav 4C
- Page 3 User and Installation Guide...
- Page 5 The use of the GEONAV implies knowledge and accep- tance of this warning by the user. NOTE: This guide applies to the GEONAV 4C and GEONAV 4C XS models. The functions peculiar to each model are highlighted in the text. Unless otherwise speci- fied, functions are intended as common to the two models.
-
Page 6: Introduction
(IPX7), the unit is equipped with a daylight visible, color TFT display. Thanks to the GEONAV and a NAVIONICS Platinum™ or Gold™ electronic chart, you will never get lost even in case of fog, bad weather or dark. - Page 7 NAVIONICS Platinum™ or Gold™ electronic charts are available worldwide from authorized NAVIONICS dealers. The GEONAV 4C XS (X-Screen) is a special version of the GEONAV 4C. Equipped with a 12-pin connector, the unit can repeat the display of Navionics Platinum™ or Gold™ marine charts on any SVGA-standard monitor for PC (multisync type, 800x600 pixels minimum resolution).
-
Page 8: Characteristics
Characteristics CHARACTERISTICS General characteristics • Portable chart plotter with built-in GPS receiver and an- tenna • 12-channel internal GPS supporting WAAS/EGNOS • Video output for connection to external monitor • Satellite acquisition time: 2 minutes (cold) 15 minutes (first fix) •... - Page 9 • Battery pack: 4 alkaline or rechargeable batteries (AA) • Built-in battery charger (for rechargeable batteries only; see par. Battery Pack) • Power consumption: 2.2 W • Operating temperature: -20° to +70° C, with 12Vdc exter- nal power supply. The range is reduced with battery sup- ply, depending on the type of battery used.
- Page 10 Characteristics Accessories • Bracket for fixed installation • Power supply cable with car lighter plug • User and Installation Guide English...
-
Page 11: Installation And Precautions
Installation The GEONAV allows using either the built-in antenna for outdoor installation or an external GPS antenna for indoor use. NOTE: At start-up, the plotter will select the internal GPS by default. - Page 12 NMEA data cable (see the Connec- tions Section). • Autopilot: To connect the GEONAV to an autopilot, use the optional NMEA data cable (see the Connections Section). • Depth sounder: To connect the GEONAV to a depth sounder, use the optional NMEA data cable (see the Connections Sec- tion).
-
Page 13: Connections
Connections CONNECTIONS Power supply The GEONAV can be powered by us- ing the appropriate power supply cable with car lighter plug or the built-in battery pack. Install the power supply cable with the connector in the position shown in the figure, then exert a light pres- sure until clicking. - Page 14 (or white) +(+12V) black - (ground) Battery pack The battery pack of the GEONAV allows you to use it as a portable unit. Use 4 alkaline cells or rechargeable batteries, AA size (if possible, high-capacity batter- ies, 2000mAh or higher).
- Page 15 batteries, the selector can be set either to “Rechargeable” or to “Alkaline”. However the battery charge function is active on con- dition that the selector is set to “Recharge- able”. The misplacement of the selector may cause the batteries to break, the corrosive liquid to leak out and, consequently, the unit to be damaged.
- Page 16 If sent by the autopilot, the following NMEA messages are transmitted to external devices: GGA - RMC - ZDA The GEONAV will add the following messages: APA - APB - XTE - RMB - BWC - GLL - VTG The data cable is optional.
- Page 17 SHIELD GND (earth) USB cable The GEONAV can be connected to a Personal Computer by using the optional USB cable. In this case, the unit can use the internal batteries only, and cannot be powered by the ex- ternal power.
-
Page 18: Cartridge Installation
Windows Explorer not to erase the content of the \NAVIONIC and \GEONAV folders. Damaging the files stored in such directories may result in loss of data or improper operation of the unit. -
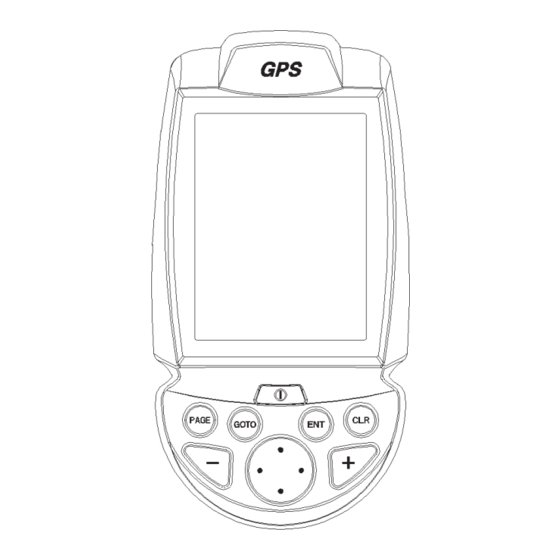
Page 19: Keyboard
Allows switching from justing the screen con- Cursor mode to Naviga- trast. tion mode. GOTO • Switches the GEONAV Allows plotting a route to- on/off. wards a manual cursor po- • Allows adjusting the sition, desired marker, port, screen backlight. -
Page 20: Diagnostic
WARNING: The unit’s internal memory can be cleared by holding the CLR key pressed when switching the unit on. This operation will delete all the settings stored in the GEONAV and restore factory settings. Moreover, the routes, tracks and mark- ers not saved on the CompactFlash™ cartridge will be deleted. -
Page 21: Navionics Electronic Charts
NAVIONICS Electronic Charts NAVIONICS ELECTRONIC CHARTS The GEONAV includes a built-in world map. Additional car- tography details relative to a specific area of navigation are available from the CompactFlash™ cartridges storing NAVIONICS Platinum™ or Gold™ electronic charts. To display chart boundaries, press the GOTO key to display the menu, select SETUP, SET CHART DETAIL and then, by the CURSOR key, select the USER or ALL mode. - Page 22 NAVIONICS Electronic Charts depth values in the unit se- lected, making them appear like those reported in the official nautical charts (see the figure). Displaying abbreviated navaid charac- teristics Position the manual cursor on the navaid symbol. A window will show the abbreviated char- acteristics of the navaid selected.
- Page 23 By querying the lights and navaids, the X-Plain™ function will give the description of the object in natural language, thus avoiding the use of abbreviations and symbols that are difficult to understand. By querying the symbols for wrecks or obstructions, NAVIONICS Platinum™...
- Page 24 NAVIONICS Electronic Charts Select PHOTOS, choose one item from the list to display one of the photographs available for the marina, then use the ZOOM key to enlarge or reduce the image, and CURSOR to pan it. Select PILOTS to gain access to the main information on the marina.
- Page 25 Displaying Tides and Currents data NOTE: This function is available only with the NAVIONICS cartridges containing Tides and Currents data. Position the cursor on the icon of a Tide or Cur- rent station, then press ENTER. If the zoom level is adequate, the present tide or current value will show in the vicinity of the cursor position, together with the curve estimated in the subsequent hours.
- Page 26 NAVIONICS Electronic Charts Displaying aerial / satellite charts NOTE: This function is available only with the NAVIONICS Platinum™ cartridges stor- ing aerial and satellite photographs. Press GOTO to display the menu, select SETUP, PHOTO OVER- LAY and then LAND or FULL. From a given zoom level on- wards, where available, aerial or satellite photographs will over-...
-
Page 27: Graphic Items
Graphic Items GRAPHIC ITEMS Besides chart data, the GEONAV displays some graphic items use- ful during navigation. The figure below shows some of these items. 1 - Marker Indicates a point of interest associated with a symbol and a name. - Page 28 Graphic Items To delete this band, press the PAGE key and switch to Naviga- tion mode. 5 - Route leg Part of route between two waypoints. 6 - Waypoint Waypoints are identified by a circle and a number. The route start- ing point is marked by the “X”...
-
Page 29: Functional Characteristics
Functional Characteristics FUNCTIONAL CHARACTERISTICS This chapter describes some of the most important functions of the GEONAV, as well as the terms most commonly used in this document. Switching on/Switching off the unit To switch the GEONAV on, press the PWR key. To switch it off, keep the PWR key pressed for more than 1 second. - Page 30 ON. A message will prompt the user to select the requested maximum range be- fore activating the chart rotation. The northern direction will be indi- cated by the symbol Autozoom With Autozoom function GEONAV will always display automati- With rotation English...
- Page 31 “AUTOZOOM ? ENTER = YES” message is displayed, then press ENTER to confirm the operation. To deactivate the Autozoom function, press the ZOOM key once. When the GEONAV is turned on, and if at least one waypoint has been previously entered, the Autozoom function is auto- matically activated.
- Page 32 Functional Characteristics When the Overzoom is activated, the unit will warn the user by replacing RANGE with OVZ (blinking) within the naviga- tion window. To activate or deactivate the Overzoom function, press GOTO to display the menu bar, then select SETUP, OVERZOOM and ON/OFF.
- Page 33 A window will allow entering local time by using the CURSOR key. Press ENTER to confirm the operation. To cancel local time, press GOTO to display the menu bar, se- lect SETUP, SET TIME and then GMT. Chart presentation This function allows the user to select the symbols and colors of chart presentation between International mode and US mode.
- Page 34 Press the PWR key to display the LIGHT window. To adjust the brightness level, press CURSOR. Press PAGE to exit. Easy View mode The GEONAV allows doubling the visibility of the electronic chart. Once the Easy View mode has been enabled, the chart will be magnified.
- Page 35 Anchor alarm This function allows generating an anchor alarm message that warns the user when the ship moves farther than the se- lected distance from its anchoring position, that is the ship’s position when the alarm is enabled. The reference distance value for the alarm can also be set. After the alarm is issued, press any key to reset it by using the current ship’s position as the new anchor position.
-
Page 36: Getting Started
The window situated in the lower part of the screen will display the boat’s speed, route and chart scale. The GEONAV is in Navigation mode; by pressing the CURSOR key, it is possible to switch to Cursor mode (editing mode). - Page 37 To go back to Navi- gation mode, press PAGE. If an autopilot is connected to the GEONAV, the plotted route is au- tomatically followed as soon as the Navigation mode is enabled. NOTE: The cursor can be moved to the de- sired position by using the GOTO function as well.
-
Page 38: Operating Modes
Navigation, each giving access to different functions. CURSOR MODE When the GEONAV is in Cursor mode, the crosshair cursor is displayed. The CURSOR key allow browsing through the elec- tronic chart, as well as editing or creating the route. See the Route Section for more details. -
Page 39: Range Window
Range Window RANGE WINDOW This window, always present, shows the following information: • Zoom status (top left corner): - Z+ means the chart can be further enlarged by pressing ZOOM+; - no indication means the chart is shown at the best pos- sible level;... -
Page 40: Navigation Window
Navigation Window NAVIGATION WINDOW This window is activated automatically as soon as the GPS receiver has obtained the boat’s position (FIX OK). If no route is present, speed, course and chart range are dis- played at the bottom of the screen. -
Page 41: Depth Sounder Window
Depth Sounder Window DEPTH SOUNDER WINDOW A depth sensor can be interfaced with the GEONAV via NMEA. In this case, the GEONAV auto- matically enables the depth sounder function, displaying a graph of sea depth. The depth scale, whose unit can... -
Page 42: Trip Window
Trip Window TRIP WINDOW The trip window shows the data relating to the route followed and, in particular: • Average speed • Time elapsed from departure • Partial distance covered • Total distance covered To reset partial counters before starting a new journey, press CLR. -
Page 43: Satellite Window
Additional information: • Day, month, year, local or Greenwich time (at the first start-up the GEONAV is initialized to Greenwich Time). • Boat’s position (lat/lon) (or the latest valid fix if the GPS receiver is still searching for satellites). - Page 44 The altitude value is available only if four satellites are tracked and a 3D fix is obtained. As soon as a valid fix is available, the GEONAV will automati- cally switch to Navigation mode and display the boat’s posi- tion at the best chart range available; the window at the bot- tom of the screen will indicate the boat’s course and speed.
-
Page 45: Info Window
Info Window INFO WINDOW This window displays the following information on the boat’s current position: • Geographical coordinates (latitude/longitude) • The position correction ap- plied to the latitude and lon- gitude (option SETUP, CALI- BRATION) • Magnetic variation value re- ceived by the GPS •... -
Page 46: Tide Info Window
Tide Info Window TIDE INFO WINDOW When a NAVIONICS cartridge featuring Tides and Currents data is present, this window displays further information, besides the forecast data sup- plied by selecting the Tides and Currents station. The following data is displayed: •... -
Page 47: Runway Window
Runway Window RUNWAY WINDOW This window displays the following information on the target waypoint: • Name of the target waypoint • Distance from the target waypoint • Estimated time of arrival to the target waypoint • Bearing • Course • Steering angle •... -
Page 48: 3D Window
3D Window 3D WINDOW NOTE: This function is available only with the NAVIONICS Platinum™ cartridges. This window allows displaying a 3D chart image of the area sur- rounding the current boat’s po- sition. Press the PAGE key repeatedly to display the 3D navigation win- dow, then use the CURSOR key to move the viewing angle and the ZOOM key to enlarge or reduce the... -
Page 49: Main Menu
Main Menu MAIN MENU The menu bar, displayed at the top of the screen, allows selecting from the following options: TRACK: To activate/deactivate the track function and to save, recall and delete the track saved. ROUTE: To delete, reverse, store, recall a route and display route information. -
Page 50: Route
Route ROUTE EDITING A ROUTE (CURSOR MODE) Creating a waypoint Using the CURSOR key, move the cursor on the position de- sired and press ENTER to insert a waypoint. To enter further waypoints, move the cursor and press ENTER. The new waypoint will be appended to the existing route. Up to 20 waypoints per route can be entered by using the GOTO function as well (see the Route to a waypoint Section). - Page 51 EDITING A ROUTE (NAVIGATION MODE) If the manual cursor is displayed, press the PAGE key to enter Navigation mode. Changing the target waypoint Use the “Route to a waypoint” function. WARNING: The route will be modified and the new target waypoint selected will be the first waypoint in the route.
- Page 52 Route FUEL: Estimated fuel consumption (liters) BRG: Bearing from previous waypoint to current waypoint The arrival time at the waypoint and the fuel consumption will be displayed provided that estimated speed and fuel con- sumption values have been inserted previously (see the Enter- ing speed and fuel consumption data Section).
- Page 53 Press ENTER and select the target waypoint by CURSOR. Press ENTER to confirm the selection, or PAGE to exit. As the GEONAV plots a new route, the waypoint selected be- comes the first waypoint in the route, whereas previous...
- Page 54 Route waypoints are deleted. This function is available in Naviga- tion mode only. This function can be accessed also by selecting the WPT item from the GOTO main menu. English...
-
Page 55: Track
Track TRACK The Track function allows re- cording the track actually fol- lowed by the boat. The Track function can be enabled and dis- abled several times during navi- gation. Starting a track To enable the Track function, press the GOTO key to display the menu bar, select TRACK, START and press ENTER to confirm. - Page 56 Track Recalling a track from the CompactFlash™ Press the GOTO key to display the menu bar, select TRACK, OLD and press ENTER to open the track catalog. Select the track desired, then press ENTER to confirm the op- eration or PAGE to exit. Deleting a track To delete the track displayed, press the GOTO key to show the main menu, select TRACK, CURRENT, DELETE and press EN-...
-
Page 57: Marker
Marker MARKER Markers are used to identify points of interest to which names and symbols can be assigned. NOTE: Marker names are displayed starting from the 32 NM chart range. CURSOR MODE Inserting a marker Move the cursor to the position desired and hold the ENTER key pressed for more than 2 seconds. - Page 58 ENTER to confirm. Once the desired marker has been selected, the GEONAV will insert a waypoint at the marker position and append the new leg to the existing route (if no route is available, the new waypoint will be connected to the boat’s position).
- Page 59 FUNCTIONS IN THE MARKER MENU Storing a set of markers in the CompactFlash™ Press the GOTO key to display the menu, select MARKER, CUR- RENT, SAVE ALL and press EN- TER to confirm. Use the CURSOR key to change the default name and press ENTER to confirm.
- Page 60 Marker To delete a set of markers stored in the CompactFlash™, press the GOTO key to show the menu, then select MARKER and OLD. By using the CURSOR key, select the set of markers from the list of those stored in the CompactFlash™, then press CLR to delete it and ENTER to confirm the operation.
-
Page 61: Goto Port
CURSOR and confirm its se- lection by pressing ENTER. Once the desired port has been selected, the GEONAV will in- sert a waypoint in the port posi- tion and append the new leg to the existing route (if no route is available, the new waypoint will be connected to the boat’s posi-... -
Page 62: Goto Nearest
(estimated on the boat’s current speed). Press ENTER to confirm the selection. The GEONAV will insert a waypoint in the port selected, de- lete automatically the existing route (if in Navigation mode), or append the waypoint to the existing route (if in Cursor mode), then go back to Navigation mode and enable automatically the Autozoom function. - Page 63 Press GOTO, select NEAREST by the CURSOR key, choose the Tides or Currents service, then press ENTER to confirm. The GEONAV will allow selecting one of the three nearest Tides and Currents stations. Use the CURSOR key to choose the sta- tion desired and press ENTER to confirm.
- Page 64 Goto Nearest • Time, speed and direction with respect to the cursor’s position in the graph • Time, speed, direction and slack time of daily flood and ebb streams • Dawn and sunset time • Moonrise and moonset time • Moon phase •...
-
Page 65: Setup
Setup SETUP The Setup menu allows setting the available options. To access the Setup menu, press GOTO to display the main menu, then select SETUP by using the CURSOR key. The menu items are grouped in six sets. When selecting a set by the CURSOR key, the list of the available options will be displayed. - Page 66 Setup By choosing USER, enables/disables the display of the single items. • Easy View (ON/OFF) Enables/disable the Chart Magnification function. • Overzoom (ON/OFF) Enables/disable the Overzoom function. • Presentation (INTER./U.S.) Selects the symbols and colors of chart presentation. • Own Ship Icon Selects the icon that will identify the ship’s position on the screen.
- Page 67 UNITS AND LANGUAGE • Set Time (LOCAL/GMT) Enters local time. • Distance Units (NAUT/ METR/STAT) Selects distance units. • Depth Units (M/FT/FA) Selects depth units. • Bearing (TRUE/MAG) Sets the magnetic mode for all bearings. • Language (EN/FR/ES/DE/ DK/IT/SV/NL/SU/NO/GR) Selects the language. WINDOWS •...
- Page 68 Setup NOTE: For the G4 XS, the reception of differential satellites, if available, is automatic. • Start USB (ON/OFF) Enables / disables the connection with the USB port of a PC (see the USB Connection Section for further informa- tion). •...
-
Page 69: Goto Lat/Lon
Press the GOTO key and select L/L by the CURSOR key. Enter the geographical coordinates desired by using CURSOR and con- firm the insertion. The GEONAV will move the manual cursor to the position selected, allowing the insertion of a waypoint or a marker. English... -
Page 70: Autopilot
Autopilot AUTOPILOT The GEONAV allows a boat equipped with an autopilot to fol- low automatically the entered route, compensating for any diversion caused by external conditions (wind, currents, etc.). The GEONAV will display the “PROXIMITY TO WAYPOINT” message to warn the user that the boat is about to reach the target waypoint. -
Page 71: Car Navigator
Car Navigator CAR NAVIGATOR NOTE: This function is available only when using NAVIONICS land cartography cartridges. Select SETUP, then CAR NAVIGATOR to switch from marine navigation to road navigation. For more information on how to use the unit in road navigation mode, please refer to the Car Navigator manual supplied. -
Page 72: Usb Connection
USB cable to the PC. From now on you will be able to access the CompactFlash™ on the GEONAV from your PC, as if it were any disk unit, as well as transfer the data file from your PC to the unit, and vice versa. - Page 73 “Eject”; WARNING: If you do not carry out this operation, the transferred data might get lost. • quit the USB connection on the GEONAV by pressing PAGE; • disconnect the unit’s USB cable from the PC; •...
- Page 74 English...
-
Page 75: Table Of Contents
Table of Contents TABLE OF CONTENTS INTRODUCTION .................... 4 CHARACTERISTICS ..................6 INSTALLATION AND PRECAUTIONS ............9 CONNECTIONS ..................11 CARTRIDGE INSTALLATION ............... 16 KEYBOARD ....................17 DIAGNOSTIC ....................18 NAVIONICS ELECTRONIC CHARTS ............19 GRAPHIC ITEMS ..................25 FUNCTIONAL CHARACTERISTICS ............27 GETTING STARTED ..................
Need help?
Do you have a question about the 4C and is the answer not in the manual?
Questions and answers