Table of Contents
Advertisement
Advertisement
Table of Contents

Subscribe to Our Youtube Channel
Related Manuals for 3SIXT 3S-0684


Summary of Contents for 3SIXT 3S-0684
- Page 1 FULL HD SPORTS ACTION CAMERA with Wi-Fi 3S-0684 USER GUIDE...
- Page 2 IMPORTANT SAFETY INFORMATION Please read the instructions carefully before using this camera for proper and safe operation. • Using a wall/car charger other than a 5V 1A Charger can damage the camera battery and could result in fire or leakage. Only use chargers marked: Output 5V 1A. •...
-
Page 3: Table Of Contents
TABLE OF CONTENTS The Basics .....................4 Installing and Charging the Battery ..........6 Installing the microSD Card ..............8 Turning the Camera ON/OFF ...............9 Capture/Playback Modes ..............10 Camera Settings Menu ................17 In-Vehicle Settings ..................19 Downloading the APP ................20 Connecting to the APP .................21 Transferring Video and Images to PC or Mac ......22 Playback Video and Images on a TV with a HDMI port ..22 Included Accessories ................23... -
Page 4: The Basics
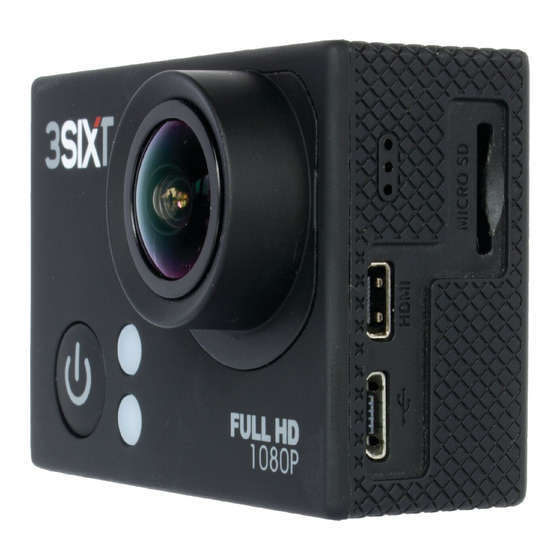
THE BASICS Power/Mode Button Microphone Status Indicator Light microSD Slot Charging Status Light Micro HDMI Port Lens Micro USB Port... - Page 5 Screen Speaker Wi-Fi Button Battery Door Shutter/Select Button...
-
Page 6: Installing And Charging The Battery
INSTALLING AND CHARGING THE BATTERY INSTALLING THE BATTERY 1. First, make sure that the camera is OFF when inserting or removing the battery. 2. Remove the camera from it’s housing. 3. Lift up the battery door with your fingernail. Remove the battery door and place the battery door in a safe location. -
Page 7: Charging Status Light
CHARGING THE BATTERY 1. Make sure that the camera is switched OFF. 2. To start charging the battery, connect the supplied micro USB cable into the camera’s micro USB port into a PC, MAC or wall adaptor’s USB 2.0 port only). -
Page 8: Installing The Microsd Card
INSTALLING THE MICROSD CARD It is recommended to use 32GB Class 10 microSD cards for microSD Slot maximum performance. 1. Make sure the camera is OFF when inserting or removing the microSD card. 2. Make sure the memory card is inserted in the correct direction (the gold contacts of the microSD card should face the front of the camera) -
Page 9: Turning The Camera On/Off
TURNING THE CAMERA ON/OFF Install the battery, charge fully and insert the microSD card as described on page 8. TURNING ON THE CAMERA • Press and hold the Power/Mode Button for 4 seconds until the LCD Screen displays ON and a sound is heard. -
Page 10: Capture/Playback Modes
CAPTURE/PLAYBACK MODES Cycling through and selecting capture and playback modes VIDEO PHOTO BURST TIME LAPSE PLAYBACK Turn camera ON and repeatedly press the Power/Mode Button cycle through camera modes and settings. The modes will appear in the following order: VIDEO PHOTO BURST SETTINGS... - Page 11 VIDEO MODE To record a video, make sure the camera is in Video mode which should be displayed on the LCD Screen . If not, short press the Power/Mode Button repeatedly until appears. TO START RECORDING • LCD Screen in ‘Video’ mode Short press the Shutter/Select Button .
- Page 12 TO STOP RECORDING • Short press the Shutter/Select Button • The video icon on the LCD Screen will return to white. The Status Indicator Light will also stop flashing which indicates that a recording has ceased. • When the microSD card is full or the battery is drained, recording will cease automatically.
- Page 13 • While in Single Image mode, the LCD Screen will display: ∙ number of images taken (top centre left); ∙ number of images remaining (top centre right); and LCD Screen in ‘Single Image’ ∙ the battery level indicator photo mode (bottom left).
- Page 14 TIME LAPSE MODE To take a Time Lapse photo, make sure the camera is in Time Lapse mode which should be displayed on the LCD Screen. If not, short press the Power/ Mode Button repeatedly until appears. TO TAKE A PHOTO LCD Screen in ‘Time Lapse’...
- Page 15 PLAYBACK/REVIEW MODE To view your videos and photos make sure the camera is in Video or Photo Playback mode which should be displayed on the LCD Screen by short pressing the Power/Mode Button repeatedly until Video Playback appears or Photo Review appear.
- Page 16 QUICK MODE Quick Mode allows you to quickly access the menu settings from Stand By Mode. TO ENTER QUICK MODE • Verify the camera is in standby Video or Camera Mode (where camera in ON and NOT recording). Press and hold the LCD Screen in ‘Quick Mode’...
-
Page 17: Camera Settings Menu
CAMERA SETTINGS Turn camera ON and repeatedly press the Power/Mode Button to cycle through camera modes and stop at the Settings screen. • Press the Shutter/Select Button to enter the Settings main menu. • LCD Screen when ‘Settings’ To select a menu item, press the is selected Shutter/Select Button. - Page 18 CAMERA SETTINGS MENU GUIDE Setting Description Options Default Driving The Driving Recorder activates the (In-vehicle) ‘Auto Record’ feature if plugged into ON/OFF Recorder a USB Car Charger Video Set the Video Resolution to your 1080P 30fps/720P 30fps 1080P Resolution preferred output Looping Video Choose the Loop Recording time ON/OFF/1/2/5/10 mins...
-
Page 19: In-Vehicle Settings
IN-VEHICLE SETTINGS To set your camera up for in-vehicle crash cam recording: • In the settings menu, turn the “Driving Recorder” setting to ON; • In the settings menu, turn the “Looping Video” setting to ON; • Join the Suction Mount and the Camera Clip Housing together. -
Page 20: Downloading The App
DOWNLOADING THE APP The iSmart DV App lets you control your camera remotely using a smartphone or tablet. Features include camera control, live preview, photo playback and sharing of content and more. Download the iSmart DV App to your smartphone or tablet via the Apple App Store or Google Play Store. -
Page 21: Connecting To The App
Wi-Fi. 4. In your device’s Wi-Fi settings, connect to the network called “3SIXT-0684”. 5. Enter the password “1234567890”. 6. Open the iSmart DV App on your device. 7. Add the new camera and allow access... -
Page 22: Transferring Video And Images To Pc Or Mac
TRANSFERRING VIDEO AND IMAGES TO PC OR MAC • Turn the camera ON and connect it to a PC or MAC’s USB 2.0 port via the supplied micro USB cable. For PC: Your captured videos and images will be located in My Computer >... -
Page 23: Included Accessories
INCLUDED ACCESSORIES WATERPROOF WATERPROOF SUCTION HOUSING + HOUSING MOUNT MOUNT REPLACEMENT DOOR ADHESIVE CLIP HANDLEBAR/ HANDLEBAR/ BASE (X2) POLE MOUNT HELMET MOUNT ADAPTER (X3) CURVED MOUNT CAMERA CLIP CLIP HOUSING HOUSING MOUNT CLIP HOUSING CLIP HOUSING HELMET ADAPTER BELT CLIP STRAPS (X2) - Page 24 WATERPROOF HOUSING The camera is submersible up to 30m if the camera is correctly sealed in the Waterproof Housing. To fit and test Waterproof Housing: 1. Release the secure clasp of the Waterproof Housing. 2. Inspect the water sealing gasket (the rubberised material) to be sure it’s in good condition.
- Page 25 ACCESSORY ASSEMBLY WATERPROOF HOUSING CLIP HOUSING HANDLE BAR MOUNT Option 1 Option 2...
- Page 26 HELMET MOUNT Option 1 Option 2 Option 3 Option 4...
- Page 27 CLIP MOUNT Option 1 Option 2 Option 3 Option 4...
-
Page 28: System Requirements
SYSTEM REQUIREMENTS WINDOWS Microsoft® Windows XP with Service Pack 3, Windows Vista with Service Pack 1 or Windows 7 or later Pentium® 4 processor (or above) 1 GB of RAM, 250 MB available hard disk space QuickTime® 6 or higher Microsoft® Internet Explorer 7 or higher Windows Media Player 10 or higher DirectX 9 or higher MACINTOSH Intel processor running Mac OS X v10.5.x or later... -
Page 29: Limitation Of Liability And Indemnity
3SIXT Full HD Sports Action Camera User Manual or use of any 3SIXT product and/or related apps. In no event shall 3SIXT be liable for... -
Page 30: Warranty
1 YEAR WARRANTY 3SIXT will replace the faulty product at no cost to the consumer. The warranty does not extend to any consequential damages or costs that may be incurred and is valid for 1 year from date of purchase. The consumer must return the faulty product to the retail store it was purchased from together with proof of purchase. - Page 31 For more information, visit www.3sixtgear.com or visit www.3sixtgear.com/support...
Need help?
Do you have a question about the 3S-0684 and is the answer not in the manual?
Questions and answers