
Related Manuals for Insignia NS-IMK20WH7


Summary of Contents for Insignia NS-IMK20WH7
-
Page 1: Ice Maker
USER GUIDE Ice Maker NS-IMK20WH7 Before using your new product, please read these instructions to prevent any damage. -
Page 2: Table Of Contents
ONE-YEAR LIMITED WARRANTY........20 Introduction Congratulations on your purchase of a high-quality Insignia product. Your NS-IMK20WH7 represents the state of the art in ice maker design and is designed for reliable and trouble-free performance. Important Safety Instructions... - Page 3 Ice Maker 4 Follow all instructions. 5 Do not place fingers or hands into the automatic ice making mechanism while the refrigerator is plugged in. Doing so my expose you to possible injury. 6 Keep your hands away from the ejector mechanism and the heating element that releases the ice cubes, located on the bottom of the ice maker.
-
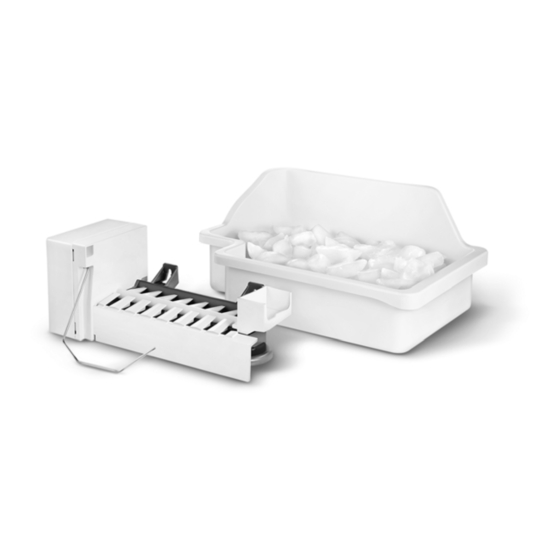
Page 4: Features
• Stores up to six pounds of ice • Prevents overflow by automatically detecting when storage bin is full • Works with these Insignia refrigerators: NS-RTM18WH7, NS-RTM18SS7, and NS-RTM21SS7 Package contents Plastic water supply tubing Ice storage bin Ice maker unit... -
Page 5: Installing The Ice Maker
(#5303917950) from your local hardware or plumbing supply store. Installing the ice maker Your Insignia refrigerator comes set up for ice maker installation. Caution Unplug the refrigerator. To eliminate the danger of electric shock during installation, you must unplug the refrigerator. - Page 6 NS-IMK20WH7 3 Remove the plug from the inside of the freezer compartment with a putty knife. Plug 4 Peel off the label covering the ice maker hole on the back of the refrigerator, then remove the foam from the hole with the needle nose pliers.
- Page 7 Ice Maker 5 Push the water inlet tube into the small hole on back of refrigerator. Rotate while inserting the tube until the flat surface of inlet tube is tight against the back of the refrigerator. 6 Secure the water inlet tube to the back of the refrigerator with two self-drilling screws (provided).
- Page 8 NS-IMK20WH7 8 Insert the two ice maker mounting screws into the holes in the freezer wall. Turn each screw clockwise five times. Ice maker mounting screws 9 Use needle nose pliers to remove the terminal cover located at the top of the freezer by first pulling down one side of the cover, then pulling down the other side.
- Page 9 Ice Maker 10 With the ice maker in one hand, plug the wiring harness connector into the terminal located at the top of the freezer panel. Make sure that the connection is tight. Make sure the wiring harness is still in the hook on the back of ice maker.
- Page 10 NS-IMK20WH7 11 Mount the ice maker onto the two ice maker mounting screws you installed in step 9. Make sure that the water inlet tube is sitting inside the fill cup, then tighten the screws. Water inlet tube Ice maker...
- Page 11 Ice Maker 13 Reinstall the freezer shelf and set the ice storage bin on the shelf. Ice storage 14 Locate the pre-punched holes at the bottom right corner of the back panel of the refrigerator. Align the bracket of the water valve with the factory drilled holes, then use a Phillips head screwdriver to drive the two self-drilling screws through the bracket and into the cabinet.
- Page 12 NS-IMK20WH7 15 Connect the wiring harness to the water valve, making sure that the connection is tight. Wiring harness plug 16 Grasp the other end of the plastic tube and push it firmly into the quick-connection on the valve until it bottoms out.
- Page 13 Ice Maker 18 Secure the plastic water supply tubing to the back of the cabinet with two plastic clamps. Plastic clamp Water supply tube www.insigniaproducts.com...
-
Page 14: Connecting The Ice Maker To The Water Supply
NS-IMK20WH7 Connecting the ice maker to the water supply Before you begin, please note: • This water line installation is not warranted by the refrigerator or ice maker manufacturer. • Follow these instructions carefully to minimize the risk of water damage. - Page 15 Ice Maker 6 Route the tubing through a hole drilled in the wall or floor (behind the refrigerator or adjacent base cabinet) as close to the wall as possible. Note Make sure that there is sufficient extra tubing to allow the refrigerator to move out from the wall after installation.
- Page 16 NS-IMK20WH7 11 Slide a brass compression nut, then a ferrule (sleeve), onto the water supply line. 1/4” tubing 1/4” compression nut Water inlet valve 12 Push the end of the tubing into the water inlet valve as far as it will go or ¼-inch, then slide the ferrule (sleeve) into the valve inlet and finger...
-
Page 17: Tips For Using Your Automatic Ice Maker
Ice Maker Tips for using your automatic ice maker Remember that water quality determines the quality of ice. The ice maker should not be connected to softened water. If the water softener has problems, chemical substances can damage the ice maker. To turn off the ice maker, raise the wire signal arm until it locks in the “up”... -
Page 18: Troubleshooting
NS-IMK20WH7 Troubleshooting Caution Do not try to repair your ice maker yourself. Doing so invalidates the warranty. Problem Possible cause Possible solution The ice maker makes no ice The freezer temperature is too Make sure that the freezer temperature is low enough to make high. -
Page 19: Specifications
Ice Maker Problem Possible cause Possible solution The ice is discolored There may be impurities in the Flush out the water supply line and clean the ice mold tray. water supply line or the ice Install a water supply line filter if your refrigerator doesn’t have mold tray. -
Page 20: One-Year Limited Warranty
Products and parts replaced under this warranty become the property of Insignia and are not returned to you. If service of Products or parts are required after the Warranty Period expires, you must pay all labor and parts charges. This warranty lasts as long as you own your Insignia Product during the Warranty Period. - Page 21 FOR THE BREACH OF ANY EXPRESS OR IMPLIED WARRANTY ON THIS PRODUCT, INCLUDING, BUT NOT LIMITED TO, LOST DATA, LOSS OF USE OF YOUR PRODUCT, LOST BUSINESS OR LOST PROFITS. INSIGNIA PRODUCTS MAKES NO OTHER EXPRESS WARRANTIES WITH RESPECT TO THE PRODUCT, ALL EXPRESS AND...
- Page 22 1-877-467-4289 (U.S. and Canada) or 01-800-926-3000 (Mexico) INSIGNIA is a trademark of Best Buy and its affiliated companies. V1 ENGLISH Distributed by Best Buy Purchasing, LLC 16-0335 ©2016 Best Buy. All rights reserved. Made in China.
Need help?
Do you have a question about the NS-IMK20WH7 and is the answer not in the manual?
Questions and answers