
Related Manuals for Shandong New Beiyang Information Technology Co. BK-T080III


Summary of Contents for Shandong New Beiyang Information Technology Co. BK-T080III
- Page 1 User’s Manual Embedded Printer BK-T080III (vertical) SHANDONG NEW BEIYANG INFORMATION TECHNOLOGY CO., LTD.
- Page 2 BK-T080III (vertical) User’s Manual Declaration Information in this document is subject to change without notice. SHANDONG NEW BEIYANG INFORMATION TECHNOLOGY CO., LTD. (hereinafter referred to as “SNBC”) reserves the right to improve products as new technology, components, software, and firmware become available. If users need further data about this product, please feel free to contact you dealer.
- Page 3 BK-T080III (vertical) User’s Manual Safety instructions Before installing and using the printer, please read the following items carefully. Install the printer at a flat and stable place. Reserve adequate space around the printer so that the operation and maintenance can be performed conveniently.
-
Page 4: Table Of Contents
BK-T080III (vertical) User’s Manual Contents 1. Summary ..............................1 1.1 Brief introduction ..........................1 1.2 Main features............................1 2. Main technical index ..........................2 2.1 Technical specification ........................2 2.2 Paper specification ..........................3 3. Structure and functions..........................6 3.1 Appearance ............................6 3.2 Overall size............................ - Page 5 BK-T080III (vertical) User’s Manual 4.8 Installing printer driver ........................19 4.8.1 Typical installation........................20 4.8.2 Advanced installation ........................22 5. Routine maintenance ..........................24 5.1 Cleaning mark sensor........................24 5.2 Cleaning print head and platen roller....................26 5.3 Cleaning paper loading sensor......................27 5.4 Cleaning retraction sensor.........................
- Page 6 BK-T080III (vertical) User’s Manual Appendix 2 Software tools........................39 Appendix 2.1 EEPROM configuration software ................... 39 Appendix 2.2 Demo program ....................... 39 - 5 -...
-
Page 7: Summary
1. Summary 1.1 Brief introduction BK-T080III (vertical) printer is a high performance thermal printer equipped with cutter and presenter, it can accept up to 180mm paper roll. The maximum print width is 80mm. It can be widely used in various Kiosk applications like information consulting terminal, data communication terminal, and test instrument terminal, etc. -
Page 8: Main Technical Index
BK-T080III (vertical) User’s Manual 2. Main technical index 2.1 Technical specification Items Parameter (203dpi) Print method Thermal Resolution 203DPI Paper width 69.5~79.5±0.5 mm Max.80mm (3.2″) Print width Max. 640 dots Print height Max.: 450 mm, Min.: 70 mm Print speed... -
Page 9: Paper Specification
Table 2.2-1 Printer recommended paper Notes: The weight shaft is an accessory part of BK-T080III (vertical) printer, and whether it should be installed depending on the paper specification greatly. The width of ticket that BK-T080III (vertical) printer adapts to is related with paper specification greatly... - Page 10 BK-T080III (vertical) User’s Manual Need weight Paper thickness Thermal side Suitable ticket length shaft or not 60~100g/m² Outer side Need 70-450mm 60g/m² Inside No need 70-220mm 80~100g/m² Inside Need 70-450mm Table 2.2-2 Relation between installation of weight shaft and paper...
- Page 11 BK-T080III (vertical) User’s Manual Caution: Please use the recommended paper or its equivalents. Using other types of paper may affect print quality and reduce the print head lifetime. Do not paste the paper to the shaft core. If the paper comes in contact with chemical or oil, it may discolor or be less heat sensitive, which will greatly affect the print quality.
-
Page 12: Structure And Functions
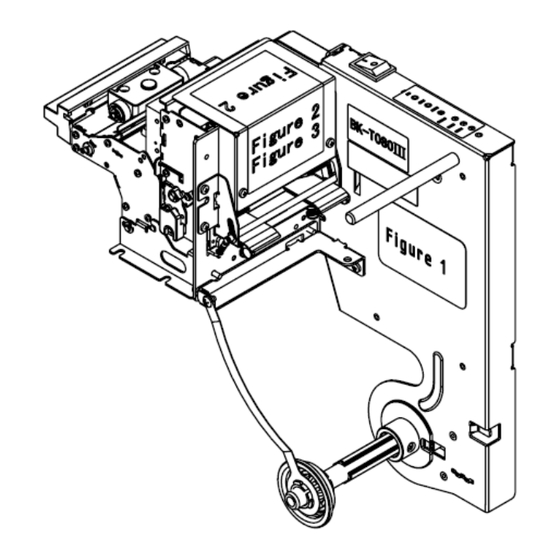
BK-T080III (vertical) User’s Manual 3. Structure and functions 3.1 Appearance Figure3.1-1 Appearance of BK-T080III (vertical) printer 1 —Circuit board box 2 —Button 3 —Product label 4 —Power switch 5 —Barcode label 6 —Paper loading label 7 —Paper outlet 8 —PRESENTER 9—PRESENTER bracket... -
Page 13: Overall Size
BK-T080III (vertical) User’s Manual 3.2 Overall size 3.2.1 Overall size of printer Figure 3.2-1 Overall size of BK-T080III (vertical) printer - 7 -... -
Page 14: Print Unit And Controlling Parts
BK-T080III (vertical) User’s Manual 3.3 Print unit and controlling parts The controlling parts include circuit board and corresponding adjusting buttons and interfaces. 3.3.1 Appearance of print unit and controlling parts The print unit consists of printing mechanism and cutting mechanism, please refer to the following figure: Figure 3.3-1 Appearance of print unit and controlling parts... -
Page 15: Presenter
Cover plate of Presenter gear Presenter turning plate Presenter weight shaft: The weight shaft is an accessory part of BK-T080III (vertical) printer, and whether it should be installed depending on the paper specification. Detailed parameters please refer to 2.2 Paper specification;... -
Page 16: Paper Roll Holder
BK-T080III (vertical) User’s Manual Caution: Do not place the presenter module in a place exposed to direct sunshine. Otherwise the sensor will become ineffective. 3.5 Paper roll holder Figure 3.5-1 Appearance of paper roll holder Side plate of paper holder: it is used to fix the paper roll shaft. -
Page 17: Interface
BK-T080III (vertical) User’s Manual 3.6 Interface Figure 3.6-1 Printer with USB interface 1 —Power socket 2 —USB interface - 11 -... -
Page 18: Installation And Suggestion
BK-T080III (vertical) User’s Manual 4. Installation and suggestion 4.1 Unpacking Open the carton and check whether all items listed on the packing list are included or have any damages. In case of damages or missing items, please contact your dealer or the manufacture for assistance. -
Page 19: Connecting The Grounding Cable
BK-T080III (vertical) User’s Manual Note: When using paper roll whose ID is 25mm or 40mm, please install corresponding paper roll shaft sleeve. Paper Paper Roll Core Shaft ID (A): Paper Roll Core Shaft ID (A): Paper Roll Core Shaft ID thickness Φ18mm... -
Page 20: Connecting Ac Power Adapter
BK-T080III (vertical) User’s Manual 4.4 Connecting AC power adapter Make sure the printer is turned off. Plug the power adapter cable pin into the power socket on the bottom of printer (see Figure 4.4-1 Power adapter connection). Connect the AC power adapter to an electrical outlet. -
Page 21: Installing And Loading The Paper Roll
BK-T080III (vertical) User’s Manual Caution: Make sure the interface cable is connected in correct direction. When connecting or disconnecting the interface cable, make sure to hold the plug shell instead of dragging the cable forcibly. 4.6 Installing and loading the paper roll Before installing the paper roll, make sure the specification of paper roll is in conformity with requirements of printer (refer to 2.2 Paper specification). -
Page 22: Paper Loading
BK-T080III (vertical) User’s Manual Push the paper roll baffle to its original position, power on the printer, then let the paper head pass the buffer shaft and put it into the paper feeding path. Refer to Figure 4.6-3: Thermal side Figure 4.6-3 Paper roll loading... -
Page 23: Installing The Printer
BK-T080III (vertical) User’s Manual 4.7 Installing the printer The operation of BK-T080III (vertical) embedded printer is reliable and easy, and it has good adaptability of installation and good maintainability. It adopts modularization design and active connection, combining with embedded installation, it also adopts flexible maintenance and operation points. Please refer to the content in this section when designing the whole machine, in order to ensure the reliable and effective work of BK-T080III (vertical) embedded printer. - Page 24 BK-T080III (vertical) User’s Manual All spaces explanation Paper roll space: the maximum space reserved for the paper roll when the printer runs normally. Invalid ticket retraction space: the space used for retract the tickets that the customer does not take away.
-
Page 25: Installing Printer Driver
Presenter to take out the jammed paper. Therefore enough space should be reserved in order to turn up the top cover for user’s operation. Paper roll loading space BK-T080III (vertical) printer adopts the mode of loading paper on one side, please see the following figure. Figure 4.7-4 Position of paper loading... -
Page 26: Typical Installation
BK-T080III (vertical) User’s Manual Windows server 2003/Windows Vista/Windows Server 2008/Windows 7. For different modes of printer with USB interface, there are two kinds of drivers for selection: API mode and Printer mode. As for API mode, the universal English software package for API mode is Setup_BK-T080_EN V1.23, and the installation includes typical installation and advanced installation;... - Page 27 BK-T080III (vertical) User’s Manual Select the Setup Type: “Typical” and click “Next”; The driver identifies the current system type, and then click “Next” button; Set the printer port. Users should choose the installing port according to its use. Select “BYCOMx” as driver (X equals to 1, 2, 3, 4, 5, 6, 7 or 8), and then click “Install”...
-
Page 28: Advanced Installation
BK-T080III (vertical) User’s Manual 4.8.2 Advanced installation Advanced installation is mainly used for the users who have special request to the printer driver. It adds the functions which support the installation of several USB printers driver and set the driving mode with the following steps: Run Setup.exe in the file “Setup_BK-T080_EN V1.23”. - Page 29 BK-T080III (vertical) User’s Manual The driver identifies the current system type automatically, and then click “Next”; Set the printer driving mode and printer port. The system supports several USB installation, then click “Install” to end the installation; Notes: The installation of USB driver has been finished during the process of installing the printer driver, thus do not need to install the USB driver separately.
-
Page 30: Routine Maintenance
BK-T080III (vertical) User’s Manual 5. Routine maintenance Caution: Before starting routine maintenance for the printer, make sure the power is turned off. Do not touch the surface of print head with hands or metal. Do not use forceps so as to prevent print head, platen roller and sensors being scratched. - Page 31 BK-T080III (vertical) User’s Manual Refer to Figure 5.1-3, hold the Presenter shown in item1 with hands and pull it forcibly in the arrow direction shown in the following figure until the Presenter turns to the position shown in item 2 of the following figure;...
-
Page 32: Cleaning Print Head And Platen Roller
BK-T080III (vertical) User’s Manual When you turn the spanner according to the red arrow shown in Figure 5.1-6, the mark sensor could be seen. Use a cross screw driver to unscrew the M3 screw on the sensor so that you can take off the mark sensor;... -
Page 33: Cleaning Paper Loading Sensor
BK-T080III (vertical) User’s Manual The print head is located interior of the cutter, the innermost of mechanism. Wipe off the surface of print head with alcohol cotton (it should be wrung out before using); Figure 5.2-2 Cleaning the print head Wipe off the dust or stains on the platen roller with soft cotton cloth dipped with pure ethanol (it should be wrung out before using);... -
Page 34: Cleaning Retraction Sensor
BK-T080III (vertical) User’s Manual 5.4 Cleaning retraction sensor When the following case occurs, the retraction sensor should be cleaned. When the Presenter fails to transmit paper retraction information properly. To clean paper retraction sensor, follow the steps given below: Turn off the power;... - Page 35 BK-T080III (vertical) User’s Manual Figure 5.5-1 Cleaning paper out sensor Figure 5.5-2 Cleaning paper out sensor Figure 5.5-3 Cleaning paper out sensor Wait for 5 to 10 minutes until the pure alcohol evaporates totally, close PRESENTER upper cover in the reverse steps and turn on the power.
-
Page 36: Clearing Jammed Paper In The Cutter
BK-T080III (vertical) User’s Manual 5.6 Clearing jammed paper in the cutter When any of the following cases occurs, please remove jammed paper manually. Paper jams between platen roller and cutter holder. Paper accumulates at paper inlet of the cutter in the front of print head. -
Page 37: Interface Signal
BK-T080III (vertical) User’s Manual 6. Interface signal 6.1 RS-232 Interface 6.1.1 Parameter Data transfer mode: asynchronous serial communication Handshaking mode: RTS/CTS control Voltage level: MARK= -3 to -15 V: Logic "1"/ OFF SPACE = +3 to +15 V: Logic "0"/ ON... -
Page 38: Usb Interface
BK-T080III (vertical) User’s Manual 6.2 USB interface USB interface is the standard interface of printer, which accords with USB 2.0 protocol standard, and work in full speed mode(For interface position, please refer to Figure 3.6-1 Printer with USB interface). Data transfer bit rate is 12Mbps. -
Page 39: Troubleshooting And Maintenance
BK-T080III (vertical) User’s Manual 7. Troubleshooting and maintenance If errors occur in the printer, consult the troubleshooting table below. If still can’t settle the trouble, please contact with SNBC or the distributor. 7.1 Common errors and settlement ERROR LED Buzzer... -
Page 40: Solution For Common Errors
BK-T080III (vertical) User’s Manual 7.2 Solution for common errors 7.2.1 Problems during paper loading Problem Possible reasons Solutions Paper roll can’t be The paper roll ID does not match loaded onto paper Replace paper roll. the printer holder smoothly Trim the paper head according to Paper head is irregular;... -
Page 41: Problems During Paper Out
BK-T080III (vertical) User’s Manual 7.2.3 Problems during paper out Problems Possible reasons Solutions Paper end; Install a new paper roll; The printer stops Paper jams in cutter; Check if there are sundries in cutter printing and warns Dust or wastepaper path;... -
Page 42: Appendix
BK-T080III (vertical) User’s Manual Appendix Appendix 1 Self-test page Print self-test page in the following steps: Turn off printer power, then keep pressing the FEED button for at least 1 second while turning on the printer. The printer will start to print a self-test page. (Take 203DPI/USB interface model for an example, and the self-test page is shown as follows). - Page 43 BK-T080III (vertical) User’s Manual :PC865,PC866 :1252,Katakana :More in Feed button Configuration … Bar Code Available :UPC-A :UPC-E :EAN-8 :EAN-13 :CODE39 :CODE93 :ITF :CODABAR :CODE128 :PDF417 Mandatory Data: Material Number :xxxxxxxx Serial Number :xxxxxxxx Revision Level :xxxxxxxx Statistic Data: Printed paper length...
- Page 44 BK-T080III (vertical) User’s Manual Print Speed (Max)-----------Print speed Cutter---------------------------Enable or disable auto cutter Paper Roll Width-------------Paper width Presenter----------------------Enable or disable PRESENTER Presenter Mode--------------PRESENTER paper out mode Presenter Wait Time--------PRESENTER waiting time before retracting or ejecting the printout Communication Interface---Communication interface setting...
-
Page 45: Appendix 2 Software Tools
BK-T080III (vertical) User’s Manual Appendix 2 Software tools For BK-T080III (vertical) embedded printer, we provide the following software tools: EEPROM configuration and Demo. The brief introduction is shown as follows. Appendix 2.1 EEPROM configuration software EEPROM configuration software is BK-T080 EEPROMSet, and its main function is to configure the printer.
Need help?
Do you have a question about the BK-T080III and is the answer not in the manual?
Questions and answers