SPL PHONITOR 2 User Manual
Headphone monitoring amplifier
Hide thumbs
Also See for PHONITOR 2:
- Quick start manual (12 pages) ,
- Assembly instructions manual (18 pages)
Table of Contents
Advertisement
This User Manual is optimized for
Acrobat Reader.
Interactive buttons may not
appear in other applications.
Phonitor 2
Matrix
Cr/A
All
Off
Source
Solo
XLR 1
RCA
L
XLR 2
Off
Output
Ø
L
Mute
Off
Model 1280 • Made in Germany
Headphone Monitoring Amplifier
R
Mono
R
Phonitor 2
IR
Stereo
VU Cal
+12
+6dB
120 V Audio Rail Preamplifier
Headphone Monitoring Amplifier
User Manual
Advertisement
Table of Contents

Related Manuals for SPL PHONITOR 2


Summary of Contents for SPL PHONITOR 2
-
Page 1: User Manual
Phonitor 2 Headphone Monitoring Amplifier Phonitor 2 Matrix Cr/A Source Solo XLR 1 XLR 2 Stereo VU Cal Mono Output Ø +6dB Mute 120 V Audio Rail Preamplifier Headphone Monitoring Amplifier Model 1280 • Made in Germany User Manual This User Manual is optimized for Acrobat Reader. - Page 2 Headphone Monitoring Amplifier Model 1280 • Made in Germany With the optional Expansion Rack you can mount the Phonitor 2 into a 19 inch rack and switch between four dif- ferent audio outputs (see more information here). F R B...
-
Page 3: Table Of Contents
Content Phase Ø Stereo switch Getting started Laterality Front view VU meters Rear view Attenuate the sensitivity of the VU meters IR Remote control Bottom view DIP switches DIP switches 120V Rail Technology Level increase of the outputs RCA input HiFi level / Studio level Comparisons Slave Thru Phonitor Matrix... -
Page 4: Getting Started
Getting started Read thoroughly and follow the instructions as well as the security advices of the Quickstart which is enclosed in the scope of delivery! You can also download the Quickstart here. By pressing the -Button you get to the table of contents. By pressing the -Button you get to the front view of the unit. -
Page 5: Front View
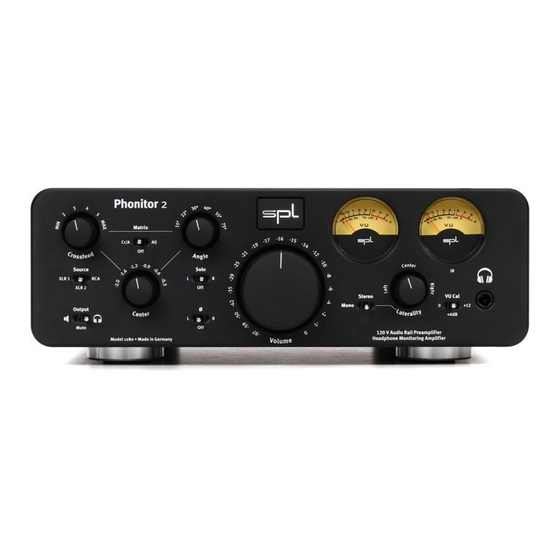
Front view Phonitor Matrix Cr/A, All, Off VU Meter Crossfeed Angle Phonitor 2 Matrix Cr/A Source Solo XLR 1 VU Cal Switch XLR 2 Stereo VU Cal Mono Output Ø +6dB Mute 120 V Audio Rail Preamplifier Headphone Monitoring Amplifier Model 1280 •... -
Page 6: Rear View
Learning Volume Up/Down: 1. Press LEARN button below 2. Point your remote at VUs and press a button for VOLUME DOWN (LEDs flash 1x) Phonitor 2 3. Repeat until LEDs flash 3x LEARN Serial 4. Press a button for This output can also drive balanced headphones... -
Page 7: Bottom View
Bottom view DIP switches Factory setting DIP Switches F R B... -
Page 8: 120V Rail Technology
120V Rail Technology In our 120V Rail Technology the audio signals are processed with an unequalled +/-60V DC, which corresponds to twice that of discrete operational amplifiers and four-times that of semiconductor operational amplifiers. The 120V Rail Technology reaches outstanding technical and sonic performances. Technically especially in terms of dynamic range and headroom and sonically especially in reproducing the finest details and delivering a totally relaxed sounding audio experience. -
Page 9: Comparisons
Operating Voltage Max. Audio Level Volt 120 V 141,4 129,1 36 V 30 V 124,2 OPA 134@30 V OPA 134@36 V SPL-OP@120 V + / - 15 Volt + / - 18 Volt + / - 60 Volt F R B... - Page 10 +/- 15 volts. Dynamic Range THD&N -105 -106 33,2 -107 -109 22,5 21,5 -111 -111,7 -113 -114,2 -115 OPA 134@30 V OPA 134@36 V SPL-OP@120 V TL 071@30 V OPA 134@36 V SPL-OP@120 V F R B...
-
Page 11: Phonitor Matrix
Phonitor Matrix Basics of stereo listening When listening to speakers sound coming from the right is not only perceived with the right ear (red line) but it is also perceived with the left ear (green line). The sensation is time delayed, lower in level and has a reduced fre- quency range (this applies to the left speaker accordingly). -
Page 12: Stereo Listening With An "Traditional" Headphone Preamplifier
Stereo listening with an “traditional“ headphone preamplifier When listening to music with a traditional headphone amplifier, the right ear only perceives the right signal (red line) and the left ear only perceives the left signal (green line). In contrast to listening to speakers the delayed and quieter signal of the respective opposite side is missing. -
Page 13: How Does The Phonitor Matrix Work
How does the Phonitor Matrix work? The Phonitor Matrix calculates the interaural time difference (Speaker Angle) and interaural level difference (Cross- feed) with their specific frequency responses to deliver a speaker-like listening experience on headphones. The super-stereo-effect is eliminated and all reverb and delay effects as well as EQ and panorama adjustments are perceived correctly on headphones. -
Page 14: Angle
In Detail An analog filter design creates interaural time and level differences for six different speaker placements. This ana- log filter design is controlled by the crossfeed and angle parameters. Angle With the ANGLE switch you adjust the inter- aural time difference which is related to the placement of the speakers. -
Page 15: Crossfeed
Crossfeed Crossfeed defines the interaural level difference. The six crossfeed values approximate the influences of room size, reflection and absorption characteristics. Frequency corrected time difference at max. Crossfeed and 30° Angle of Frequency corrected level difference at max. Crossfeed and 30° Angle of the right channel (red = right signal, green = left signal) the right channel (red = right signal, green = left signal) µs... -
Page 16: Setting Of Crossfeed And Angle
A vast number of factors, e.g. type of loudspeakers, room acoustics or the individual perception, influence the ste- reo-listening. This is why the Phonitor 2 offers six different switch positions to finely adjust the Crossfeed and to best match to your speaker playback. - Page 17 Table: Settings of Crossfeed and Angle Angle parameter Crossfeed parameter Interaural level difference Interaural time difference (µs) Speaker angle 0,03 10° 0,06 15° 0,08 20° 15° 0,12 25° 0,16 30° 0,20 35° 0,24 15° 0,35 20° 0,40 20° 22° 0,47 25°...
-
Page 18: Adjustment Of The Phonitor Matrix
Cr/A Phonitor 2 to your room with your loudspeaker setup. Phonitor 2 • Play some audio material you know well with the Phonitor 2 and go to a place where you usually listen to Source music through speakers. -
Page 19: Matrix On/Off
Phonitor 2 matrix. You can activate the Phoni- Source tor Matrix for the speaker outputs at the rear by setting the DIP switch 5 on the bottom of the Phonitor 2 to ON XLR 1... -
Page 20: Source Selection
Phon Source selection The Phonitor 2 is not just a headphone monitor amplifier. It is also a preamplifier three audio sources, XLR 1, Cr/A XLR 2 and RCA. Cr/A The chosen source feds he headphone output on the front as well as the XLR audio outputs Source XLR 1 on the rear of the Phonitor 2. -
Page 21: Solo
(180°). Output Ø If the Phonitor 2 is set to mono at the same time you hear only the differences of both chan- Mute nels. Therefore you are able to precisly evaluate whether signals are placed in the middle. If Model 1280 •... -
Page 22: Stereo Switch
Phonitor 2 – – Matrix Stereo switch Cr/A By using the Stereo switch (10) you can switch the audio signal to Stereo, Ste- Source Solo reo with Laterality control and Mono. In Mono mode, both stereo channels are XLR 1... -
Page 23: Vu Meters
VU meters VU meters (1) display the input levels for the selected source. The meter indicates levels from -20 dB to +5 dB. Phonitor 2 0 dB corresponds to +4 dBu. – – The ballistics of the VU meters guarantee an optimal visual perception. The... -
Page 24: Ir Remote Control
2. Point your remote at VUs VU meters light up red. and press a button for Mute VOLUME DOWN (LEDs flash 1x) Phonitor 2 3. Repeat until LEDs flash 3x • Press the IR REMOTE LEARN button (18) on the rear of the unit. The Power LED now lights up... -
Page 25: Dip Switches
DIP switches With the DIP switches (20) on the bottom of the unit the following settings can be chosen: Level increase of the outputs By using the DIP switches 1 and 2 you can increase the level of the outputs (XLR and headphone). DIP switch 1: ON = The outputs (XLR and headphone) are boosted to +12 dB. -
Page 26: Slave Thru
Slave Thru By using DIP switches 4 the chosen input passes directly to the XLR output on the rear. DIP switch 4: ON = The chosen input passes directly to the XLR output without being affected by any control, except Phase inversion). (Slave Thru). Phonitor Matrix activation for the XLR outputs With DIP switch 5 the Phonitor Matrix can be activated for the XLR outputs on the rear. -
Page 27: Specifications
Specifications Inputs XLR inputs • Neutrik XLR, balanced, Pin 2 = (+) • Impedance: ca. 20 kohms • CMR: -82 dBu (at 1 kHz) • Max. Input level: +32.5 dBu RCA inputs • Unbalanced • Impedance: ca. 10 kohms • Max. -
Page 28: Outputs
Outputs Headphone output Warning: Never connect a mono jack cable to the headphone output (front panel stereo jack). Make sure that the stereo jack is fully inserted, otherwise a short circuit might damage the headphone amplifier! • 6.35 mm TRS connector •... -
Page 29: Line Outputs
Max. Output power (at +30 dBu @ 1 kHz) • 2 x 1 W at 600 Ohm impedance • 2 x 2 W at 300 Ohm impedance • 2x 3.7 W at 120 Ohm impedance • 2x 2.9 W at 47 Ohm impedance •... -
Page 30: Internal Operating Voltages
Internal operating voltages • Analog: +/- 60 V Power supply • Mains voltage (switchable): 230 V AC / 50 Hz or 115 V AC / 60 Hz • Fuses: 230 V: T 500 mA; 115 V: T 1 A • Power consumption: max 40 VA Dimensions (incl. -
Page 31: Important Notes
Technical specifications are subject to change. © 2016 SPL electronics GmbH. This document is the property of SPL and may not be copied or reproduced in any manner, in part or fully, without prior authorization by SPL. Sound Performance Lab (SPL) continuously strives to improve its products and reserves the right to modify the product described in this manual at any time without prior notice.
Need help?
Do you have a question about the PHONITOR 2 and is the answer not in the manual?
Questions and answers