Table of Contents
Advertisement
Advertisement
Table of Contents

Related Manuals for Nolan N-Com B3


Summary of Contents for Nolan N-Com B3
- Page 1 Firmware Version: 4.0x USER INSTRUCTIONS AND SAFETY...
- Page 2 Congratulations on your purchase of an N-Com product. N-Com B3 was made using the most advanced technologies and the best materials. Long-running tests and thorough system development have allowed the highest audio quality to be achieved. For additional information about B3 visit the website www.n-com.it...
-
Page 3: Table Of Contents
Contents WARNINGS AND SAFETY ....................4 1.1.Road safety ................................4 1.2.Switching on the system in safe environments ..................4 1.3.Interferences................................4 1.4.Appropriate use ............................... 4 1.5.Qualified personnel..............................5 1.6.Accessories and batteries ............................ 5 1.7. Disposal ..................................6 CONTENT OF THE PACKAGING ..................6 INSTALLATION........................7 3.1.Installing the microphone ........................... -
Page 4: Warnings And Safety
Read this User Manual carefully, as well as the User Manuals for other N-Com kits that you will be using with the N-Com B3. Read the simple rules listed below. Failure to comply with these rules may lead to dangerous situations. -
Page 5: Qualified Personnel
The helmet is a safety device. Tampering with it and/or with the electronic system inside the helmet, in addition to invalidating the product warranty, can also lead to dangerous situations. 1.6. Accessories and batteries Only use the type of batteries, battery chargers and accessories approved by Nolan for the specific model. ... -
Page 6: Disposal
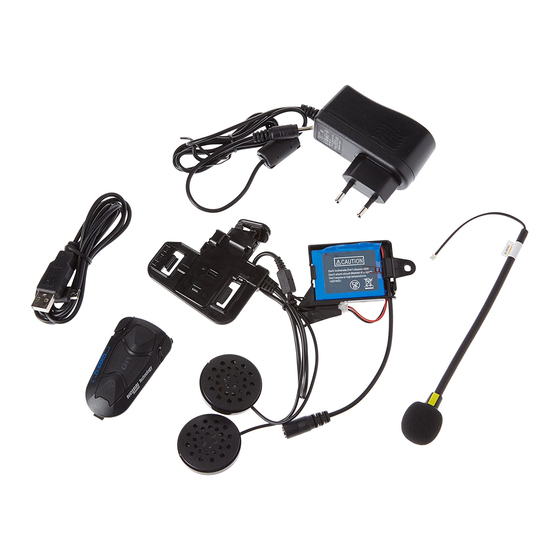
For more detailed information on the disposal of obsolete equipment, contact your municipality, a waste disposal service or the store where the product was purchased. CONTENT OF THE PACKAGING The N-Com B3 package contains: e-box B3 Electronic plate PC connection cable... -
Page 7: Installation
INSTALLATION You can download the installation video from www.n-com.it N-Com / Download section. Fig. 2 Fig. 1 Remove the “N-Com” protection plate located on the helmet shell (Fig. 1) open the helmet chin guard (flip up helmets). Remove the right and left cheek pads from ... - Page 8 ONLY FOR FULL-FACE HELMETS Remove the chin guard by pulling on the special red tab. Fig. 7 Remove the right and left polystyrene cheek pads by gently pulling them out of the helmet. The helmet shell can be opened slightly to facilitate the removal of the cheek pad .
-
Page 9: Installing The Microphone
3.1. Installing the microphone JET HELMETS OR FLIP-UP HELMETS Fig. 9 Fig. 10 Prepare the microphone by inserting the microphone clamp, being careful to position it properly (Fig. 9) Note: the flat part of the clamp must be facing upward when the microphone is positioned as shown in figure 11. -
Page 10: Installing The System On The Helmet
3.2. Installing the system on the helmet Fig. 20 Position the system inside the helmet as shown in figure 20, next to the N-Com housing in the shell. Looking at the helmet from the outside, slide the rear positioning tab into groove A as shown in the figure;... - Page 11 Fig. 23 Fig. 24 Insert the microphone connector in the micro USB electronic plate. Before you place the speaker in its housing, apply the Velcro pad to the polystyrene cheek pad (Fig. 24). Position the loudspeaker in the special ...
- Page 12 ONLY FOR JET HELMETS OR FLIP-UP HELMETS Secure the battery-holder support to the right side of the helmet, lining up the holes with the pins on the shell (Fig. 27) Fig. 27 ONLY FOR FULL FACE HELMETS Position the battery in the right polystyrene ...
-
Page 13: Removing The System
Fig. 30 Fig. 31 Position the comfort padding in its housing (see specific instructions provided in the helmet user manual), hooking the neck roll (Fig. 30). Position both the comfort cheek pads in their housing (see specific instructions provided in the ... -
Page 14: Basic Functions
BASIC FUNCTIONS All N-Com system functions are available through the operation of three pushbuttons: “ ”, “on” and “ ”. Every time the system is given a command, a special acoustic signal can be heard, which varies depending on the function being requested, or on the vocal command given. This way, all the functions can be used while wearing the helmet. -
Page 15: N-Com Wizard
After a few seconds, the mobile phone will display the name “N-Com B3 v.X.XX”, followed by the manufacturer’s identification data;... -
Page 16: Affiliation Reset Function
Note: If a Bluetooth device (mobile phone or GPS) equipped with music player with Bluetooth A2DP player has already been paired up, the pairing up DOES NOT have to be repeated as the A2DP protocol has already been stored in the B3. Once the Bluetooth device has been paired up, connection is automatic when the system is turned on. -
Page 17: Gps Satellite Navigator Functions
GPS SATELLITE NAVIGATOR FUNCTIONS B3 is compatible with the most common satellite navigators for motorcycles. By connecting the N-Com system to the GPS, all instructions will be transferred to the helmet. Every time the navigator communicates instructions, the intercom via Bluetooth with the Pillion Passenger is cut off and automatically restored at the end of the communication. -
Page 18: Music Via Bluetooth
Note: The Bluetooth intercom does not work while listening to an A2DP audio source. 11. MUSIC PLAYER VIA CABLE N-Com B3 allows connection via cable (sold separately) to audio sources equipped with the 3.5mm output generally used by these devices for the headsets. -
Page 19: N-Com Rider-Passenger Intercom Mode
12. N-COM RIDER-PASSENGER INTERCOM MODE In order for two N-Com systems to communicate with one another, they have to be paired up first. 12.1. Intercom affiliation 1. Make sure both N-Com Bluetooth systems are turned off; 2. Set both N-Com Bluetooth systems in Pairing up mode by pressing “on” (for more than 4 seconds), until the LEDS start to flash quickly;... -
Page 20: Making A Bike-To-Bike Call
After a few seconds, the helmets “recognize” one another: a confirmation beep is given in Helmet 2 that indicates the memory setting where Helmet 1 is stored and Intercom communication is established; N.B.: if all the memory settings are free, Helmet 2 will store Helmet 1 in position A (see diagram in Chapter 13.1). -
Page 21: Universal Intercom
14. “UNIVERSAL INTERCOM” The N-Com B3 system can be connected via Bluetooth to intercom systems of other brands, thanks to the UNIVERSAL INTERCOM function. 14.1. Pairing up the UNIVERSAL INTERCOM To pair up an N-Com system and an intercom of another brand (from now on called Intercom B), the following procedure needs to be carried out: Put the N-Com system in the “Pair up Mode”... -
Page 22: Battery
15. BATTERY Before using the N-Com device for the first time, recharge the battery completely for at least 10 hours. To obtain best performances from the battery, it is recommended to completely recharge the battery the first few times. Afterwards, you can recharge the battery for shorter periods. Whenever possible, it is best to recharge the battery completely. -
Page 23: Summary Table Of Controls
16. SUMMARY TABLE OF CONTROLS Button Pressure Brief Long Brief Long Brief Long Brief Long Turning on X (2s) Turning off (4s) Increase Volume Decrease Volume Scroll menu (Base, Radio, Bike to Bike) (2s) Answer phone call Voice call... - Page 24 Button Pressure Brief Long Brief Long Brief Long Brief Long Automatic search for new station (2s) Change station (pre-set stations) (2s) Pre-set station (4s) Answer call Bike-to- Bike Intercom swap (from Bike-to-Bike to Rider-Pillion Passenger)* Connection to...
-
Page 25: Limited Warranty
17. LIMITED WARRANTY With this LIMITED WARRANTY CERTIFICATE, Nolangroup warrants this Product to be free from defects in material and workmanship at the time of its original purchase by the buyer. We invite you to: - Read the cautions pertaining to safety and proper use. - Read the warranty terms and conditions. -
Page 26: Procedure For The Forwarding Of Claims
THAT CAN BE DEROGATED AT THE PARTIES’ WILL; SPECIFICALLY, NOLANGROUP DOES NOT GRANT SPECIFIC WARRANTS OF MERCHANTABILITY OR FITNESS FOR A PARTICULAR PURPOSE. IN NO CASE SHALL NOLAN BE LIABLE FOR INCIDENTAL OR CONSEQUENTIAL DAMAGES INCLUDING BUT NOT LIMITED TO LOST PROFITS OR COMMERCIAL DAMAGES, TO THE FULL EXTENT THOSE DAMAGES CAN BE DISCLAIMED BY THE LAW. -
Page 27: Warranty Registration Form
18. WARRANTY REGISTRATION FORM Product name: Identification code Buyer’s Information Name Last name Address Phone e-mail Dealer’s stamp Date of purchase... - Page 28 Printed on recycled paper B3 - 18/02/2015 17:17:00...
Need help?
Do you have a question about the N-Com B3 and is the answer not in the manual?
Questions and answers