Table of Contents
Advertisement
User Manual
• Safety precautions are intended to protect safety of the user and prevent property damages. Please read this manual and use the
product properly.
• After reading, always furnish this manual in a place that can be accessed by persons using the product.
• As figures used in this manual were drawn for the purpose of explanation, they may be partially different from actual appearance.
• External appearance and specifications of the product are subject to change without notice for quality improvement.
Product warranty is included in the manual.
• This product is subject to treatment of domestic waste and is to be discarded by the user according to the standards on plastic
garbage bag and separate disposal and recycling.
•This product is suitable for household use only.
WF-100W_EU | WF-100B_EU
Smart Wi-Fi Boiler
Smart Wi-Fi Boiler
Advertisement
Table of Contents

Related Manuals for Rinnai WF-100W_EU


Summary of Contents for Rinnai WF-100W_EU
- Page 1 WF-100W_EU | WF-100B_EU Smart Wi-Fi Boiler Smart Wi-Fi Boiler User Manual • Safety precautions are intended to protect safety of the user and prevent property damages. Please read this manual and use the product properly. • After reading, always furnish this manual in a place that can be accessed by persons using the product.
-
Page 2: Table Of Contents
7. When components are lost or damaged as the customer arbitrarily disassembles the product. 8. When the product is damaged from repair or remodeling by a non-service engineer of Rinnai 9. When failure is caused by natural disasters (lightning, fire, storm and flood, gas, salt, earthquake, etc.) - Page 3 Block diagram of Rinnai Wi-Fi boiler Communication network (3G/4G/Internet) 3G/4G/Wi-Fi HOME Wireless router Smart phone Rinnai server...
-
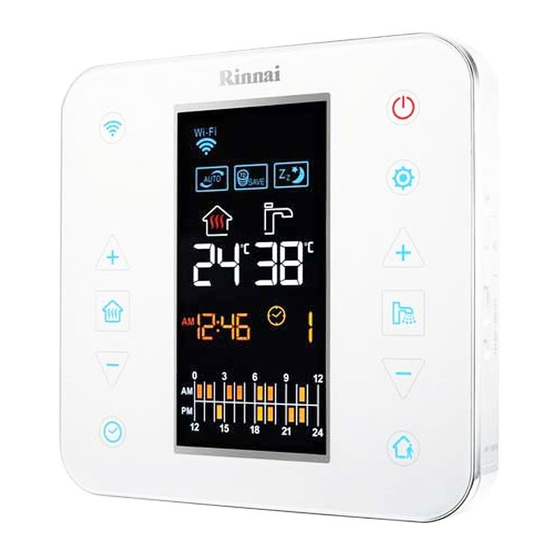
Page 4: Name Of Each Part
Name of each part Indoor temperature controller Buttons Wi-Fi Power Settings Increase heating Increase hot water temperature temperature Heating ON / OFF Hot water ON / OFF Decrease heating Decrease hot water temperature temperature Timer Outing Increase volume Decrease volume Switch heating method... - Page 5 Indoor temperature controller Display part Eco combustion Service mode Wi-Fi Sleep mode Automatic mode Hot water preheating Save mode Heating mode Hot water mode Hot water temperature Heating temperature (setting / current) Combustion Timer mode Time Outing mode Timer setting Components •...
-
Page 6: Precautions For Installation
6. Rinnai Wi-Fi boiler only supports wireless routers with Wi-Fi 2.4Ghz. 7. Rinnai Wi-Fi boiler supports IEEE802.11.b communication protocol. Make sure to check whether the router supports IEEE802.11.b before installation. 8. Only use letters and numbers for the name of Wi-Fi connection (characters like &,%,+,é... -
Page 7: Correct Method Of Use
Correct method of use Indoor temperature controller Turning temperature controller ON / OFF ⓐ ⓑ ⓒ Temperature controller is turned ON to operate the boiler by pressing ⓐ (power) button. Press ⓐ (power) button again to turn temperature controller OFF. To set current time Press ⓑ... - Page 8 To change voice guidance language Press ⓑ(Settings) for 3 seconds with the remote controller switched off. When the current language is displayed in the remote controller, select the voice guidance language by using ⓒ (increase heating temperature or decrease heating temperature) button. Voice guidance is starting.
- Page 9 To change heating methods. The user can choose among two different heating methods. Indoor temperature (Space heating mode) • A temperature sensor attached to remote controller detects temperature of the room to maintain constant indoor temperature. When the user configures temperature inside the room, the boiler operates according to temperature setting.
- Page 10 To use heating ⓑ ⓐ Press ⓐ (heating ON / OFF) button. Heating is ON. et the wanted heating temperature by ⓑ pressing (increase heating temperature or decrease heating temperature) buttons. • The boiler is not operated when current temperature is higher than setting temperature.
- Page 11 To use heating Liquid crystal display when [floor heating] is used Range of temperature setting for floor heating is between 50°C and 80°C. Press ⓐ (heating ON / OFF) button to turn heating OFF. Heating has been turned off. Gas rates can be saved as energy efficiency of the boiler is highest in this mode.
- Page 12 To use rapid heating ⓑ ⓐ Press ⓐ (heating ON / OFF) button. Heating is ON. Press ⓑ (increase heating Liquid crystal display when rapid heating is used with [indoor temperature heating] temperature and decrease heating temperature) buttons at the same time.
- Page 13 To use hot water ⓑ ⓐ Press ⓐ (hot water ON / OFF) button. Hot water is available. Press ⓑ (increase hot water temperature or decrease hot water temperature) buttons to configure hot water temperature. Hot water temperature has changed. Hot water temperature can be set between 35°C and 60°C.
- Page 14 To use hot water When hot water faucet is turned ON, water drop icon flickers together with flame icon. Press ⓐ (hot water ON / OFF) to turn the function OFF. Hot water is disabled. To use hot water at accurate temperature, completely turn the faucet to the hot water side.
- Page 15 To use hot water preheating ⓑ ⓐ Press ⓐ (hot water ON / OFF) button. Hot water is available. Press ⓑ (increase hot water temperature and decrease hot water temperature) buttons at the same time. • Red color appears on the hot water display and preheating is turned ON.
- Page 16 To use modes ⓐ Liquid crystal display when [indoor temperature Press ⓐ (mode / setting) button and heating] is done in auto mode select the mode you want. • Mode is changed as follows whenever ⓐ (mode / setting) button is pressed. Auto Save Sleep...
- Page 17 To use modes Liquid crystal display when [sleep mode] is used Auto Save Sleep mode mode mode Sleep mode is starting. This is convenient function that automatically adjusts indoor temperature for 6 hours after sleep mode is set to provide sound sleep. Sensible temperature felt by the user may differ according to the environment of use.
- Page 18 To use outing ⓑ ⓐ Press ⓐ (outing) button . Liquid crystal display when [Indoor temperature heating] is used with outing Outing mode is enabled. • When the Outing mode is activated heating is stopped for 4 hours and CH set temperature cannot be modified.
- Page 19 To use reservation timer ⓐ ⓑ Set current time (refer to page 7) Press ⓐ (heating ON / OFF) button. Heating is ON. Press ⓑ (timer) button. Heating program is starting. Use ⓑ (timer) button to set the wanted heating program. •...
- Page 20 To use reservation timer ⓓ ⓒ ⓐ ⓑ Press ⓐ (heating ON/OFF) button. Heating is ON. Press ⓑ (timer) button and choose program 4 or 5. Please select heating time. Press ⓒ (increase heating temperature or decrease heating temperature) buttons to move the cursor to the wanted time and press ⓓ...
- Page 21 To use reservation timer Please press ⓑ (Timer) button after time set. Please press ⓒ to set the daytime ⓑ temperature (H) and press to confirm. press ⓒ to set the night Please ⓑ temperature (L) and press to confirm. Boiler will start heating (CH).
- Page 22 To use Wi-Fi ⓐ Press ⓐ (Wi-Fi) button. will flicker and then turn ON. Wi-Fi is connecting. To disable Wi-Fi function, press (Wi-Fi) button again. ⓐ Wi-Fi function will be stopped after is turned OFF. Wi-Fi is disconnected. When the boiler is controlled on a smart phone application, it can only be used when temperature controller is connected to Wi-Fi.
-
Page 23: How To Download Application
How to download application Rinnai Wi-Fi boiler application can be downloaded on Play Store or iPhone App Store by searching with the keyword ‘Mirai’. Mirai application is optimized for iOS and Android. Please check the version of OS on your Mirai smart phone. -
Page 24: Application
Register the user of the Wi-Fi boiler. Enable Wi-Fi connection on your device. Run the application. Read the terms of agreement of ⓐ ⓐ Rinnai app, select ⓐ (Agree), and press ⓑ (OK) button. ⓑ ⓑ Enter ⓐ (Country), ⓑ (Phone number) and press ⓐ... - Page 25 • Registration mode is turned OFF after 4-digit unique ID 10 minutes. • The following letters and numbers can appear on temperature controller. Letters : Numbers : Please run the Rinnai boiler application and choose thermostat ID.
- Page 26 How to register (for Android users) Select the wireless router to be used at home. Enter ⓐ (Password) of the ⓐ ⓐ wireless router set by the user and press ⓑ (OK) button. ⓑ...
- Page 27 Select the item with 4-digit unique ID displayed on temperature controller. 123A • Remote controller item type Rinnai - #### ( 4-digit unique ID) 123A is changed according to each device. 4-digit unique ID Registering... Registration of remote controller has been successfully completed.
- Page 28 If the GPS function of the smartphone is switched off during the registration procedure the GPS Notifications will not be available. Register the user of the Wi-Fi boiler. Run the application. Read the terms of agreement of Rinnai app, select ⓐ (Agree), and press ⓑ (OK) button. ⓐ ⓐ ⓑ...
- Page 29 How to register (for iOS users) Enter ⓐ (Country), ⓑ (Phone number) and press ⓐ ⓐ ⓒ (OK) button. ⓑ However, when ‘Proceed without ⓒ entering phone number’ is selected, you can enter user information on the following page without entering phone number. Enter ⓐ(User nickname), ⓐ...
- Page 30 10 minutes. • The following letters and numbers can appear on temperature controller. Letters : Numbers : Run the Rinnai boiler application and select ID of temperature controller. Press ⓐ (Home) button on your device and then press ⓑ (Setting) button.
- Page 31 Rinnai 12 A A A Rinnai 123A ai_123A A Select the item with 4-digit unique ID displayed on temperature controller. • Type of temperature controller display. Rinnai - ##### ( 4-digit unique ID) ※ 123A is changed according to each device. 4-digit unique ID...
- Page 32 How to register (for iOS users) Return to the application and ⓐ press (OK) button. ⓐ Select the wireless router to be used at home.
- Page 33 How to register (for iOS users) Enter ⓐ (Password) of the wireless ⓐ ⓐ router set by the user and press ⓑ (OK) button. Wi-Fi registration is complete. ⓑ Registering... Temperature controller has been successfully registered.
- Page 34 Login You can use the Wi-Fi boiler after logging in. Enter the password selected ⓐ ⓐ during registration and press Password ⓑ (OK) button. ⓑ ⓑ If password is lost. You can find your password using the question selected during registration.
- Page 35 Login Enter new ⓐ (Password) and ⓐ Type in your password(4~16digts) press ⓑ (OK) button. You may now log in with the new password on the login screen. ⓑ...
- Page 36 How to use heating Heating can be controlled on the user’s device. Press ⓐ (Power) button to turn the ⓐ power of temperature controller ON. Press ⓑ to enter heating ⓓ ⓓ control screen. ⓔ ⓔ ⓕ ⓕ Press ⓒ (Heating) button to start heating.
- Page 37 How to use hot water Hot water can be controlled on the user’s device Press ⓐ (Power) button to turn the ⓐ power of temperature controller Press ⓑ to enter hot water ⓔ ⓔ ⓔ ⓓ control screen. ⓕ ⓕ Press ⓒ...
- Page 38 Reservation timer setting ■ 24-hour timer setting Heating timer can be set for different hours. Press ⓐ (Reservation) button to change timer setting. ⓑ Press ⓑ (24-hour timer) button to select 24-hour timer. Press ⓒ (Setting) button to change timer. •...
- Page 39 Reservation timer setting ■ Weekly timer setting Heating timer can be set for different days of the week. Press ⓐ (Reservation) button to change timer setting. ⓑ Press ⓑ (Weekly timer) button to select weekly timer. Press ⓒ (Setting) button to ⓒ...
-
Page 40: Additional Functions
Additional functions ■ Outing / returning notification Unnecessary boiler operation is reduced during outing and pleasant heating environment is provided by heating the house before returning. Alarm can be turned ON and ⓐ OFF by pressing button ⓐ. Outing/return alarm notification requires GPS function on your smart phone. - Page 41 Additional functions ■ Wake-up mode Pleasant and quick hot water is provided in the tiresome and busy morning. ※ When wake-up mode is set, hot water is automatically preheated 10 minutes before waking up. Press button ⓐ to set wake-up ⓐ...
- Page 42 Additional functions ⓔ can turn alarm function ON / OFF. ⓔ ⓔ ⓔ ⓕ ⓕ ⓕ ⓕ can set volume of alarm sound ⓖ ⓖ ⓖ ⓖ can set alarm sound. ■ User notification Current boiler status is displayed at the wanted time. ⓐ...
- Page 43 Additional functions ■ Status change alarm, Precaution alarm, Error alarm ⓐ Status change alarm is a function that notifies changes in the setting of the boiler made by other users. ⓑ Precaution alarm is a function ⓐ ⓐ that notifies precautions about times for inspection.
- Page 44 Additional functions This function can additionally register boilers at your parents’ house or vacation house on your smart phone. (You can add up to 3 Rinnai Wi-Fi boilers.) New remote controller can be registered by entering the name of new device.
- Page 45 Additional functions Change user information ■ ⓓ ⓓ Change ⓐ (User nickname). • ⓐ ⓐ Change ⓑ (Password). • Enter ⓒ (Current password) and then • ⓑ ⓑ ⓑ enter new password. Once input is done, press ⓓ (OK) • ⓒ...
- Page 46 Additional functions Version You can check the version of the • application. ⓐ Info privacy You can check the privacy of the • application. Press ⓐ (Info Privacy) button. Log out Press ⓐ (Log out) button to go • back to the Log in page. ⓐ...
- Page 47 Matters to be confirmed before reporting of failure When there is a problem in the boiler, check the following matters before requesting a service. Self-diagnostic Matters to be confirmed Measures indication 1. Immediately stop using gas, close the intermediate gas valve, and open all windows and doors for ventilation.
- Page 48 • Clean the heating filter. (Refer to page 18) Incorrect Heating, • Immediately call the technical support service of Rinnai. adjustment of the hot water PCB microswitches. Heating, Abnormal heating •...
- Page 49 • If the same symptom recurs, contact our service center thermistor for service. Malfunction of • Immediately call the technical support service of Rinnai. Heating thermistor return CH Heating, Insufficient hydraulic • Check the pressure gauge on the front panel and follow the...
-
Page 50: Installation
Installation... -
Page 51: Remote Controller Installation
Remote Controller Installation 1. Requirements for an Installation Location. 1) Install a remote controller on the wall at the height of 1.2~1.5m from the floor. Also, the location provides a sufficient clearance for allowing of each access. A living room or a main bed room could be suitable. 2) Improper installation location. - Page 52 3. Mounting the Remote Controller. 1) Mounting the Remote Controller to the Wall Make a hole for the hole plug (ø6.0x depth 35~40mm) on the wall and then, Cement insert the hole plug. wall Flat headed screw Drill a hole to be vertical to the wall. Do not exert too much force.
-
Page 53: Product Specifications
Product specifications t a t Model name Wall-mounted Installation 120(H) X 120(W) X 16.6(D) Dimensions(mm) 229 (Only thermostat) Weight (g) 447 (Total package) DC 12V Power Heating water temperature : 50~80°C / indoor temperature : 5~40°C Heating Temperature adjustment Hot water 35~47°C adjusted by 1°C and above 50°C is adjusted to 50, 55 and 60°C Power Consumption (W) 3.5 (Only thermostat) - Page 54 Memo...
- Page 55 Memo...
- Page 56 ver.161214...
Need help?
Do you have a question about the WF-100W_EU and is the answer not in the manual?
Questions and answers