HP MSM720 Quick Start Manual
Hide thumbs
Also See for MSM720:
- Installation manual (33 pages) ,
- Specification (27 pages) ,
- Datasheet (16 pages)
Advertisement
This Quickstart shows you how to install the MSM720 Controllers. This information applies to the MSM720 Access Controller (J9693A, J9695A) and the MSM720
Premium Mobility Controller (J9694A, J9696A). These products are hereafter referred to as controller. The controller works with HP access points to deliver a
high-performance networking solution. For additional installation information, and instructions on how to initially configure the controller, see the HP MSM720
Controllers Installation Guide, available at www.hp.com/support/manuals.
Hardware overview
1
2
3
5
6
7
8
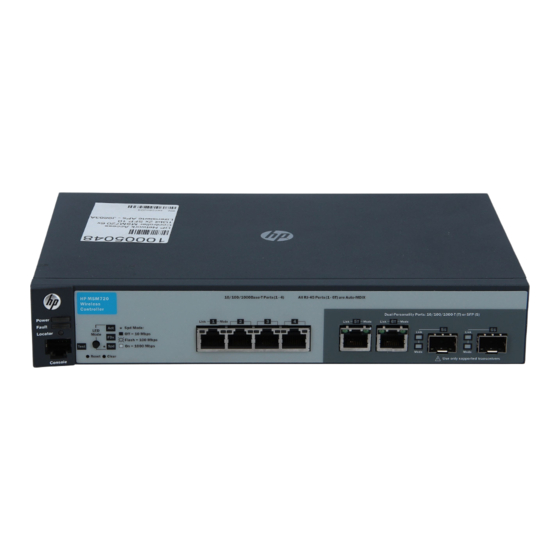
MSM720 front panel
1: Power, Fault, and Locator LEDs
2: LED Mode select button and Mode Indicator LEDs
3: Four 10/100/1000 access network ports
4: Two dual-personality Internet network ports
5: Console port
6: Test LED
7: Reset and Clear buttons
8: Port LEDs: Link (left) and Mode (right)
Package contents
Controller, power adapter and cord, console cable, four mounting brackets,
eight bracket screws, four rubber feet, and documentation.
LEDs
There are three types of LEDs: Status LEDs (labeled 1 and 6 in the graphic),
Port LEDs (8), and Port LED Mode indicators (2).
HP MSM720 Controllers Quickstart
4
Reset and Clear buttons
The Reset and Clear buttons are accessible (with a paper clip) on the
controller front panel (labeled 7 in the image to the left).
•
To reset the controller, either power cycle it or press and release the Reset
button.
•
To reset the controller to factory defaults, press and quickly release the Reset
button, and then immediately press and hold the Clear button until the LEDs
above the Clear button flash three times.
Ports
Controller console port: A standard serial port with an RF-45 connector. To
connect to a computer, use the supplied DB-9 to RJ-45 console cable.
Access network: Four auto-sensing 10/100/1000 Base-T ports with the
Auto-MDX feature. You can use either straight-through or crossover
twisted-pair cables to connect network devices to the controller.
Internet network: Two dual personality ports for either 10/100/1000 Base-T
RJ-45(Auto-MDX) uplinks or optional SFP slots for fibre uplinks.
Advertisement
Table of Contents

Related Manuals for HP MSM720


Summary of Contents for HP MSM720
-
Page 1: Hardware Overview
HP MSM720 Controllers Quickstart This Quickstart shows you how to install the MSM720 Controllers. This information applies to the MSM720 Access Controller (J9693A, J9695A) and the MSM720 Premium Mobility Controller (J9694A, J9696A). These products are hereafter referred to as controller. The controller works with HP access points to deliver a high-performance networking solution. -
Page 2: Installation
MSM720 Controllers Quickstart Important information to read before installing Important information to read before installing Installation Country of use: Some versions of the controller require the installer to select Prepare the installation site: the country of operation during set up. When the country is set, the unit... - Page 3 Note: Optional accessories must be mounted at the same time as the The network ports must be facing up. Do not mount the controller Caution: mounting brackets. For more information, see the MSM720 Controllers with ports facing down. Installation Guide.
-
Page 4: Status Leds
(orange) sequence. • The port has been disabled through the On for three seconds at power up or controller console, the web browser reset. interface, HP Manager, or other network Locator services <slot-id> management tool (blue) command was issued to... -
Page 5: Port Mode Led
Manufacturing Date – The manufacturing date is included in the product serial expense. number, CCYMPPPZZZ (HP serial number format for this product). The manufacturing date is indicated by YM in the serial number, where Y indicates the year counting from within each new decade, with 2010 as the starting point, and M is the month when the unit was manufactured. - Page 6 MSM720 Controllers Quickstart LEDs Дата изготовления – Дата изготовления включена в серийный номер изделия, CCYMPPPZZZ (формат серийного номера HP для данного изделия). Дата изготовления указана как YM в серийном номере, где Y соответствует году с началом отсчета в каждом новом десятилетии, начиная с 2010, а M соответствует...
Need help?
Do you have a question about the MSM720 and is the answer not in the manual?
Questions and answers
I'd like to add a secondary radius server. I need to reboot ?