Millenium Slow Stick X Assembly Instructions Manual
Hide thumbs
Also See for Slow Stick X:
- Assembly manual (12 pages) ,
- Assembly instructions manual (9 pages)
Advertisement
Quick Links
Millennium RC presents...
The New and Improved
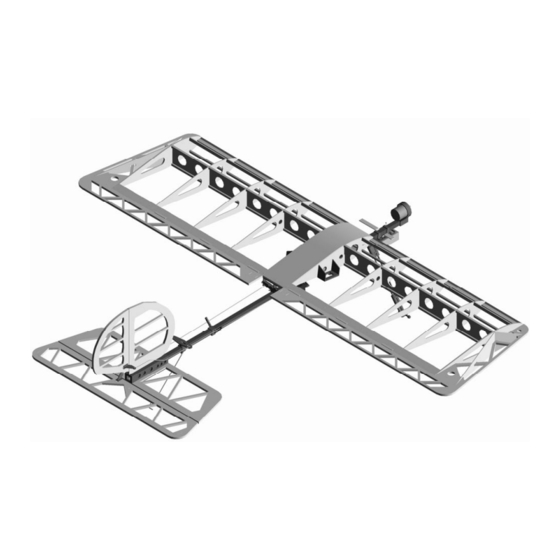
SSX – X-Trainer Build Kit
Wing span: Approx. 42"
Wing Area: 504 sq. in.
Wing Loading: 6.71 oz/ sq. ft.
Introduction:
The Slow Stick X and X-Trainer airplanes are available either as a complete kit which includes all of the
fuselage components or as "short kit" upgrade to the GWS Slow Stick
™. The "short" kit replaces the original Styrofoam wing and tail surfaces of the Slow Stick to a more robust
balsa-constructed design, complete with ailerons and a full symmetrical wing, allowing the Slow Stick to
become a fully aerobatic model aircraft. This wing and tail are designed to easily attach to your existing stick
fuselage. This build kit can be built either as a Slow Stick X™ (with the straight wing) or as the X-
Trainer™ (with a dihedral wing). The Slow Stick X is also available as a pre-built and covered ARF.
Adult supervision recommended for children 15 and under. R/C Airplanes should be flown following safety
guidelines provided by the AMA (Academy of Model Aeronautics).
CAUTION: This is not a toy!
Recommendations:
1. Read through each step before starting assembly.
2. After removing all the pieces from packaging, inspect to make sure there are no broken or missing parts.
3. Check off each completed step to help keep from losing your place.
4. Cover the work table with plastic wrap to protect from glue.
(now even easier to build and cover!)
Electric ARF Park Flyer Airplane Kit
™
Advertisement

Related Manuals for Millenium Slow Stick X

Summary of Contents for Millenium Slow Stick X
- Page 1 This wing and tail are designed to easily attach to your existing stick fuselage. This build kit can be built either as a Slow Stick X™ (with the straight wing) or as the X- Trainer™...
- Page 2 Slow Stick X™ or X-Trainer™ Wing/Tail Build Kit Assembly Instructions Rev. 14 List of Provided “Short Kit” Parts: The Slow Stick X and the X-Trainer are also (“Short Kit” is intended for those who are wishing to upgrade available as a Build Kit Bundle (complete kit)
-
Page 3: Wing Assembly
IMPORTANT: DO NOT GLUE UNTIL INSTRUCTED TO DO SO! NOTE: These instructions include steps for Step-3: Install but do not glue SC1 assembly. building the wing either as a straight-wing Slow The small holes in SC1 and SC2-A/B should Stick X OR the dihedral wing X-Trainer. line-up. - Page 4 Step-6: Install, DO NOT glue TE (trailing Step-9: Install end rib W4. Square W4 to LE edge) assembly to ribs. Parts are delicate at this and TE then glue to TE and LE only. point. Step-10: CAUTION! DO NOT install W1A upside down.
- Page 5 Step-11: Glue LE-B top and bottom in place. Keep trailing edge straight while gluing with thin CA. Tip! Scotch Tape and Packing tape are great for keeping the parts from gluing to the work surface. Step-14: Glue wing hinge sockets in place. Be sure to align the center markings with the edge of TE-A.
- Page 6 Step-16: Install DO NOT glue WT1 and Step-19: Round-off leading edge and tip of WT2. wing. Leave trailing edge flat, but sand flush TE-A and TE-B. Step-20: Sand 3/16 Square leading edge piece flush with Part LE so that plywood part P1 sits Step-17: Glue wing tip assembly to W4 wing flat.
- Page 7 Step-22: Build two aileron servo blocks from Step-24: Glue P2 and P4 in place on one wing parts P3 and P5. At this time, go ahead and half. Use slow drying glue on P2 such as complete the other wing half. Be sure to make epoxy.
- Page 8 Step-26: Build two aileron frames from 19- Step-29: Cut covering at hinge slots on the 1/2” cut stick (See Step-25), A1, A2 and pre cut wing and ailerons and insert CA hinges. Use a aileron leading edge pieces. Note hinge slots pin pushed through the center of the hinge to are pre cut and need to be positioned on the keep it from pushing all the way through while...
- Page 9 a template. 3/16” square sticks for the stabs were cut in step 25. Note that S3 is a Stack made up of S3A and S3B. The plywood piece S3A needs to be on the bottom of the horizontal stab. Bevel the leading edge of the rudder and elevator.
-
Page 10: Fuselage Assembly
location. Do NOT add weight to balance the aircraft. Move the wing back if the model is tail heavy or forward if it is nose heavy. Ultimately you want the length between the wing and tail to be maximized. More advanced pilots can move further back... -
Page 11: Final Assembly
Slide the two servo mounts down about an inch from the rear wing saddle mount. Now slide the front wing saddle mount, approximately 5 ½” down from the front. Install the servos, as per servo manufacturer instructions, using servo manufacturer- provided hardware. -
Page 12: Control Throws
Millennium R/C 12859 Lower River Blvd. Orlando, FL 32828 Phone: 407-208-9745 Fax: 866-799-2372 E-mail: Service@millenniumrc.com www.millenniumrc.com www.FlyERC.com For updates and tips, visit the Slow Stick X or X- Trainer Build Thread on RC Groups: www.rcgroups.com/forums/showthread.php?t=646592...
Need help?
Do you have a question about the Slow Stick X and is the answer not in the manual?
Questions and answers