
Related Manuals for Bushnell 119432CW


Summary of Contents for Bushnell 119432CW
- Page 1 119432CW 119422CW Digital Trail Camera w/Night Vision Instruction Manual Model#: 119422CW / 119432CW 04-14...
-
Page 3: Table Of Contents
Page Index Introduction Parts & Controls Guide Battery and SD Card Installation About the Setup Menu Using the Setup Menu SETUP MENU REFERENCE TABLE 10-12 Camera Operation Mount the Camera Power on the Camera Test the Coverage Area Secure the Camera Viewing the Photos and Videos Glossary Technical Specifications... - Page 4 Congratulations on your purchase of one of the best Trail Cameras on the market! Bushnell is very proud of this camera and we are sure you will be pleased with it as well. We appreciate your business and want to earn your trust.
-
Page 5: Introduction
INTRODUCTION Congratulations on your purchase of the Bushnell 119422CW/119432CW Digital Trail Camera. This camera is designed to record human or animal activity in the outdoors with its still image and movie modes and weatherproof, rugged construction. Your Trail Cam features a compact, portable size and an extra long battery life. -
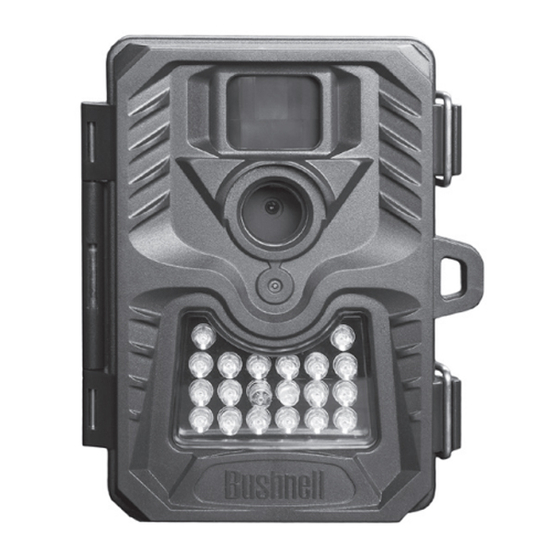
Page 6: Parts & Controls Guide
Parts and Controls Guide PIR Motion Sensor Camera Lens Padlock Hole Infrared LED Array Tripod Socket Front of Camera Light Indicator Sensor (Setup Mode Only IR LED Array Detail... -
Page 7: Parts & Controls Guide
Parts and Controls Guide USB Port Display Power Switch SD Card Slot Battery Compartment Control Panel (Front Unlatched & Opened) Control Panel Detail... -
Page 8: Battery And Sd Card Installation
Do not mix battery types-use ALL lithium or ALL alkaline. Rechargeable batteries are not recommended. Memory Your 119422CW/119432CW Digital Trail Camera has a memory card slot, to accept SD cards up to 32GB max. capacity (sold separately). Inserting an SD card •... -
Page 9: About The Setup Menu
ABOUT THE SETUP MENU Slide the power switch to the On position. You’ll see “WAIT” on the display, then the setup menu screen. Before you start using the camera, you’ll no doubt want to set the date/time so they are imprinted correctly on your photos, and maybe change the trigger delay time and image resolution to your preferences. -
Page 10: Setup Menu Reference Table
The following table lists all of the menu items, their available settings, and a description of their functions: Menu Item Description Settings (Bold=default) Date Press OK and use the UP/DOWN set year, month, and day keys to change the year setting, then press OK again and repeat these steps to also set the current month and day. - Page 11 Menu Item Description Settings (Bold=default) Mode 5M, 7M (with Select “Mode” and press OK. Use UP/DOWN to select 1P (single Mode set to 1P or 3P for photo), 3P (burst of 3 photos), or Movie (video mode). Press OK. photos), Use UP/DOWN to set LO (5MP) 5-60 Sec (in Movie (video)
- Page 12 Menu Item Description Settings (Bold=default) Duty Press DOWN after Format to (this sets the (NOTE: setting to “Y” select “Duty”. Setting window “Overwrite” reads “OVR”. Press OK. Select not recommended feature) when using SD cards “Y” (Yes) if you want the oldest of 16GB or higher photos/videos to be replaced by capacity)
-
Page 13: Camera Operation
PIR sensor is triggered, it will start to take photos immediately after the delay time (as set) has passed. 3. Test the Coverage Area One of 119422CW/119432CW Trail Camera’s most useful features is the ability to test the coverage area. • After mounting the camera, open the front housing and slide the Power switch to the “ON”... -
Page 14: Secure The Camera
CAMERA OPERATION (continued) mode-the camera will be “sleeping” and waiting for the PIR sensor to trigger the first photo or video capture. 4. Secure the Camera A standard padlock may be used in the camera’s lock hole to secure it and prevent theft. -
Page 15: Viewing The Photos And Videos
VIEWING THE PHOTOS and VIDEOS After your camera has been operating for awhile, you will of course want to review the photos and/or videos it has been capturing. This can be done by either of two methods, according to your preference or the availability of accessory equipment: Using an SD Card Reader Push the SD card in slightly to release it then pull it out gently. -
Page 16: Glossary
GLOSSARY PIR (Passive Infrared Sensor): Senses motion like a typical security motion detector. Requires infrared energy (heat) in addition to motion to trigger the sensor to help limit detection to live subjects (rather than leaves, etc). Camera Delay: Time elapsed between photos while events are sensed and recorded. -
Page 17: Technical Specifications
Technical Specifications Model Number 119422CW/119432CW Image Sensor Type 1/2.5 inch CMOS Effective Resolution 5.0 Megapixels (sensor resolution) Effective Focal Length 7.6 mm Lens Aperture f/2.8 IR Filter Automatic IR Filter Display LCD (monochrome, text/graphics only) PIR Sensor Trigger Speed 1.0 second... -
Page 18: Troubleshooting/Faq
Setup mode while in the field. Make sure that you are using a good quality name brand SD card in your camera. Bushnell recommends SanDisk® brand SD Cards up to 32GB. Our experience indicates that poor quality SD cards can sometimes reduce your Trail Cam battery life. - Page 19 Troubleshooting / FAQ Camera won’t power up Make sure that you have installed all 4 batteries in the battery compartment. Bushnell recommends using 4 Energizer® Lithium AA batteries in this Trail Cam. Make sure that the batteries are installed correctly, observing proper polarity.
- Page 20 If this is seen on a consistent basis, then the sensor may need servicing. Please contact Bushnell customer service. 7. Short video clips—not recording to the length set a. Check to make sure that the SD card is not full.
-
Page 21: Troubleshooting/Faq
Troubleshooting / FAQ Camera won’t retain settings Make sure that you have been saving the changes to any parameter settings that you made while in Setup mode, by pressing “OK” after changing the setting. If you don’t save your new setting after changing it, the camera will continue to use the original default setting for that parameter. - Page 22 Overland Park, Kansas 66214 Richmond Hill, Ontario L4B 2M9 For products purchased outside the United States or Canada please contact your local dealer for applicable warranty information. In Europe you may also contact Bushnell at: Bushnell Germany GmbH European Service Centre Mathias-Brüggen-Str.
- Page 23 · Consult the dealer or an experienced radio/TV technician for help. The device does not contain any user-serviceable parts. Repairs should only be made by an Authorized Bushnell repair center. Unauthorized repairs or modifications could result in permanent damage to the equipment, and will void your warranty and your authority to operate this device under Part 15 regulations.
- Page 24 For further questions or additional information please contact: Bushnell 9200 Cody, Overland Park, Kansas 66214 (800) 423-3537 • www.Bushnell.com ©2014 B.O.P.
Need help?
Do you have a question about the 119432CW and is the answer not in the manual?
Questions and answers