
Related Manuals for Bushnell CELLUCORE 24


Summary of Contents for Bushnell CELLUCORE 24
- Page 1 CELLUCORE 24 TRAIL CAMERA INSTRUCTION MANUAL CELLUCORE 24 MODEL # 119906A (AT&T) / 119906V (VERIZON)
- Page 2 WELCOME Welcome to your Bushnell Trail Camera! This manual has all the instructions you need to set up your camera and your account, plus quick answers to your questions. If your camera does not seem to be functioning properly or if you are having image quality issues, please check the Troubleshooting Tips section.
-
Page 3: Table Of Contents
TABLE OF CONTENTS Camera Overview Viewscreen Indicator Guide Quick Start Guide Settings Menu Mounting & Positioning Using An External Power Source Frequently Asked Questions Technical Specifications Two-Year Limited Warranty... -
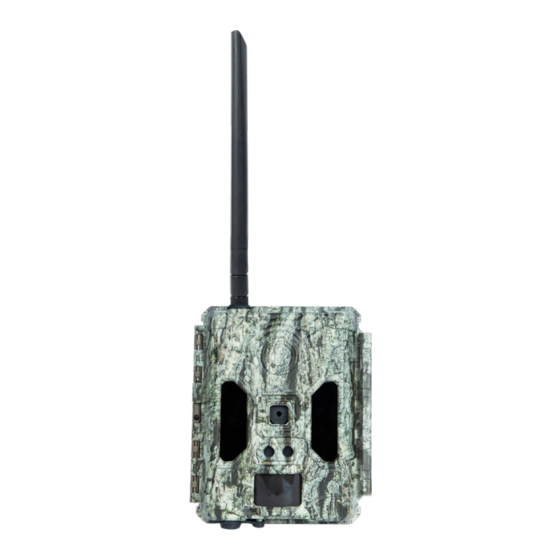
Page 4: Camera Overview
CAMERA OVERVIEW Antenna Control Panel Cover LED IR Flash Lens Latch Motion Light Sensor Indicator PIR Sensor DC In (For optional solar panel accessory) - Page 5 SD Card Slot SD Card not included Lock Hole Battery Tray Battery Panel Door View Screen Ok Button Left Power On/Off Down Right Menu...
-
Page 6: Viewscreen Indicator Guide
SD Card Inserted Battery Life Countdown Timer QUICK START GUIDE 1. Download the free Bushnell Trail Camera app on your smartphone from the App Store (iPhone®) or Google Play® (Android®). 2. Open the app, then sign in or create a new account. - Page 7 “+” to add a new camera. Scan the QR code on the veiw screen of your Cellucore 24 or manually or enter its serial # to associate this camera with your account.
- Page 8 be easily changed to suit your individual preferences or application (for example, if you would rather capture videos, or photos at a different resolution, spaced further apart), using the app on your smartphone or home computer. 7. Prior to closing the camera, Camera signal ensure the camera has acquired cellular signal.
-
Page 9: Settings Menu
SETTINGS MENU (Check your app for these settings) Time and Date Sets the hour (24-hr format only, “00”=midnight, “12”=noon), minute, year, month, and date. Mode Selects the format your camera will record in. Camera: For photos only. Hybrid: A photo (multiple photos, if NUM PICS is set >1) followed by a video clip will be captured for each PIR trigger event. - Page 10 Camera Name Allows you to enter a name for your camera that will appear on the image time stamp. Press the OK button to choose “Input” and go to the name input screen. If necessary, select the arrow in the upper right of the keyboard to erase the current camera name, then enter the new name using the arrow buttons and keyboard.
- Page 11 PIR Delay Selects the length of time that the camera will “wait” until it responds to any additional triggers from the PIR. Settings begin with 5 second default when parameter is first selected. To choose other intervals, press OK, and select by using the arrow buttons.
- Page 12 Work Mode Allows you to select when the camera is active. Day only, Night only, or 24 hours. Format Execute This will format the SD card in the camera, erasing ALL images and data from the SD card. Field Scan Allows you to capture images without requiring a trigger during a specified time period and interval.
- Page 13 Image Recycle On: Replaces the oldest images on the SD card with the newest when the card is full. Off: Does not replace any images on the SD card. If the SD card is full it will stop saving images. Wireless On/Off Activates/Deactivates the cellular communication functionality of the...
-
Page 14: Mounting & Positioning
MOUNTING & POSITIONING After you’ve set up the camera’s settings to your preferences, you’re ready start capturing images. We recommend mounting the camera on a sturdy tree or post with a diameter of about 6”. To get the optimal picture quality, the camera should be about 16-17 ft. - Page 15 • Using the tripod socket: The camera is equipped with a socket at the back (below the strap brackets) to enable mounting on a tripod or other camera mounting accessories that have a standard 1/4”-20 thread.
-
Page 16: Using An External Power Source
(Power accessory not included) Connect the optional (119986C) Accessory Solar Panel (please visit www.bushnell.com for more information) to the “DC In” jack at the bottom of the camera (other external power supplies should not be used, as the camera and/ or display may not function correctly). - Page 17 have multiple devices logged into the same account but only one e-mail address per account. If you wish to share your photos with others you will need to share the account log in information with them. Q: How do I delete photos on my account? There are several ways to delete images.
-
Page 18: Technical Specifications
ACCESSORIES Q: Do you have a solar panel for my camera? Yes, the 119986C solar panel is compatible with ALL Bushnell cellular trail cameras. TECHNICAL SPECIFICATIONS Lens: F = 2.8; FOV=55°; Auto IR-Cut-Remove (at night) Picture Size 16:9 format : 24MP(6528x3672);... -
Page 19: Two-Year Limited Warranty
TWO-YEAR LIMITED WARRANTY Your Bushnell® product is warranted to be free of defects in materials and workmanship for two years after the date of purchase. In the event of a defect under this warranty, we will, at our option, repair or replace the product, provided that you return the product postage prepaid. - Page 20 140 Great Gulf Drive, Unit # B Vaughan, Ontario L4K 5W1 For products purchased outside the United States or Canada please contact your local dealer for applicable warranty information. In Europe you may also contact Bushnell at: Bushnell Germany GmbH European Service Centre Mathias-Brüggen-Str. 80 D-50827 Köln...
- Page 21 Contains FCC ID: 2ASQI-KW881 Note: This Bushnell Wireless Camera is not designed or intended for operation or sale outside of North America. This product features technology licensed from Zipit...
- Page 22 Zipit Wireless, Inc. Copyright 2003-2020 Zipit Wireless, Inc. All rights reserved. Access to the Zipit services may be bound by EULA and Privacy policies located at www. bushnell.com or www.zipitwireless.com/legal. FOR END USER LICENSE AGREEMENT AND TERMS/ CONDITIONS OF USE, PLEASE VISIT WWW.WIRELESSTROPHYCAM.COM...
- Page 24 For further questions or additional information please contact: Bushnell Outdoor Products 9200 Cody, Overland Park, Kansas 66214 (800) 423-3537 | www.bushnell.com ©2021 Bushnell Outdoor Products...
Need help?
Do you have a question about the CELLUCORE 24 and is the answer not in the manual?
Questions and answers