Advertisement
ATTACH YOUR RECEIPT HERE
Serial Number _______________ Purchase Date ______________
Questions, problems, missing parts? Before returning to your retailer, call our customer
service department at 1-866-994-4148, 8 a.m. - 6 p.m., EST, Monday - Thursday,
8 a.m. - 5 p.m., EST, Friday.
AB1420
TM
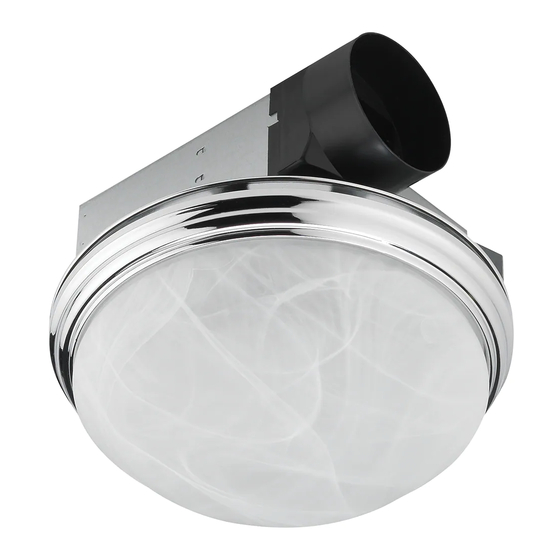
DECORATIVE
VENTILATION FAN
MODEL #7105-03-L
ITEM #0553447
Français p. 13
Español p. 25
Lowes.com
Advertisement
Table of Contents

Related Manuals for Utilitech 7105-03-L


Summary of Contents for Utilitech 7105-03-L
- Page 1 ITEM #0553447 DECORATIVE VENTILATION FAN MODEL #7105-03-L Français p. 13 Español p. 25 ATTACH YOUR RECEIPT HERE Serial Number _______________ Purchase Date ______________ Questions, problems, missing parts? Before returning to your retailer, call our customer service department at 1-866-994-4148, 8 a.m. - 6 p.m., EST, Monday - Thursday, 8 a.m.
-
Page 2: Table Of Contents
TABLE OF CONTENTS Product Specifications ........................2 Package Contents ..........................3 Safety Information ..........................4 Preparation ............................5 New Construction Assembly Instructions ...................6 Existing Construction Assembly Instructions ..................8 Care and Maintenance ........................10 Troubleshooting ..........................12 Warranty ............................12 PRODUCT SPECIFICATIONS SPECIFICATIONS SPECIFICATIONS Airflow: 70 CFM Power consumption: 47 W 120 V, 60 Hz Exhaust fan speed: 1,560 RPM Duct diameter: 3 in. -
Page 3: Package Contents
PACKAGE CONTENTS PART DESCRIPTION QUANTITY PART DESCRIPTION QUANTITY Fan body 4 in. duct connector Glass globe 3 in. duct connector Decorative pan HARDWARE CONTENTS (shown actual size) Long Wood Short Machine Screw Screw Qty. 4 Qty. 2 Lowes.com... -
Page 4: Safety Information
SAFETY INFORMATION Please read and understand this entire manual before attempting to assemble, operate or install the product. Always disconnect the power supply prior to servicing the fan, motor or junction box. Installation work must be carried out by a qualified person(s) in accordance to all local and safety codes including the rules for fire-rated construction. -
Page 5: Preparation
PREPARATION Before beginning assembly of product, make sure all parts are present. Compare parts with package contents list and hardware contents list. If any part is missing or damaged, do not attempt to assemble the product. Estimated Assembly Time: 30 minutes Tools Required for Assembly (not included): Hammer, Drill Bits, Flathead Screwdriver, Wire Nuts, Nails, Duct Tape, Phillips Screwdriver, Utility Knife Helpful Tools (not included): Electric Drill, Wood Screws... -
Page 6: New Construction Assembly Instructions
NEW CONSTRUCTION ASSEMBLY INSTRUCTIONS NEW CONSTRUCTION – ATTACHING TO THE JOIST BEFORE INSTALLATION Turn off power source. Review all safety precautions. 1. Place the fan body (A) next to a ceiling joist or wall stud. The fan housing should be level and perpendicular to the joist or stud. - Page 7 NEW CONSTRUCTION ASSEMBLY INSTRUCTIONS 4. Install a circular 4 in. or 3 in. duct (not included) and secure it with duct tape or clamps (neither included). Finish ceiling work. Ceiling hole should be aligned with edge of fan body (A). 5.
-
Page 8: Existing Construction Assembly Instructions
EXISTING CONSTRUCTION ASSEMBLY INSTRUCTIONS Installing the fan body in an existing building REQUIRES AN ACCESSIBLE AREA (attic or crawl space) above the planned installation location and existing duct and wiring. BEFORE INSTALLATION Turn off power source. Review all safety precautions. 1. - Page 9 EXISTING CONSTRUCTION ASSEMBLY INSTRUCTIONS 5. Mount fan body to the joist or stud using long wood screws (AA) where indicated by arrows outside fan body (A). Hardware Used Long wood screws 6. Pull wire through hole (5.1) and into junction box (not included).
-
Page 10: Care And Maintenance
EXISTING CONSTRUCTION ASSEMBLY INSTRUCTIONS 9. Install two 40 watt candelabra bulbs (not included), or two E12 13 watt bulbs (not included). 10. Mount glass globe (B) to decorative pan (C). Place glass globe (B) against decorative pan (C) and align indentation in glass globe (B) with nubs on decorative pan (C). - Page 11 CARE AND MAINTENANCE 2. Wash and clean the glass globe (B) in a sink and dry with a cloth. 3. Remove dust and dirt from the fan body (A) with a vacuum cleaner. 4. Dampen cloth with dish detergent, wipe the fan body (A) and dry with a cloth.
-
Page 12: Troubleshooting
Inquiries regarding warranty claims can be directed to 1-866-994-4148, 8 a.m. - 6 p.m., EST, Monday - Thursday, 8 a.m. - 5 p.m., EST, Friday. Printed in China Utilitech & UT Design ® is a registered trademark of LF, LLC. All rights reserved.
Need help?
Do you have a question about the 7105-03-L and is the answer not in the manual?
Questions and answers
We broke the globe in our 7105-03-L light. Where can I get a replacement?
Glass globe and decorative pan are needed. Are they available, please?