Advertisement
Ordering Replacement Parts
To order replacement parts, simply call our Customer Service Department toll-free at 1-800-999-3756, Monday
through Friday, 6 a.m. until 6 p.m. Mountain Time (excluding holidays). To help us assist you, please be pre-
pared to give the following information when calling:
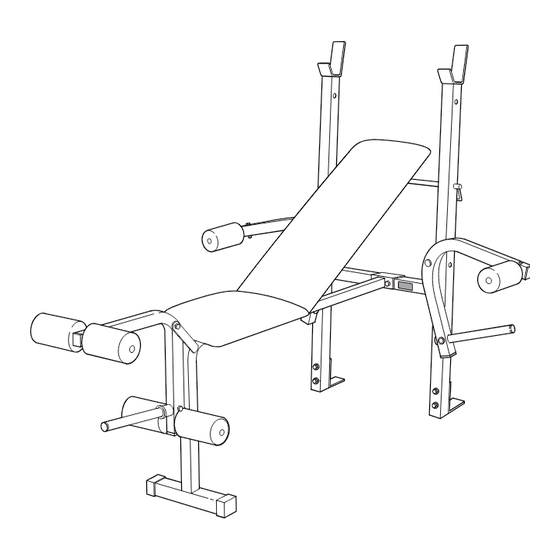
1. The MODEL NUMBER of the product (WEBE13871).
2. The NAME of the product (WEIDER
®
138 Weight Bench).
3. The SERIAL NUMBER of the product (see the front cover of this manual).
4. The KEY NUMBER and DESCRIPTION of the desired part(s) (see page 14 of this manual).
Part No. 150791 H03664-C R1098A
Printed in Canada © 1998 ICON Health & Fitness, Inc.
Model No. WEBE13871
Serial No.
Write the serial number in the space
above for reference.
Serial Number Decal
QUESTIONS?
As a manufacturer, we are com-
mitted to providing complete
customer satisfaction. If you have
questions, or find that there are
missing or damaged parts, we
will guarantee you complete sat-
isfaction through direct assis-
tance from our factory.
TO AVOID UNNECESSARY
DELAYS, PLEASE CALL DIRECT
TO OUR TOLL-FREE CUSTOMER
HOT LINE. The trained techni-
cians on our customer hot line
will provide immediate assis-
tance, free of charge to you.
CUSTOMER HOT LINE:
1-800-999-3756
Mon.–Fri., 6 a.m.–6 p.m. MST
CAUTION
Read all precautions and instruc-
tions in this manual before using
this equipment. Save this manual
for future reference.
PATENT PENDING
USER'S MANUAL
Advertisement
Table of Contents

Subscribe to Our Youtube Channel
Related Manuals for Weider 138


Summary of Contents for Weider 138
- Page 1 Friday, 6 a.m. until 6 p.m. Mountain Time (excluding holidays). To help us assist you, please be pre- pared to give the following information when calling: 1. The MODEL NUMBER of the product (WEBE13871). 2. The NAME of the product (WEIDER ® 138 Weight Bench).
-
Page 2: Table Of Contents
This warranty gives you specific legal rights. You may also have other rights which vary from state to state. ICON HEALTH & FITNESS, INC., 1500 S. 1000 W., LOGAN, UT 84321-9813 WEIDER is a registered trademark of ICON Health & Fitness, Inc. -
Page 3: Important Precautions
Part List - Model No. WEBE13871 Important Precautions R1098A Key No. Qty. Description Key No. Qty. Description WARNING: To reduce the risk of serious injury, read the following important precautions before using the weight bench. “H”-Frame 1 3/4” Square Inner Cap Main Frame Fly Arm Stabilizer... -
Page 4: Before You Begin
® 138 Weight Bench WEIDER ® 138 Weight Bench (see the front cover of will help you to achieve the specific results you want. this manual). For your benefit, read this manual carefully before Before reading further, please review the drawing using the WEIDER ®... -
Page 5: Part Identification Chart
for 3 minutes after each set if you are doing a muscle STAYING MOTIVATED Part Identification Chart - Model No. WEBE13871 R1198A building workout, 1 minute after each set if you are doing a toning workout, and 30 seconds after each For motivation, keep a record of each workout. -
Page 6: Assembly
Assembly Exercise Guidelines THE FOUR BASIC TYPES OF WORKOUTS PERSONALIZING YOUR EXERCISE PROGRAM Before beginning assembly, carefully read the THE FOLLOWING TOOLS (NOT INCLUDED) ARE following information and instructions: REQUIRED FOR ASSEMBLY: • Muscle Building We have not specified an exact length of time for each workout, or a specific number of repetitions or •... -
Page 7: Adjusting The Weight Bench
3. Be sure that the “H”-Frame (1) is oriented as Adjusting the Weight Bench High Side of shown. The high side of the weight rests must be Weight Rests on the side indicated. Attach the Main Frame (2) to the “H”-Frame (1) with two 5/16” x 2 1/4” Bolts (16) The steps below explain how the weight bench can be adjusted. - Page 8 7. Attach one Backrest Bracket (5) to the Backrest (6) 11. Press two 3/8” Plastic Sleeves (37) into the “H”- with two 1/4” x 3/4” Screws (13). Be sure the Frame (1) as shown. Backrest Bracket is oriented as shown. Attach the other Backrest Bracket to the Backrest with one Lubricate a 3/8”...
Need help?
Do you have a question about the 138 and is the answer not in the manual?
Questions and answers