Table of Contents
Advertisement
Available languages
Available languages
Quick Links
TwinTalker 6000
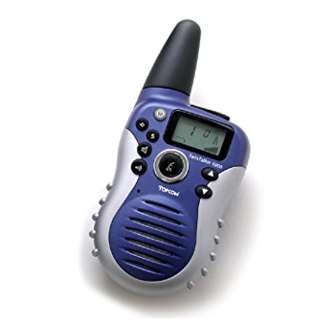
10
9
11
2
4
3
1
User Guide
2.3. Desktop charger
The desktop charger provides drop-in charging conveniency
1. Put the desktop charger on a flat surface.
2. Plug one end of the supplied adapter into the electric socket and the other
end into the connector on the backside of the desktop charger.
3. Put the radio in the charger as indicated.
4. The charging LED will turn on if it's properly inserted and charging.
5. It will take about 8 to 10 hours to fully charge the batteries
3. LCD SCREEN
a. RX icon. Displayed when receiving a signal.
i
d
a
b. TX icon. Displayed when transmitting a signal.
c. Displays the current VOLUME LEVEL.
d. CTCSS code. Changes from 1 to 38 as
selected by user.
b
e. Displayed during the CHANNEL SCAN mode.
f
f. Displays during the VOX mode.
g. Button lock symbol
h. The current battery level charge.
i. Channel number. Changes from 1-8 as
h g e c
selected by user.
4. GETTING STARTED
4.1. Turning the Unit ON/OFF
To activate; press and hold the POWER button
LCD Screen will display the current channel.
To switch off; press and hold the POWER
and the LCD Screen will turn blank.
6
5
7
8
12
U8006155/1
. The unit will "beep" and the
button again. The unit will "beep"
1. DESCRIPTION
(see front cover)
1. Microphone
2. Monitor button
3. Talk button
4. Call button
5. Ear/mic/connector
6. Antenna
2. INSTALLATION
2.1. Removing/Installing the Belt Clip
1. To remove the clip from the unit, push up on the belt clip (2) while pulling
the clip tab (1).
2. When re-installing the belt clip, a click indicates the BeltClip is locked into
position.
2.2. Battery Installation
1
2
3
4
1. Remove the belt clip (2).
2. Pull the Battery Cover Tab (4) and remove the Battery Cover (3).
3. Install the battery Pack.
Ensure the metal contacts on the site of the battery are facing outwards from
the radio to connect with the contact on the battery door.
4. Re-install the Battery Cover (3) and Belt Clip (2).
Note: Instead of the supplied battery pack, the TT6000 can be used with
3xAAA standard rechargeable batteries. Follow the polarity as shown when
installing. You are not able to use the desktop charger with standard recharge-
able AAA batteries installed
Important :
Dispose of the batteries at a designated battery disposal unit and not in
the household waste.
Remove the batteries when you do not use your radio for a longer period.
Do not try to diassemble the battery pack.
Do not shortcircuit & dispose of in fire.
4.2. Adjusting Speaker Volume.
The Speaker Volume can be adjusted using the up
Speaker Volume level is displayed on the LCD(see §3)
4.3. Receiving a Signal
The unit is continuously in the RECEIVE mode when the unit is ON and not
transmitting. When you receive a signal on the current channel, the RX icon is
displayed (see §3)
4.4. Transmitting a Signal
1. Press and hold the TALK button to TRANSMIT. The TX icon will be
displayed
2. Hold the unit in a vertical position with the MICROPHONE 5 cm from the
mouth and speak into the microphone.
3. Release the TALK button when you have finished transmitting.
NOTE: To check the channel activity; press and hold the MONITOR
You'll hear static if the channel is unoccupied. Don't TRANSMIT if someone is
talking on the channel.
IMPORTANT: In order for other people to receive your transmission, they must
also be on the same channel and have set the CTCSS code you are currently
using. Refer to the 'Changing Channels'
5. OPERATION
5.1. Changing Channels
The PMRS has 8 available channels.
To change channels:
1. Press the MENU button
once, the current channel number flashes on
the LCD Screen.
2. Press the UP
or DOWN button
3. Press the MENU button
to confirm the channel selection and go to
CTCSS SUB-CHANNEL SELECTION mode, or press the TALK button to
select the desired channel and return to NORMAL mode.
5.2. CTCSS (Continuous Tone Coded Squelch System)
The 2 digit CTCSS code corresponds to a specific tone frequency the radio
emits. Two users, with the same channel and CTCSS set can hear one
another.They will not be able to hear anyone else on the channel unless the
other radios have the same exact CTCSS code enabled.
7. LCD display
8. Up/Down button
9. Menu/Lock button
10.On/Off button
11.Scan button
12.Speaker
/down key
. The
button.
to change the channel.
Advertisement
Table of Contents

Subscribe to Our Youtube Channel
Related Manuals for Topcom TwinTalker 6000


Summary of Contents for Topcom TwinTalker 6000
- Page 1 TwinTalker 6000 1. DESCRIPTION (see front cover) 1. Microphone 7. LCD display 2. Monitor button 8. Up/Down button 3. Talk button 9. Menu/Lock button 4. Call button 10.On/Off button 5. Ear/mic/connector 11.Scan button 6. Antenna 12.Speaker 2. INSTALLATION 2.1. Removing/Installing the Belt Clip 1.
-
Page 2: Specifications
During the time of the warranty Topcom will repair free of charge any defects caused by material or manufacturing faults. Topcom will at its own discretion fulfil its warranty obligations by either repairing or exchanging the faulty equipment. - Page 3 TwinTalker 6000 1. BESCHRIJVING (Zie voorpagina) 1. Microfoon 7. LCD display 2. Monitor toets 8. Omhoog/Omlaag toets 3. Zend toets (PTT) 9. Menu toets 4. Oproep toets 10.Aan/Uit toets 5. Hoofdtelefoonaansluiting 11.Scan toets 6. Antenne 12.Luidspreker 2. INSTALLATIE 2.1. Verwijderen en installeren van de riemclip 1.
-
Page 4: Reiniging En Onderhoud
Gedurende de garantieperiode verhelpt Topcom kostenloos alle defecten die Schakel uw communicatietoestel uit in alle zones waar explosiegevaar heerst, te wijten zijn aan materiaal- of productiefouten. Topcom kan, naar keuze, het tenzij uw toestel speciaal hiervoor werd ontworpen. In dergelijke zones defecte toestel ofwel herstellen ofwel vervangen. -
Page 5: Installation
TwinTalker 6000 1. DESCRIPTION (voir couverture avant) 1. Microphone 7. Écran LCD 2. Bouton de contrôle auditif 8. Bouton Monter/Descendre 3. Bouton de transmission 9. Bouton Menu/Verrouillage 4. Bouton d’appel 10.Bouton On/Off 5. Ear/mic/connecteur 11. Bouton Scannage 6. Antenne 12.Haut-parleur 2. -
Page 6: Spécifications
Pendant la période de garantie, Topcom répare gratuitement toutes les pannes spécialement prévu pour un tel usage. Des étincelles dans de telles zones résultant de défauts de matériau ou de fabrication. Topcom assurera, à sa sont susceptibles de provoquer une explosion ou un incendie, occasionnant propre discrétion, ses obligations de garantie en réparant ou en échangeant... -
Page 7: Montage
TwinTalker 6000 1. BESCHREIBUNG (siehe Vorderseite) 1. Mikrofon 7. LCD-Display 2. Überwachnung-Taste 8. Nach-oben-/Nach-unten-Taste 3. Sprechtaste 9. Menü-/Verrieglungstaste 4. Anruftaste 10.An-/Aus-Taste 5. Kopfh/Mikro/Anschluß 11. Such-Taste 6. Antenne 12.Lautsprecher 2. MONTAGE 2.1. Entfernen/Montieren der Gürtelklemme 1. Um die Klemme von der Einheit zu entfernen, drücken Sie auf die Gürtelklemme (2) und ziehen die Klemmenschlaufe (1) heraus. -
Page 8: Pflege Und Wartung
Feuer verursachen, welches zu Körperverletzungen oder zum Tod führen sachgemäßem Betrieb und Schäden, die durch die Verwendung von Teilen, kann. die keine Originalteile sind, oder von nicht von Topcom empfohlenem Zubehör 7.5. Sprengzünder und -zonen entstanden sind, werden nicht von der Garantie gedeckt. -
Page 9: Instalación
TwinTalker 6000 1. DESCRIPCIÓN (refiérase a la portada) 1. Micrófono 7. Pantalla LCD 2. Tecla del monitor 8. Tecla Arriba/Abajo 3. Tecla Hablar 9. Tecla Menú/Bloqueo 4. Tecla Llamada 10.Tecla Encender/Apagar 5. Conector Auricular/micro 11.Tecla Exploración 6. Antena 12.Altavoz 2. INSTALACIÓN 2.1. -
Page 10: Instrucciones De Seguridad
7.3. Para vehículos con airbag. de compra y el tipo de aparato. Durante el periodo de garantía Topcom No colocar el equipo en una zona encima del airbag o en la zona de reparará... -
Page 11: Guia Do Utilizador
TwinTalker 6000 1. DESCRIÇÃO (ver a capa) 1. Microfone 7. Painel LCD 2. Botão monitorizar 8. Botão Cima/Baixo 3. Botão conversar 9. Botão Menu/Trancar 4. Botão chamar 10.Botão Ligar/Desligar 5. Auricular/microfone 11.Botão Rastrear 6. Antena 12.Altofalante 2. INSTALAÇÃO 2.1. Retirar/Instalar o Clipe para Cinto 1. -
Page 12: Instruções De Segurança
7.4. Atmosferas Potencialmente Explosivas. Durante o período de garantia, a Topcom irá reparar, a título gratuito, qualquer Desligue o seu comunicador quando estiver em qualquer área com uma defeito provocado por defeitos a nível do material ou mão-de-obra. A Topcom atmosfera potencialmente explosiva, excepto quando se tratar de um aparelho irá, segundo o seu próprio critério, cumprir as suas obrigações de garantia... -
Page 13: Funzionamento
TwinTalker 6000 1. DESCRIZIONE (vedere copertina) 1. Microfono 7. Display LCD 2. Tasto Monitoraggio 8. Tasto Su/Giù 3. Tasto Conversazione 9. Tasto Menu/Blocco 4. Tasto Chiamate 10.Tasto On/Off 5. Presa cuffie/mic 11.Tasto Scansione 6. Antenna 12.Altoparlante 2. INSTALLAZIONE 2.1. Rimozione/installazione della clip da cintura 1. -
Page 14: Caratteristiche Tecniche
Per evitare possibili interferenze con operazioni in cui viene impiegato all’uso di ricambi non originali o di accessori non raccomandati da Topcom. materiale esplosivo, spegnere il ricetrasmettitore in prossimità di detonatori La garanzia non copre i danni causati da fattori esterni, quali fulmini, acqua e elettrici, in "aree potenzialmente esplosive"... - Page 15 TwinTalker 6000 1. ΠΕΡΙΓΡΑΦΗ (δείτε εξώφυλλο) 1. Μικρ φωνο 7. Οθ νη LCD 2. Πλήκτρο παρακολούθησης 8. Πλήκτρο επάνω/κάτω 3. Πλήκτρο οµιλίας 9. Πλήκτρο µενού/κλειδώµατος 4. Πλήκτρο κλήσης 10. Πλήκτρο ενεργοποίησης/ 5. Ακουστικ /µικρ φωνο/φορτιστής απενεργοποίησης 6. Κεραία 11. Πλήκτρο σάρωσης...
-
Page 16: Ο∆Ηγιεσ Ασφαλειασ
πιθανά εκρηκτική ατµ σφαιρα, εκτ ς εάν ο τύπος της συσκευής είναι ειδικά οποιαδήποτε βλάβη προκληθεί απ ελαττωµατικά υλικά ή κατασκευή. προσαρµοσµένος για τέτοια χρήση. Υπ κειται στη διακριτική ευχέρεια της Topcom είτε να επισκευάσει ή να Οι σπινθήρες σε τέτοιες περιοχές µπορεί να προκαλέσουν έκρηξη ή πυρκαγιά, ανταλλάξει την ελαττωµατική συσκευή. - Page 17 TwinTalker 6000 1. BESKRIVNING (se etuiets framsida) 1. Mikrofon 7. LCD-display 2. Kontrollknapp 8. Upp/Ner knapp 3. Talknapp 9. Meny/Låsknapp 4. Anropsknapp 10.På/Av knapp 5. Ör/mik 11. Avsökarknapp 6. Antenn 12.Högtalare 2. INSTALLATION 2.1. Borttagande/Fastsättande av bältesclipset. 1. För att ta bort clipset från apparaten trycker man bältesclipset (2) uppåt samtidigt som man drar i clipsfliken (1).
-
Page 18: Vård Och Underhåll
är angivna. eller tar bort batterier och dessa kan förorsaka explosion. Under garantitiden reparerar Topcom alla defekter till följd av material- eller fabrikationsfel. Topcom skall enligt eget omdöme fullfölja sina 7.3. För fordon med luftkudde. - Page 19 TwinTalker 6000 1. BESKRIVELSE (se forside) 1. Mikrofon 7. LCD-display 2. Overvågningstast 8. Op/Nedtast 3. Taletast 9. Menu/Låsetast 4. Opkaldetast 10.Tænd/Sluktast 5. Øretelefon/mikrofon/oplader 11. Scantast 6. Antenne 12.Højtaler 2. INSTALLATION 2.1. Fjernelse/Installation af bælteclip 1. Skub bælteclippen op (2), og træk ned i klemmestroppen (1) for at fjerne bælteclippen.
-
Page 20: Rengøring Og Vedligeholdelse
Ved reklamation kontaktes det sted, hvor telefonen er købt.Den defekte enhed forårsage alvorlige kvæstelser på køretøjets passagerer. sendes retur til et Topcom servicecenter (i de fleste tilfælde via forhandleren) vedhæftet gyldig købskvittering eller kopi heraf.Hvis enheden har en defekt 7.4. Potentielle Eksplosive Luftarter. - Page 21 TwinTalker 6000 1. KUVAUS (ks. etukansi) 1. Mikrofoni 7. LCD näyttö 2. Monitorinäppäin 8. Ylös/Alas-näppäin 3. Puhenäppäin 9. MENU/Lukkonäppäin 4. Puhelunäppäin 10.Päällä/Poisnäppäin 5. Kuuloke/mikrofoni/lataaja 11.Skannerinäppäin 6. Antenni 12.Kaiutin 2. ASENNUS 2.1. Vyösoljen Poisto/Asennus 1. Poista vyösolki yksiköstä painamalla sitä ylöspäin (2) samalla kun vedät soljen nipukasta (1).
-
Page 22: Hoito Ja Huolto
Topcom käyttää omaa harkintaansa täyttäessään takuun velvoitteet jokol korjaamalla tai vaihtamalla vioittuneen laitteen uuteen. Kaikki takuuvaatimukset ovat mitättömiä jos ostaja tai kolmas osapuoli yrittää sitä korjata. Takuu ei kata asiantuntematonta käsittelyä tai käyttöä, ja vikaa joka aiheutuu ei-alkuperäisten osien tai lisälaitteiden käytöstä, joita Topcom ei ole suositellut. - Page 23 TwinTalker 6000 1. POPIS (viz. prední kryt) 1. Mikrofon 7. LCD displej 2. Tlacítko Monitor (monitorování) 8. Tlacítko Up/Down (nahoru/dol_) 3. Tlacítko Talk (mluvení) 9. Tlacítko Menu/Lock (zámek) 4. Tlacítko Call (volání) 10.Tlacítko On/Off (vypnout/zapnout) 5. Ear/mic/konektor 11.Tlacítko Scan 6. Anténa 12.Sluchátko...
- Page 24 CTCSS kód. 5. Zmácknete Tlacítko SCAN pro deaktivaci volby CHANNEL SCAN. Twintalker 6000 má k dispozici 38 CTCSS kódu. 1. Zmácknete dvakrát Tlacítko MENU a CTCSS kód se rozsvítí. 5.7. Úroven Nabití Baterie/Indikátor Slabé Baterie 2.
Need help?
Do you have a question about the TwinTalker 6000 and is the answer not in the manual?
Questions and answers