Table of Contents
Advertisement
Advertisement
Table of Contents

Related Manuals for Quantum q-logic 2


Summary of Contents for Quantum q-logic 2
- Page 1 Basic Operation Instructions...
- Page 2 Identification Key © Copyright 2016 INFMANU4801/Rev A/August 2016...
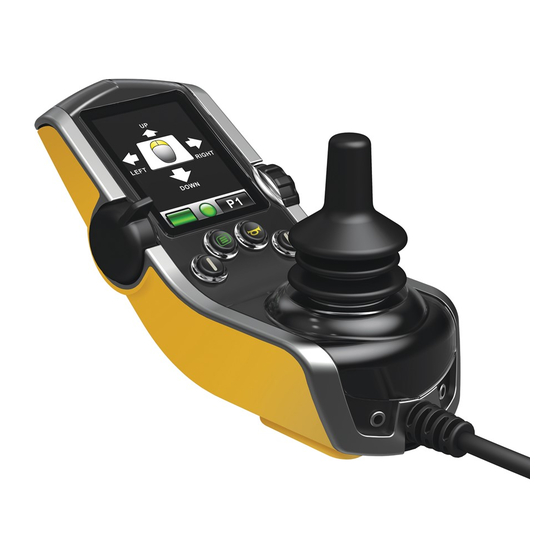
- Page 3 Identification Key Drive/Function Inhibit LCD Screen Controller Mono Jacks Joystick On/Off Mode Select Lever Horn Button Menu Button Key 1 Select Button Charger Port Speed Adjustment Key 2 Select Button Right Turn Indicator Button Left Turn Indicator Button Light Button Battery Condition Meter...
- Page 4 Identifcation Key Mode LED Attendant Control Mode Button On/Off Button Actuator Indicators Battery Condition Meter Joystick On/Off and Mode Jacks...
- Page 5 Identification Key On/Off Button 4-Direction Navigation Key Enhanced Display Charger/Programmer Port LCD Screen Mode Button Battery Condition Meter On/Off and Mode Jacks 9-pin D-sub Connector...
- Page 6 NOTE: This product is compliant with WEEE, RoHS, and REACH directives and requirements. NOTE: This product meets IPX4 classification (IEC 60529). NOTE: The Q-Logic 2 Controller and its components are not made with natural rubber latex. Consult with the manufacturer regarding any after-market accessories.
-
Page 7: Table Of Contents
Table of Contents Label Information ........................... 8 Q-Logic 2 Controller ..........................9 Precautionary Guidelines ........................9 Operating the Q-Logic 2 Controller ...................... 9 On/Off and Mode Select Lever ......................9 Joystick ..............................9 Lock/Unlock Procedure .......................... 9 Speed Adjustment Knob ........................10 Keypad .............................. -
Page 8: Label Information
EMI/RFI—This product has been tested and passed at an immunity level of 20 V/m. Disposal and recycling—Contact your Pride/Quantum Rehab Provider for information on proper disposal and recycling of your Pride/Quantum product and its packaging. -
Page 9: Q-Logic 2 Controller
The Q-Logic 2 Controller is a fully programmable, modular electronic controller system that allows you to operate your power chair. The Q-Logic 2 has several input devices available that operate through a power module. The hand control will primarily be discussed in this manual, along with references to the Enhanced Display, Stand-alone Joystick, and Attendant Control. -
Page 10: Speed Adjustment Knob
Contact your Quantum Rehab Provider with any questions. NOTE: If you Q-Logic 2 Controller is equipped with a lighting system, the menu button and key 1/key 2 select button will be replaced with a light button and left/right turn indicator buttons. -
Page 11: Lcd Screen
To return your power chair to green status, reverse operation. Drive Profile Selection Your Q-Logic 2 Controller may be programmed for up to five drive profiles that allow the system to be custom-tailored to your environment. The drive profile may be changed two different ways. Profiles 1-5 may be selected by pressing the On/Off and Mode Select Lever in the forward direction. -
Page 12: Actuator Adjustment (Seat Screen)
Actuator Adjustment (Seat Screen) The Q-Logic 2 Controller can control five power seat actuators using the mode select lever and the joystick. To select and adjust an actuator: 1. Push the On/Off and Mode Select Lever up once to power on the chair and the controller. - Page 13 3. Push the joystick to the left or right to cycle through to the elevating seat mode, this is illuminated on the actuator indicator. See figure 2. NOTE: If your Q-Logic 2 settings are different than those described, contact your Quantum Rehab Provider. Your Quantum Rehab Provider may have changed the programming of your Q-Logic 2 Controller.
-
Page 14: Main Menu
NOTE: If a warning appears on the Q-Logic 2 controller LCD stating “iLevel® is not engaged,” the power chair’s speed will be reduced to 25% when elevated. If this warning appears while on level ground, please discontinue use of iLevel®... - Page 15 Handcontrol Settings Main Menu Handcontrol Settings Sound System Settings Display Display Display Display Language Language Suono Day / Night English Italiano Brightness Day Brightness Night Measurement System Set Time Time format Reminder Display Display Language Day / Night Day / Night Brightness Day Brightness Night Measurement System...
- Page 16 Display Display Language Brightness Night Day / Night Brightness Day Brightness Night Measurement System Set Time Time format Reminder Display Display Display Language Measurement System Measurement System Day / Night Brightness Day Brightness Night Measurement System Set Time Time format Reminder Display Display...
- Page 17 Main Menu Enhanced Display Settings Enhanced Display Settings Sound System Settings Display Sound Sound Command Beep Command Beep Mouse Command Beep Seat Command Beep Audible Profile Indicator Sound Sound Command Beep Mouse Command Beep Mouse Command Beep Seat Command Beep Audible Profile Indicator Sound Sound...
-
Page 18: Bluetooth® Menu
To add a Bluetooth screen (Aux menu must be enabled by provider to use Bluetooth® functions). The Q-Logic 2 hand control is equipped with built-in Bluetooth® that allows you to connect to a computer, smartphone, or tablet. To access the Bluetooth® functionality, you must navigate to an AUX profile where you will able to access the Bluetooth®... - Page 19 1. Push the On/Off and Mode Select Lever up once to power on the chair and controller. 2. Push the Menu button to access the Main Menu screen. See figure 6A. 3. Use the joystick to highlight the Handcontrol settings option, then push the joystick to select that function.
- Page 20 Main Menu Handcontrol Settings Handcontrol Settings Sound System Settings Display Bluetooth Bluetooth Bluetooth Mouse Mouse ClickToPhone VoiceOver Powercycle Needed VoiceOver Timing Bluetooth Bluetooth Mouse ClickToPhone ClickToPhone VoiceOver Powercycle Needed VoiceOver Timing Bluetooth Bluetooth Mouse VoiceOver ClickToPhone VoiceOver Powercycle Needed VoiceOver Timing Figure 6A.
- Page 21 Bluetooth VoiceOver Timing VoiceOver Timing Mouse Double Command Double Command ClickToPhone Long Command 500ms VoiceOver VoiceOver Timing VoiceOver Timing VoiceOver Timing Double Command Long Command Long Command 200ms Figure 6B. Bluetooth Menu...
-
Page 22: Auxillary (Aux) Menu
The Standby Select Manu screen appears after the programmed timeout when Standby Select is enabled. Standby Select allows the user to navigate through the available profiles without the use of a Mode Key. The profile that was active when the timeout occurred is highlighted. Contact your Quantum Rehab Provider for more information. -
Page 23: Attendant Control/Stand-Alone Joystick
Attendant Control and Stand-Alone Joystick For more information on these applications, contact your Quantum Rehab Provider. The Attendant Control and the Stand-alone Joystick are similarly laid out: „ On/Off Button „ Battery Condition Meter Enables/disables power Indicates battery charge „ Actuator LEDs „... - Page 24 Enhanced Display Settings Main Menu Enhanced Display Settings Sound System Settings Display Display Display Display Language Language Suono Day / Night English Italiano Brightness Day Brightness Night Measurement System Set Time Time format Reminder Display Display Language Day / Night Day / Night Brightness Day Brightness Night...
- Page 25 Display Display Language Brightness Night Day / Night Brightness Day Brightness Night Measurement System Set Time Time format Reminder Display Display Display Language Measurement System Measurement System Day / Night Brightness Day Brightness Night Measurement System Set Time Time format Reminder Display Display...
- Page 26 Enhanced Display Settings Main Menu Enhanced Display Settings Sound System Settings Display Sound Sound Command Beep Command Beep Mouse Command Beep Seat Command Beep Audible Profile Indicator Sound Sound Command Beep Mouse Command Beep Mouse Command Beep Seat Command Beep Audible Profile Indicator Sound Sound...
-
Page 27: Sleep Mode
Sleep Mode A Q-Logic 2 Controller offers a sleep mode feature that will shut off the main power if the joystick remains stationary for a programmed period of time from 0 to 240 minutes. To restore power and resume operation of the chair, push the On/Off and Mode Select Lever up once. - Page 28 #110 Function executed. Joystick out of center. Joystick not centered. Information Warning Error Figure 11. Error Codes Error Code Diagnosis Solution 35, 37 Joystick Fault/Connection, Stop Sign Check if joystick cable is connected. Turn On/Off Mode Error #35 occurs on the screen Select Lever off and then back on again to recycle the power.
-
Page 29: Care And Maintenance
Care and Maintenance Refer to your power chair owner’s manual for proper cleaning and disposal instructions. Temperature Some parts of your power chair are suspectible to extreme changes in temperature. Always keep your power chair between the temperatures of 18°F (-8°C) and 122°F (50°C). Warranty Refer to your power chair owner’s manual for specific information on the controller warranty. - Page 30 Notes...
- Page 32 401 York Avenue Duryea, PA 18642 Canada 5096 South Service Road Beamsville, Ontario L0R 1B3 32 Wedgwood Road Bicester, Oxfordshire OX26 4UL www.quantumrehab.co.uk Australia 20-24 Apollo Drive Hallam, Victoria 3803 www.quantumrehab.com.au New Zealand 38 Lansford Crescent Avondale Auckland, New Zealand 1007 www.pridemobility.co.nz Italy Via del Progresso, ang.