Table of Contents
Advertisement
Advertisement
Table of Contents

Related Manuals for Celestron skyexpedition 60


Summary of Contents for Celestron skyexpedition 60
- Page 1 xPEdItIon coMPutErIZE tELEScoP InstructIon Manual Model #22004...
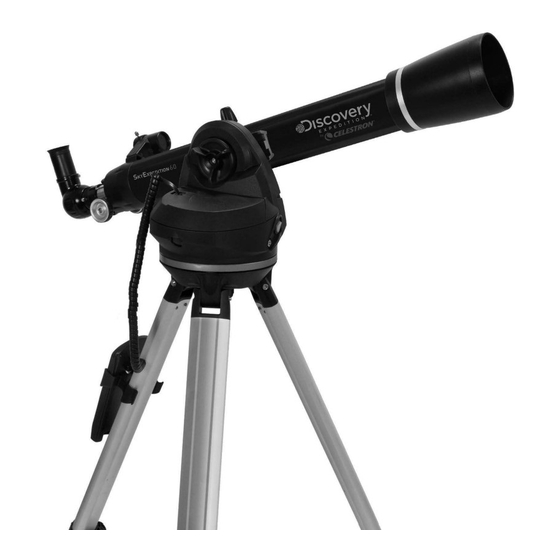
- Page 2 SkyExpedition 60 1. Objective Lens 6. Tripod Leg Extension Clamp 11. StarPointer Finderscope 2. Motorized Base 7. Hand Control 12. Altitude Clutch Knob 3. On/Off Switch 8. Focuser Knob 13. Telescope Mounting Bolt 4. Tripod 9. Star Diagonal 5. Accessory Tray 10. Eyepiece...
- Page 3 • Incredible 3°/second slew speed. • Fully enclosed motors and optical encoders for position location. • Computerized hand controller with 4,000 object database. • Storage for programmable user defined objects; and • Many other high performance features! The SkyExpedition’s deluxe features combined with Celestron’s legendary optical standards give amateur astronomers one of the most sophisticated and easy to use telescopes available on the market today. WarnIng never look directly at the Sun with the naked eye or with a telescope (unless you have the proper • solar filter). Permanent and irreversible eye damage may result.
-
Page 4: Assembling The Telescope
aSSEMBLy The SkyExpedition comes partially assembled and can be attaching the Hand control Holder operational in a matter of minutes. The SkyExpedition is The SkyExpedition comes with a snap-on hand control holder that conveniently packaged in one reusable shipping carton that conveniently attaches to any of the tripod legs. To attach the hand contains the following accessories: control holder simply position the holder with the square plastic • 25 mm and 9 mm Eyepieces tab facing up and push against the tripod leg until it snaps in to place. • Erect Image Diagonal • StarPointer Finderscope • Accessory Tray • the skyX Student Edition Astronomy Software • SkyExpedition Hand Control with 4,000 Object Database aSSEMBLIng tHE tELEScoPE Your SkyExpedition comes in three major sections: the optical tube, the motorized mount and the tripod. These sections can be attached in seconds using the quick release coupling screw located under the tripod mounting platform and the dovetail mounting clamp located on the outside of the motorized base. To begin, remove all of the accessories from their individual boxes. Remember to save all of the containers so that they can be used to transport the telescope. Before attaching the visual FIgure 2-3 accessories, the telescope tube and mount should be attached to attaching the Motorized Base to the tripod the tripod. First, install the accessory tray onto the tripod legs:... -
Page 5: Leveling The Telescope
2. Loosen the tube clamp mounting bolt. slide the eyepiece out. 3. Slide the telescope tube’s dovetail mounting bar into the tube clamp. Eyepieces are commonly referred to by focal length and barrel diameter. Make sure that the fi nderscope is pointing up when the tube is attached The focal length of each eyepiece is printed on the eyepiece barrel. The to the base. longer the focal length (i.e., the larger the number) the lower the eyepiece 4. Tighten the mounting bolt by hand to secure the tube to the base. power or magnifi cation; and the shorter the focal length (i.e., the smaller the number) the higher the magnifi cation. Generally, you will use low-to- Your telescope is fully assembled and is ready to attach the accessories. moderate power when viewing. For more information on how to determine power, see the section on “Calculating Magnifi cation” found on the Celestron website at www.celestron.com/downloads. Mounting Bolt Barrel diameter is the diameter of the barrel that slides into the star diagonal or focuser. The SkyExpedition uses eyepieces with a standard 1-1/4” barrel diameter. Dovetail Altitude Clutch Focusing Knob To focus your telescope, simply turn either of the focus knobs at the eyepiece end of the optical tube. Turn the focus knob until the image is sharp. Once sharp, turn the knob towards you to focus on an object that is closer than the one you are currently observing. Turn the knob away from you to focus on a more distant object than the one you are currently observing. the StarPointer Finderscope The StarPointer is the quickest and easiest way to point your telescope exactly at a desired object in the sky. It’s like having a laser pointer... -
Page 6: Aligning Starpointer
aligning the StarPointer Powering the telescope 1. To turn on the StarPointer, turn the switch to the “on” position The SkyExpedition can be powered by 8 user supplied AA size – see Figure 2-9 alkaline batteries or an optional 12V AC adapter. To install batteries into the SkyExpedition: 2. Locate a bright star or planet and center it in a low power eyepiece in the main telescope. 1. Press the tab on the front of the battery compartment and remove the cover. 3. With both eyes open, look through the glass window at the alignment star. If the StarPointer is perfectly aligned, you will see the red LED dot overlap the alignment star. If the StarPointer is not aligned, take notice of where the red dot is relative to the bright star. 4. Without moving the main telescope, turn the StarPointer’s two adjustment screws until the red dot is directly over the alignment star. Experiment as to which way each screw moves the red dot. Adjustment Screws FIgure 2-11a Battery reMovIng tHe Battery coMPartMent lId Compartment Power Switch 2. Gently remove the battery holder from inside the... -
Page 7: Hand Control Operation
direction Keys: selected from the database. Allows complete control of the telescope in any direction. Use the direction keys to center objects in the StarPointer tour: Activates the tour mode, which seeks out all the best objects for fi nderscope and eyepiece. a given month and automatically slews the telescope to those objects. catalog Keys: The hand control has a key on the hand control to Enter: Pressing enter allows you to select any of the SkyExpedition allow direct access to each of the catalogs in its 4,000+ object database. functions, accept entered parameters and slew the telescope to The hand control contains the following catalogs in its database: displayed objects. Messier – Complete list of all Messier objects. undo: undo will take you out of the current menu and display the previous level of the menu path. Press undo repeatedly to get back to a – Many of the brightest deep sky objects from the Revised main menu or use it to erase data entered by mistake. New General Catalog. Menu: Displays the many setup and utilities functions such as caldwell – A combination of the best NGC and IC objects. tracking rate and user defi ned objects and many others. Planets - All 8 planets in our Solar System plus the Moon and Sun. 10. Scroll Keys: Used to scroll up and down within any of the menu lists. -
Page 8: Auto Two-Star Align
1. Power on the SkyExpedition by flipping the switch located ask that you center the bright alignment star in the center of on the side of the base, to the “on” position. Once turned the eyepiece and press the ALIGN button. This will accept the on the hand control display will say LCM Ready. Press star as the first alignment position. (There is no need to adjust ENTER to choose sky align. Pressing the ALIGN key will the slewing rate of the motors after each alignment step. The bypass the other alignment options and the scrolling text and SkyExpedition automatically selects the best slewing rate for automatically begins sky align. aligning objects in both the finderscope and the eyepiece). 2. Once sky align has been selected, the hand control will 5. For the second alignment object, choose a bright star or display “Enter if OK”, “Undo to edit” and “Saved Site.” The planet as far as possible from the first alignment object. bottom line of the LCD will display either the current time Once again use the arrow button to center the object in the or the time when you last used the telescope. Since this is finderscope and press ENTER. Then once centered in the your first time using the SkyExpedition, press UNDO to enter eyepiece press the ALIGN button. current time/site information. 6. Repeat the process for the third alignment star. When the The hand control display will then ask for the following information: telescope has been aligned to the final stars, the display will read “Match Confirmed.” Press UNDO to display the Location — The hand control will display a list of cities to names of the three bright objects you aligned to, or press choose from. Choose the city from the database that is closest ENTER to accept these three objects for alignment. You are to your current observing site. The city you choose will be now ready to find your first object. -
Page 9: One-Star Align
information that was entered into the hand control. Use the Up and to be used to accurately locate small or faint deep-sky objects or to track Down buttons to scroll through the information. Press ENTER to accept objects accurately for photography. the current information or press UNDO to manually edit the information To use One-Star Align: (see Sky Align section for detailed instruction on entering time/site 1. Select One-Star Align from the alignment options. information). 2. Press ENTER to accept the time/site information displayed on the 4. The display will now prompt you to select a bright star from the display, or press UNDO to enter new information. displayed list on the hand control. Use Up and Down buttons (6 and 9 on 3. The SELECT STAR 1 message will appear in the top row of the display. the keypad) to scroll to the desired star and then press ENTER. Use the Up and Down scroll keys (10) to select the star you wish to use 5. Use the arrow buttons to slew the telescope to the star you selected. for the first alignment star. Center the star in the finderscope and press ENTER. Finally, center the Press ENTER. star in the eyepiece and press ALIGN. 4. The SkyExpedition then asks you to center in the eyepiece the alignment 6. Based on this information, the SkyExpedition will automatically display star you selected. Use the direction arrow buttons to slew the telescope the most suitable second alignment star that is above the horizon. Press to the alignment star and carefully center the star in the finderscope. ENTER to automatically slew the telescope to the displayed star. If for Press ENTER when centered. some reason you do not wish to select this star (perhaps it is behind a 5. Then, center the star in the eyepiece and press ALIGN. tree or building), you can either: 6. Once in position, the SkyExpedition will model the sky based on this • Press the UNDO button to display the next most suitable star for information and display Align Successful. -
Page 10: Object Catalog
improve your pointing accuracy, especially on objects in that and fascinating facts about many of the objects. part of the sky. Press the EntEr Key. • This will automatically slew the • If you have aligned your telescope using the One-star align telescope to the coordinates of the object. While the telescope method, you can use re-align to align to an additional object is slewing to the object, the user can still access many of the in the sky. This will improve the pointing accuracy of your hand control functions (such as displaying information about telescope without having to re-enter addition information. the object). To replace an existing alignment star with a new alignment star: If you slew to an object that is below the horizon, SkyExpedition will notify you by displaying a message 1. Select the desired star (or object) from the database and slew reminding you that you have selected an object outside to it. of your slew limits (see Slew Limits in the Scope Setup 2. Carefully center the object in the eyepiece. section of the manual). Press UNDO to go back and select 3. Once centered, press the UNDO button until you are at the a new object. Press ENTER to ignore the message and main menu. continue the slew. The LCM hand control will only display objects that are below the horizon if the Filter Limits are 4. With LCM Ready displayed, press the ALIGN key on the set below 0º in altitude. See Filter Limits in the Utility hand control. Feature section of the manual for more information on 5. The display will then ask you which alignment star you want setting the filter limits. -
Page 11: Direction Buttons
dIrEctIon ButtonS Solar: Used for tracking the Sun when solar observing using a proper solar filter. The SkyExpedition has four direction buttons in the center of the hand View time-Site — View Time-Site will display the last saved time and control which controls the telescope motion in altitude (up and down) and longitude/latitude entered in the hand control. azimuth (left and right). The telescope can be controlled at nine different speed rates. user defined objects — The SkyExpedition can store up to 50 different user defined objects in its memory. The objects can be daytime land objects or an interesting celestial object that you discover that is not included in vAilAble peedS the regular database. There are several ways to save an object to memory depending on what type of object it is: 1 = 2x 4 = 16x 7 = 1º / sec Save Sky object: The SkyExpedition stores celestial objects to its database by saving its right ascension and declination in 2 = 4x 5 = 32x 8 = 2º / sec the sky. This way the same object can be found each time the telescope is aligned. Once a desired object is centered in the 3 = 8x 6 = 64x 9 = 3º / sec eyepiece, simply scroll to the “Save Sky Obj” command and press ENTER. The display will ask you to enter a number rate Button between 1-25 to identify the object. Press ENTER again to save... -
Page 12: Utility Features
• Press ENTER to begin the search. button and select Direction Buttons from the Utilities menu. Use the Up/Down arrow keys (10) to select either the Azimuth buttons Note: Some of the databases contain thousands of objects, (left and right) or Altitude buttons (up and down) and press and can therefore take a minute or two to return the ENTER. Pressing ENTER again will reverse the direction of the closest object. hand control buttons from their current state. Direction Buttons ScoPE SEtuP FEaturES will only change the eyepiece rates (rate 1-6) and will not affect the slew rates (rate 7-9). Setup time-Site — Allows the user to customize the hand goto approach — lets the user define the direction that the control display by changing time and location parameters (such telescope will approach when slewing to an object. This allows as time zone and daylight savings). the user the ability to minimize the effects of backlash For anti-backlash — All mechanical gears have a certain amount example, if your telescope is back heavy from using heavy optical of backlash or play between the gears. This play is evident or photographic accessories attached to the back, you would want by how long it takes for a star to move in the eyepiece when to set your altitude approach to the negative direction. This would the hand control arrow buttons are pressed (especially when ensure that the telescope always approaches an object from the changing directions). The SkyExpedition’s anti-backlash features opposite direction as the load pulling on the scope. allows the user to compensate for backlash by inputting a value To change the GoTo approach direction, simply choose GoTo which quickly rewinds the motors just enough to eliminate Approach from the Scope Setup menu, select either Altitude or the play between gears. The amount of compensation needed Azimuth approach, choose positive or negative and depends on the slewing rate selected; the slower the slewing... -
Page 13: Scrolling Menu
Once the telescope is powered on again, the display will read Wake Up. After pressing Enter, you have the option of scrolling through the time/site information to confirm the current setting. Press ENTER to wake up the telescope. Pressing UNDO at the Wake Up screen allows you to explore many of the features of the hand control without waking the telescope up from hibernate mode. To wake up the telescope after UNDO has been pressed, select Hibernate from the Utility menu and press ENTER. Do not use the direction buttons to move the telescope while in hibernate mode. Sun Menu For safety purposes the Sun will not be displayed as a database object unless it is first enabled. To enable the Sun, go to the sun Menu and press ENTER. The Sun will now be displayed in the Planets catalog and can be used as an alignment object when using the Solar System Alignment method. To remove the Sun from displaying on the hand control, once again select the Sun Menu from the Utilities Menu and press ENTER. Scrolling Menu This menu allows you to change the rate of speed that the text scrolls across the hand control display. • Press the Up (number 6) button to increase the speed of the text. • Press the Down (number 9) button to decrease the speed of the text. calibrate goto GoTo Calibration is a useful tool when attaching heavy visual or photographic accessories to the telescope. GoTo Calibration calculates the amount of distance and time it takes for the mount to complete its final slow GoTo when slewing to an object. Changing the balance of the telescope can prolong the time it takes to complete the final slew. GoTo Calibration takes into account any slight imbalances and changes the final GoTo distance to compensate. Set Mount Position The Set Mount Position menu can be used to recover an alignment in cases where the telescope or tripod has been manually moved. For instance, you might use this feature if you needed to adjust the level of the tripod by... - Page 14 rEady xpeditioN SkyExpedition Hand control Menu tree: Menu tree sHowIng tHe suB-Menus assocIated wItH tHe PrIMary coMMand FunctIons...
-
Page 15: Appendix A - Technical Specifications
aPPEndIx a - tEcHnIcaL SPEcIFIcatIonS oPtIcaL SPEcIFIcatIonS Design Refractor Light Gathering Power 73x unaided eye Aperture 60 mm Field of View: Standard Eyepiece 1.5º Focal Length 700 mm Linear Field of View (at 1000 yds) 79 feet F/ratio of the Optical System Eyepiece Magnification 28x (25 mm) 78x (9 mm) Optical Coatings Fully Coated Optical Tube Length 29 inches Highest Useful Magnification 142x Resolution: Rayleigh Criterion 2.31 arc seconds Dawes Limit 1.93 arc seconds ELEctronIc SPEcIFIcatIonS MEcHanIcaL SPEcIFIcatIonS Input Voltage 12 V DC Nominal Motor: Type / Resolution DC Servo motors with encoders, both axes... -
Page 16: Appendix B - Glossary Of Terms
aPPEndIx B - gLoSSary oF tErMS a – absolute Magnitude The apparent magnitude that a star binaries or visual multiples. The nearest magnitude would have if it were observed “star” to our solar system, Alpha Centauri, from a standard distance of 10 parsecs, or is actually our nearest example of a multiple 32.6 light years. The absolute magnitude of star system, it consists of three stars, two the Sun is 4.8. at a distance of 10 parsecs, it very similar to our Sun and one dim, small, would just be visible on Earth on a clear red star orbiting around one another. moonless night away from surface light. c – airy disk The apparent size of a star’s disk produced celestial The projection of the Earth’s equator even by a perfect optical system. Since equator on to the celestial sphere. It divides the sky the star can never be focused perfectly, 84 into two equal hemispheres. per cent of the light will concentrate into a celestial pole The imaginary projection of Earth’s single disk, and 16 per cent into a system of rotational axis north or south pole onto the surrounding rings. - Page 17 of a celestial body. The brightest stars are assigned r – magnitude 1 and those increasingly fainter from A telescope in which the light is collected by means of reflector 2 down to magnitude 5. The faintest star that can a mirror. be seen without a telescope is about magnitude 6. resolution The minimum detectable angle an optical system can Each magnitude step corresponds to a ratio of 2.5 in detect. Because of diffraction, there is a limit to the brightness. Thus a star of magnitude 1 is 2.5 times minimum angle, resolution. The larger the aperture, brighter than a star of magnitude 2, and 100 times the better the resolution. brighter than a magnitude 5 star. The brightest star, Sirius, has an apparent magnitude of –1.6, the full right The angular distance of a celestial moon is –12.7, and the Sun’s brightness, expressed ascension: (RA) object measured in hours, minutes, and on a magnitude scale, is –26.78. The zero point of the seconds along the Celestial Equator eastward apparent magnitude scale is arbitrary. from the Vernal Equinox. S – Meridian A reference line in the sky that starts at the North celestial pole and ends at the South celestial pole and sidereal rate This is the angular speed at which the Earth is passes through the zenith. If you are facing South, rotating. Telescope tracking motors drive the the meridian starts from your Southern horizon and telescope at this rate. The rate is 15 arc seconds per passes directly overhead to the North celestial pole.
-
Page 18: Appendix C - Maps Of Time Zones
aPPEndIx c – MaPS oF tIME ZonES... - Page 20 SKy MaPS...
-
Page 26: Additional Information
©2011 Discovery Communications, LLC. Discovery Expedition and related logos are trademarks of Discovery Communications, LLC, used under license. All rights reserved. ©2011 Celestron • 2835 Columbia Street • Torrance, CA 90503 U.S.A. Telephone: 310.328.9560 • Fax: 310.212.5835 • All rights reserved.
Need help?
Do you have a question about the skyexpedition 60 and is the answer not in the manual?
Questions and answers