Table of Contents
Advertisement
Quick Links
Introduction
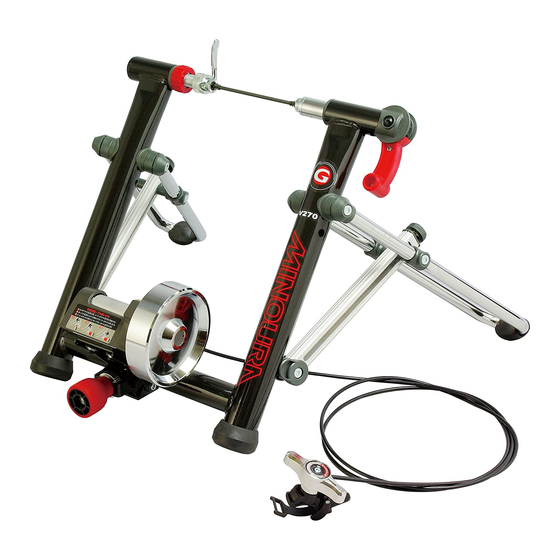
Thank you for purchasing the Minoura GYRO V270 indoor bicycle trainer.
The V270 incorporates a new, patent pending Gyro Technology flywheel that by design is 35% more
effective than other trainers in its class.
The new NEODYMIUM (neo-dee-um) magnet is four times stronger than typical ferrite magnets and offers
a much wider range of resistance from low to high all while providing equal step differentials to simulate
real road riding.
The exclusive U-SHAPE legs are lightweight but more stable than other trainers weighing much more.
And each leg can be adjusted +/- 10 mm to compensate for uneven surfaces.
Read the is manual carefully and keep it for future reference.
For More Information
MINOURA NORTH AMERICA
(for U.S. residents ONLY)
1996 East Ave. Hayward, CA 94541 U.S.A.
Phone: 1-510-538-8599
Fax: 1-510-538-5899
Email: support@minourausa.com
indoor bicycle trainer
instructions manual
If you need help, please contact the shop first where you originally
purchased this product or call the distributors in your own country.
The distributors list can be found on our web site.
MADE IN JAPAN
GYRO V270
MINOURA JAPAN HEADQUARTERS
(for ALL customers)
1197-1 Godo, Anpachi, Gifu 503-2305 Japan
Phone: +81-584-27-3131
Fax: +81-584-27-7505
Email: minoura@minoura.jp
Web: www. minoura.jp
Advertisement
Table of Contents

Related Manuals for MINOURA GYRO V270


Summary of Contents for MINOURA GYRO V270
- Page 1 Introduction Thank you for purchasing the Minoura GYRO V270 indoor bicycle trainer. The V270 incorporates a new, patent pending Gyro Technology flywheel that by design is 35% more effective than other trainers in its class.
-
Page 2: Required Tools
How To Assemble U-Leg Required Tools: 2 x 5mm Hex Wrench (supplied) for 700C ~ 29" for 24" ~ 26" Choose the pivot hole for your bike size on the Attach the U-Leg to the main pillar. main pillar. Check the plastic end caps on the U-Leg are aligned to the hole. - Page 3 How To Install Mag Unit & Foot Step GYRO Mag Unit Required Tools: 1 x 5mm Hex Wrench (supplied) 1 x 10mm Spanner (not supplied) The GYRO Mag unit and Foot Step now need to be attached to the frame. Attach the Foot Step onto the bracket on the Step-Bar first, put the Mag unit over the Foot Step, then tighten both brackets together with the pivot bolt.
- Page 4 Placing V270 on Floor Fully open the legs and place on a flat and horizontal floor. To open the U-Leg, hold the main frame and the rubber cap on the U-Leg. Do NOT pull the Alloy Leg Guide directly, otherwise it will be bent or damaged. Main Frame Alloy Leg Guide U-Leg...
- Page 5 How To Mount Your Bike V270's coupling position is pre-adjusted in the factory to fit the 125mm standard rear hub width. If it is too loose or tight to your bike, or if you use different width of rear hub like a track race bike, adjust the left side coupling as precisely as possible for maximum stability.
- Page 6 How To Use Foot Pedal The Foot Pedal is a convenient device to engage/release the drive roller to/from the rear tire quickly, and it keeps the proper pressure of the drive roller to the tire without adjusting everytime you use the V270. To maintain the tire life as long as possible, you should adjust correctly.
- Page 7 How To Operate Remote Shifter V270 comes with a convenient remote shifter device. By installing it on your handlebar or stem, you can adjust the resistance level without getting off the bike. The remote shifter should be used in conjunction with the gears on your bike to achieve maximum efficiency in your workout.
- Page 8 Schematics UF-9 UF-8 UF-6 UF-7 UF-10 UF-11 UF-10 UF-1 UF-14 UF-12 UF-5 UF-2 UF-4 UF-15 UF-13 GM-7 GM-9 UF-3 GM-10 GM-6 GM-11 GM-8 GM-4 GM-5 GM-12 GM-3 GM-2 GM-13 GM-1 GM-14 CAUTION Do NOT touch GM-2 "Alloy Rotor" GM-15 during and 15 minutes after workout. It is VERY HOT.
Need help?
Do you have a question about the GYRO V270 and is the answer not in the manual?
Questions and answers