ReSound MICRO MIC User Manual
Hide thumbs
Also See for MICRO MIC:
- User manual (27 pages) ,
- Quick manual (2 pages) ,
- Frequently asked questions manual (10 pages)
Table of Contents
Advertisement
Advertisement
Table of Contents

Subscribe to Our Youtube Channel
Related Manuals for ReSound MICRO MIC


Summary of Contents for ReSound MICRO MIC
-
Page 1: User Guide
WIRELESS CONNECTIVITY User guide... -
Page 2: Welcome
Welcome Congratulations on your purchase of a ReSound Micro Mic. The Micro Mic is a high quality portable speech and audio streamer that streams speech and audio directly to your hearing instru- ment. Please read this manual carefully to fully benefit from the Micro Mic. -
Page 3: Statement
Statement: This device complies with Part 15 of the FCC Rules and ICES-003 of the IC Rules. Operation is subject to the following two condi- tions: (1) this device may not cause harmful interference, and (2) this device must accept any interference received, including inter- ference that may cause undesired operation. -
Page 4: Intended Use
Annex I of Council Directive 93/42/EEC for medical devices (MDD) and Essential Requirements and other relevant provisions of Directive 1999/5/EC (R&TTE). The declaration of conformity may be consulted at www.resound. In US: FCC CFR 47 Part 15, subpart C In Canada: IC: 6941C-SM2M... - Page 5 Operation is subject to the following two conditions: 1. this device may not cause interference, and 2. this device must accept any interference, including interference that may cause undesired operation of the device. For other identified applicable international regulatory require- ments in countries outside EU and US, please refer to local coun- try requirements for these areas.
-
Page 6: Table Of Contents
Stop streaming ........16 Wearing the Micro Mic ......18 Status light indicator (LED) . - Page 7 General precautions ....... .30 Built-in battery care ....... .32 Battery warning.
-
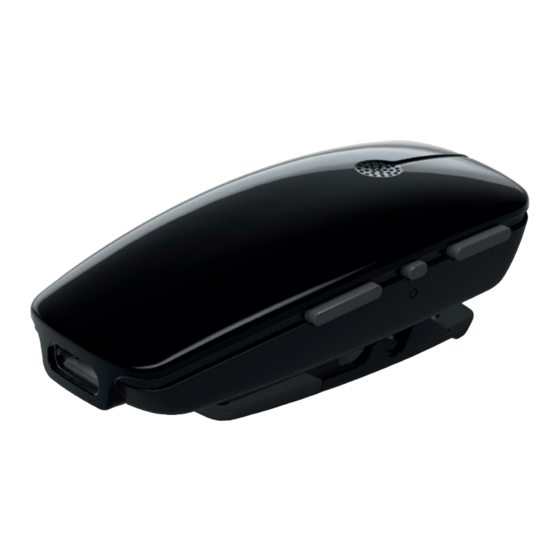
Page 8: Description
Description Power button Microphone inlet Microphone inlet Status light indicator (LED) Micro USB for charging... - Page 9 Volume down Mute button Volume up Mute light indicator (LED) 10 Paring button 11 Mounting clip...
-
Page 10: Getting Started
Getting Started Before using your Micro Mic, you need to charge the recharge- able battery. To charge it, plug the charging cable into the Micro Mic as shown in the picture below. Next, plug the other end of the charging cable into the charger and into a power outlet. - Page 11 • When charging your Micro Mic for the first time, let it charge for at least 3 hours, even if the battery indicator indicates that the battery is fully charged. • For safety reasons, recharge the battery only with chargers supplied by ReSound.
-
Page 12: Turning Your Micro Mic On And Off
Turning your Micro Mic ON and OFF To turn the Micro Mic ON, press and hold the Power button (see page 8) for approximately 1.5 seconds, until the status LED turns green. After releasing the Power button, the status LED will blink green every 2 seconds. - Page 13 Pairing the Micro Mic in channel 1 1. Make sure the Micro Mic is turned ON. Your hearing instru- ments must be OFF – open the battery doors. 2. With the tip of a pen or similar object, press the small pairing but- ton once, as shown in the picture to the right.
- Page 14 Pairing the Micro Mic in channel 2 or 3 (For people using more than one streaming device) To pair the Micro Mic in channel 2, press the pairing button twice. The status LED will now blink yellow twice every 2 seconds to indicate that it is ready to be paired in channel 2.
-
Page 15: Start Streaming
Start streaming Turn ON the Micro Mic. Streaming can be started in one of three ways. 1. Press and hold the push or toggle button on both hearing instruments for about three seconds in order to listen to a streamed audio signal*. If ear to ear program coordination is activated in your hearing instruments, you only have to acti- vate streaming on one of the hearing instruments. -
Page 16: Stop Streaming
You may also press the home button to return to your default settings. 3. If you use a ReSound app, select the desired program in the program screen. *This will return the hearing instruments to the last program used. - Page 17 Note! You may get out of range from your Micro Mic. If your Micro Mic gets out of range and in range again within 5 minutes, your hearing instruments will automatically reconnect and con- tinue streaming. This also applies if the Micro Mic is turned off and...
-
Page 18: Wearing The Micro Mic
Wearing the Micro Mic Clip your Micro Mic on the speaker’s jacket or other clothing or hang it around the neck using included the lanyard. Place the device within a range of 4-16 inches (10-40cm) from the speak- er’s mouth. When using the clip, make sure that the Micro Mic is mounted vertically with the Status LED pointing towards the mouth. -
Page 20: Status Light Indicator (Led)
Status light indicator (LED) The LED on your Micro Mic serves as a multipurpose user inter- face, providing information on the status of your device. Power/Charging No charging Powered Off Powered On (Normal) Powered On (Volume control disabled) Powered On (Low battery) - Page 21 Charging Fully charged No LED indication No LED indication No LED indication No LED indication 3 seconds 3 seconds 3 seconds 3 seconds Constant lit Constant lit...
-
Page 22: Volume Control And Mute
• Use the “+” and “-“ buttons (see page 9) to adjust the volume to a comfortable level. Every volume change on the Micro Mic will be indicated by a short blink of the Mute LED. When reaching the maximum or minimum volume level the Mute LED will show a longer (1 second) steady orange light. - Page 23 Please ask your hearing care professional for more infor- mation about this accessory. Mute The signal from the Micro Mic can be muted, should the wearer of the device want to engage in conversations or activities irrelevant for the hearing instrument user.
-
Page 24: Mute Light Indicator
Special features Drop detection In the event that the Micro Mic falls from a height of more than 30 inches (75cm), a built-in sensor will mute the output streamed to the hearing instruments for up to 2 seconds. This is done to pro- tect the hearing instrument user from very loud and unpleasant impact noise should the unit be accidentally dropped during use. - Page 25 • Make sure the Micro Mic is turned OFF. • Press and hold the volume ‘-‘ button and the Power ON but- ton for 1.5 seconds until the status LED turns green (Micro Mic powering up) and release the Power button.
-
Page 26: Test Mode
• When in Test mode the Status LED (see page 8) will be solid orange. • When entering Test mode the default volume is applied. If needed, the volume can be adjusted on the Micro Mic until transparency has been verified. - Page 27 • To exit Test mode and save settings turn off the Micro Mic and lock the volume control (see Volume control lock section in the Special features chapter). Note: Adjustments to reach transparency can be made on the Micro Mic and/or in the hearing instrument using the fitting...
-
Page 28: Important Information
(washing powder, soap etc…) or alcohol to clean the device. • When the Micro Mic is not in use, turn it OFF and store it safely. • Protect the Micro Mic from excessive moisture (bathing, swim- ming) and heat (radiator, car dashboard). -
Page 29: General Warnings
Although unlikely, nearby electronic devices may be affected. In that case, move the Micro Mic away from the affected elec- tronic device. • If the Micro Mic is affected by electromagnetic interference while in use, move away from the source. -
Page 30: General Precautions
• Do not make any changes or modifications to this device. • Opening the Micro Mic may damage it. If problems occur which cannot be resolved, consult your hearing care profes-... - Page 31 • The Micro Mic may only be repaired by an authorized service center. • Do not use the Micro Mic in areas where RF transmission is prohibited, e.g. airplanes etc. • Do only connect the Micro Mic to connections, which it is ex-...
-
Page 32: Built-In Battery Care
Built-in battery care Please observe the following • Your product is powered by a rechargeable battery. • The full performance of a new battery is achieved only after two or three complete charge and discharge cycles. • The battery can be charged and discharged hundreds of times, but will eventually wear out. -
Page 33: Battery Warning
Any attempt to do so is risky and may result in damage of the product. • Only recharge the Micro Mic with a power supply unit that has been supplied together with the product. • Dispose of batteries according to local regulations. Please re- cycle when possible. -
Page 34: Charger Care
Charger care Please observe the following • Do not attempt to charge your product with anything other than the AC adapter provided. The use of any other types may damage or destroy the product and could be danger- ous. • Use of other chargers may invalidate any approval or war- ranty. - Page 35 • Avoid charging your product in extremely high or low tempera- tures and do not use the charger outdoors or in damp areas. Do not charge the Micro Mic while it is on your body.
-
Page 36: Technical Specifications
Warranty The Micro Mic is covered by a limited warranty issued by the manu- facturer for a period of 12 months from the day of the original purchase. Please notice that extended warranties may apply in your country. -
Page 37: What Is Covered By This Warranty
What is covered by this warranty? Any electrical component, that because of workmanship, manu- facturing or design defects fails to function properly under normal use during life of this warranty, will be replaced or repaired at no charge for parts or labor when returned to the point of purchase. If it is determined that repair is not feasible, the entire unit may be replaced with an equivalent unit upon mutual agreement of the Hearing Care Professional and the customer. -
Page 38: Troubleshooting Guide
Possible cause The Power button is not pressed long enough The Micro Mic does not turn ON The Micro Mic has run out of power The Micro Mic does not The Power button is not pressed turn OFF long enough... - Page 39 Press the Power button for a least 1.5 seconds - until the status LED light turns red Unlock the volume control (see Volume control lock chapter) Assure that the Micro Mic and the hearing instruments are within wireless range Power on the Micro Mic and activate streaming again...
- Page 40 When the pairing sequence times out, no pairing melody is played in the The Micro Mic and the hearing in- hearing instrument strument have not been simultane- ously in pairing mode One or both hearing instru-...
- Page 41 Possible Remedy Go through the pairing process Assure that the Micro Mic and hearing instruments are within wire- less range and repeat pairing process Repeat pairing process and assure that the battery doors on both hearing instruments are closed within 20 seconds after the pairing...
- Page 42 TROUBLESHOOTING GUIDE Symptom Possible Cause The Micro Mic is not worn correctly by the speaker The sound level from the Micro Mic is very low The sound received by the micro- phone is very low...
- Page 43 Possible Remedy Clip the Micro Mic on the speaker’s jacket or other clothing or hang it around the speaker’s neck using the lanyard, placing the device within 4-16 inches (10-40cm) from the speaker’s mouth Increase the volume using the “+” button on the Micro Mic...
- Page 44 CAUTION indicates a situation that could lead to minor and moderate injuries. Advice and tips on how to handle your ReSound ac- cessory better. This device includes a RF transmitter that operates in the range of 2.4 GHz – 2.48 GHz.
- Page 45 Please ask your local hearing care professional concerning disposal of your Micro Mic...
- Page 48 ReSound North America ReSound Canada 8001 Bloomington Freeway 303 Supertest Road Bloomington, MN 55420 Toronto, Ontario M3J 2M4 1-888-735-4327 1-888-737-6863 resound.com resound.com ReSound Government Services 8001 Bloomington Freeway Bloomington, MN 55420 1-800-392-9932 resound.com/veterans...
Need help?
Do you have a question about the MICRO MIC and is the answer not in the manual?
Questions and answers