Table of Contents
Advertisement
This device complies with Part 15 of the FCC rules. Operation is subject to the following conditions;
(1) This device may not cause harmful interference.
(2) This device may accept any interference received, including interference that may cause undesired operation.
CAUTION: Changes or modifications not expressly approved by the party responsible for compliance could void the
user's authority to operate this device.
User Manual
By Firstech LLC, Version: 1.0
Applicable to the following remote(s);
2WT11R-SS 2 Way 5 Button LCD Remote
WWW.COMPUSTAR.COM
Advertisement
Table of Contents

Related Manuals for Firstech 2WT11R-SS


Summary of Contents for Firstech 2WT11R-SS
-
Page 1: User Manual
By Firstech LLC, Version: 1.0 Applicable to the following remote(s); 2WT11R-SS 2 Way 5 Button LCD Remote This device complies with Part 15 of the FCC rules. Operation is subject to the following conditions; (1) This device may not cause harmful interference. -
Page 2: Table Of Contents
Quick Reference............................. 4 Button Lock ............................4 Valet Mode ............................4 Remote Maintenance – Battery Charging ..................... 4 2WT11R-SS: ............................4 1WG8R-SS: ............................4 Programming the Clock ........................4 2 Way Remote Button Functions ......................5 Function Button Menu .......................... 6 Remote Option Menu Table........................ -
Page 3: Introduction
Introduction Thank you for purchasing a Firstech system for your vehicle. Please take a minute to review this entire manual. Note that this manual applies to the 2 Way 5 Button Liquid Crystal Display Remote (2WT11R- SS) whether you purchased the ALARM IT, START IT, or MAX IT system. This manual also supports the 1WG8R-SS remote that is included with your RF Kit. -
Page 4: Quick Reference
Button Lock The 2WT11R-SS comes equipped with button lock. This requires you to tap any button to wake your remote up then tap the button for the function you are trying to activate. Button lock can be turned off in your remote’s option menu. -
Page 5: Way Remote Button Functions
STEP 2: After entering programming mode the time icon will flash indicating the current time. Adjust the time settings by tapping the Lock button to change the hour and Unlock button to adjust the minute. STEP 3: Once the time has been set, exit remote programming by holding down the Trunk and Start/Stop buttons for 2.5 seconds. -
Page 6: Function Button Menu
Function Button Menu Hold For Hold For 2.5 Then Press Seconds Seconds Drive Lock Turbo Timer On/Off Auxiliary 1 Auxiliary 2 Auxiliary 3 Auxiliary 4 On/Off Car Mode Timer Start On/Off Auxiliary 5 Auxiliary 6 Auxiliary 7 On/Off Valet Mode Passive Mode On/Off On/Off Remote Option Menu Table... -
Page 7: Way Remote Button Functions
Volume VOL: Adjust the volume of your remote. 1 is the lowest. 3 is the highest. Temperature Temp F or C Changes the temperature readout from Fahrenheit to Celsius. Turns Auxiliary Feature Turns your Auxiliary Extender feature on or off. On or Off Turns Allows you to use the Lock and Unlock buttons for sliding doors via... -
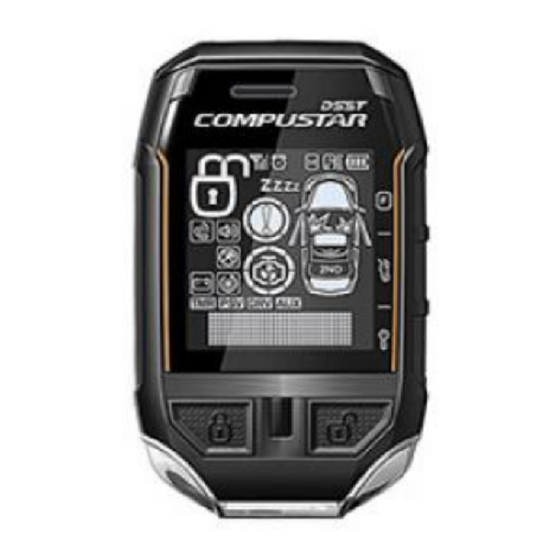
Page 8: Remote Lcd (Liquid Crystal Display) Diagram And Icons
Half second Drive lock. Activates ignition controlled door locks. 2.5 seconds Option programming menu 2 - Installers Only. Half second Activates passive arming (vehicle will arm/lock 30 seconds after the vehicle is disarmed) Activates timer start mode. Timer start mode has multiple programmable settings: Half second duration settings, temperature settings and self start settings. - Page 9 Common Icons – Lock/Arm – Unlock/Disarm This icon indicates whether the system is locked/armed or unlocked/disarmed. While armed, the system will monitor the doors, trunk, hood, shock sensor, and aux inputs. If any of these inputs are triggered while the system is armed, the alarm will be triggered.
- Page 10 Impact This icon will be displayed if an impact to the vehicle is detected while the system is armed. The remote will beep rapidly while displaying this icon if the impact is hard; this means that the alarm was triggered. If it beeps slowly while displaying this icon, that means that the impact was soft and that the alarm simply gave four warning chirps.
-
Page 11: General Features
10 and 20 seconds prior to passively locking and arming. If you want the system to passively arm and not passively lock, ask your local Firstech dealer to configure this setting. -
Page 12: Manual Transmission Remote Start Function (Reservation Mode)
If the vehicle’s engine does not shut off, your door trigger may be functioning improperly. Do not use the remote start feature and take your vehicle to a local authorized Firstech dealer for service. Once the vehicle shuts off your system is in reservation mode and the vehicle is ready to safely remote start. -
Page 13: Reservation Mode Settings
These outputs can be configured for different times. Your authorized Firstech dealer can set these outputs up accordingly. Auxiliary controlled features will require additional parts and labor. -
Page 14: Remote Mute/Vibration Mode
Remote Mute/Vibration Mode To mute your remote, you must turn on vibration mode. There are two ways to enter vibration mode. METHOD 1: Hold the small, unmarked button between the Lock and Unlock buttons for 2.5 seconds. “Vibrate” will flash on the remote’s LCD. Your remote will also vibrate once, confirming that you are now in vibration mode. -
Page 15: Advanced Features
The remote will beep twice, “Drive Lock Off” will scroll across the screen, and the drive lock icon will disappear to confirm drive lock is off. IMPORTANT: Drive lock mode requires additional work from your authorized Firstech dealer. Drive lock has two settings;... - Page 16 on the inside of your windshield. RPS Touch (Remote Paging Sensor) The new RPS touch has multiple features including: remote paging, 4 digit pin unlock/disarm, and arm/lock. All features are operated with a simple touch of the sensor. Please have your installer program the RPS Touch controller settings. RPS Touch and car call functions do not require programming, however in order to unlock/disarm your vehicle you must program a 4 digit passcode using the instructions below: STEP 1: Choose your RPS Touch 4 digit code.
-
Page 17: Timer Start Mode
STEP 2 : Scroll through the remote options by taping the Function button . Once the LCD reads “RPS-ON” tap the Lock button to turn this feature on. The LCD will read “RPS-OFF” STEP 3: Exit remote programming by holding down the Trunk and Key/Start buttons simultaneously for 2.5 seconds. -
Page 18: Cold/Hot Start Mode
If you purchased an Alarm or Alarm and Remote Start system, you can add additional sensors from Firstech. Protect your investment by adding a battery back up system to protect main power or a FT-DAS sensor to protect custom wheels and tires. -
Page 19: Remote Start Error Diagnostic
STEP 2: Within 2 seconds after cycling the ignition for the 5 time, tap the Lock button on 2 way remotes or the (lock) button on 1 way remotes for a half second. The parking lights will flash once to confirm the transmitter has been coded. -
Page 20: Alarm Diagnostic
Alarm Diagnostics While the alarm is armed, the LED will blink slowly. While the siren is going off, the LED will indicate which specific zone was triggered. Priority Situation LED On Duty Door/Hood/Trunk/Ign Triggered 2 flashes, break, then repeat Shock Triggered 3 flashes, break, then repeat Auxiliary Input Triggered 4 flashes, break, then repeat... -
Page 21: Limited Lifetime Warranty
Limited Lifetime Warranty Firstech, LLC Warrants to the original purchaser that this product shall be free of defects in material and workmanship under normal use and circumstances for the period of time that the original owner of this product owns the vehicle in which it is installed; except that the remote controller unit for the period of one year from the date of installation to the original owner of this product.
Need help?
Do you have a question about the 2WT11R-SS and is the answer not in the manual?
Questions and answers
Error code 08 appears and car horn will honk