Table of Contents
Advertisement
Quick Links
User
Manual
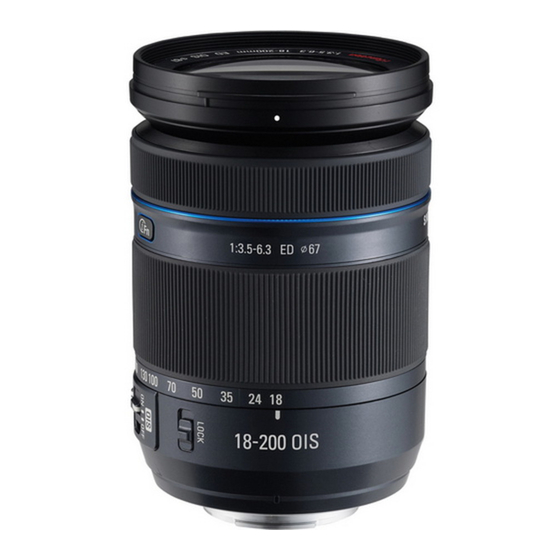
SAMSUNG 18-200mm F3.5-6.3 ED OIS
ENG / SPA / FRE
This User Manual has been specially designed to guide you through the basic functions and features of your device.
Please read the User Manual carefully to ensure safe and correct use.
A
1
2
3
4
5
B
C
D
E
English
Before Using This Device
Thank you for purchasing the Samsung Lens. The illustrations used
in this manual may differ from the actual items. Some functions
described in this manual may not be available depending on the
camera model. Update the firmware of the camera body and lens.
Visit www.samsung.com to download the firmware.
Unpacking
Lens, Lens cap, Lens mount cover, Hood, Case, User manual
• Optional Item: Filter
Layouts
(See illustration A)
1 Lens mount index 2 Zoom ring 3 Focus ring
4 Lens hood mount index 5 Lens 6 i-Function button
7 AF/MF switch 8 OIS switch 9 Zoom lock switch
0 Lens information contacts
Attaching and Removing the Lens
► To attach the lens,
1
Remove the lens cap, lens mount cover, and body cap.
2
Align the red mark on the lens with the red mark on the
camera body. Then, rotate the lens as shown in the illustration
until it locks into place. (See illustration B)
AD68-08137A (1.3)
► To remove the lens, press and hold the lens release button, and
then rotate the lens as shown in the illustration.
(See illustration C)
Setting the Focus Method
0
Set the AF/MF switch on the lens to AF or MF.
Auto Focus (AF): The focus is adjusted automatically when you
half-press [Shutter].
Do not apply excessive force to the front of the lens while the
camera is using auto focus (AF). Doing so may cause the lens
9
to malfunction.
Manual Focus (MF): The focus can be adjusted manually by
rotating the focus ring.
8
Use the MF Assist function on the camera to aid with manual
focusing. Refer to your camera manual for more details.
7
Using i-Function
6
When you press the i-Function button on the lens, you can use
the E mode or Z or adjust some shooting options.
In the E mode, you can select scenes or filter effects that
your camera supports. Z allows you to zoom in on a subject
with less degradation of photo quality than the Digital zoom. This
feature is available only when your camera supports it. i-Scene
mode is available only on some camera models.
1
Rotate the mode dial to P, A, S, M, or i.
2
Press [i-Function] on the lens to select a setting.
• Available settings may differ depending on the shooting mode.
Shooting mode
Setting
E
i
P, A, S, M, i
Z
Shutter speed
S, M
3
Rotate the focus ring on the lens to adjust the setting (or to
change the zoom rate in Z mode).
4
Focus and capture the photo.
F
• To select the items that will appear when you press the
i-Function button on the lens, you can use the iFn Customizing
menu on your camera.
• Available scenes or filter effects in the E mode may vary
depending on the camera model.
• If you select Z, the photo resolution will vary according
to the zoom rate.
Using the Zoom Ring
Set the composition of the photo (the focal distance of the lens) by
rotating the zoom ring on the lens.
When you use the zoom function, focus can be slightly changed.
Adjust the focus again before you capture a photo.
Locking the zoom
(See illustration D)
Set the zoom lock to keep the viewing angle of the lens constant.
To set the zoom lock, turn the zoom ring until the focal length
reaches 18 mm, and then push the switch left.
Using the Optical Image Stabilization (OIS)
Function
(See illustration E)
The user can minimize the shaking of camera by using the OIS
function. Set the OIS switch on the lens to ON.
Using a Lens Hood
(See illustration F)
To prevent deterioration of image quality by blocking out
unnecessary light, use a lens hood.
When you use a flash in situations where the distance between
the subject and the camera is close, the flash light may be partially
blocked by the lens or a lens hood. To ensure proper lighting,
remove the lens hood or adjust the distance between the camera
and subjects.
Using a Filter (optional)
Before putting a filter on the lens, make sure it is compatible.
Refer to "Specifications" for compatible filter size.
• A filter is a precise optical product. Keep away from dust, dirt,
or scratches. Also, do not try to mount two or more filters at the
same time. Doing so may deteriorate the image quality and cause
vignetting (a reduction of an image's brightness or saturation at the
periphery as the viewing angle of the lens is hidden).
• In case of a thick framed filter, the vignetting can occur with a
wide-angle lens.
Specifications
Lens Name
Focal Length
Focal Length in 35 mm Equivalent
Lens Construction-Elements
Lens Construction-Groups
Aspherical Elements
ED Elements
Angle of View
Maximum Aperture
Minimum Aperture
Number of Diaphragm Blades
Minimum Focus Distance (Wide)
Setting
Shooting mode
Minimum Focus Distance (Tele)
Aperture value
A, M
Maximum Magnification
Exposure value
P, A, S
Lens Hood
White Balance, ISO
P, A, S, M
Optical Image Stabilizer
Mount Type
Filter Size
Max. Diameter
Length
Weight (Lens Only, Approx.)
Operating Temperature
Operating Humidity
Specifications may change without notice for better performance.
State of California Proposition 65 Warning (US only)
Warning : This product contains chemicals known to the
State of California to cause cancer and birth defects or other
reproductive harm.
Español
Antes de usar este dispositivo
Gracias por adquirir la lente Samsung.
L
as ilustraciones usadas
en el manual del usuario pueden ser diferentes de los elementos
reales. Algunas funciones descritas en este manual podrían no estar
disponibles según el modelo de la cámara. Actualice el firmware
del cuerpo y la lente de la cámara. Visite www.samsung.com para
descargar el firmware.
Desembalaje
Lente, Tapa de la lente, Tapa de montaje de la lente, Cubierta,
Funda, Manual del usuario
• Elemento opcional: Filtro
Diseño
(Ver ilustración A)
1 Índice de montaje de la lente 2 Anillo de zoom
3 Anillo de enfoque 4 Índice de montaje de la tapa de la lente
5 Lente 6 Botón i-Function 7 Interruptor AF/MF
8 Interruptor OIS 9 Selector de bloqueo de zoom
0 Contactos de información de la lente
Colocar y retirar la lente
► Para colocar la lente
1
Retire la tapa de la lente, la tapa de montaje de la lente y la
cubierta del cuerpo.
2
Haga coincidir la marca roja de la lente con la marca roja del
cuerpo de la cámara. Luego, gire la lente como se muestra en
la ilustración hasta que se ajuste en su sitio.
(Ver ilustración B)
► Para retirar la lente, mantenga pulsado el botón de
desenganche, y luego gire la lente como se muestra en la
ilustración. (Ver ilustración C)
Establecer el método de enfoque
Configure el interruptor AF/MF de la lente en AF o MF.
Uso del enfoque automático (AF): El enfoque se ajusta
automáticamente si presiona [Obturador] hasta la mitad.
No aplique fuerza excesiva sobre el frente de la lente mientras la
cámara esté utilizando la función de enfoque automático (AF). Esto
podría afectar el funcionamiento de la lente.
Uso del enfoque manual (MF): Es posible ajustar el foco
SAMSUNG 18-200mm
manualmente girando el anillo de enfoque de la lente.
F3.5-6.3 ED OIS
Ajuste la función de Asistencia MF para obtener ayuda con el
18–200 mm
enfoque manual. Consulte el manual de su cámara para conocer
27.7–308 mm
más detalles.
18
13
Uso de i-Function
3
2
Al pulsar el botón i-Function en la lente, podrá usar el modo
75.9°–8.0°
E o Z, o ajustar algunas opciones de disparo. En el
F3.5–6.3
modo E, podrá seleccionar escenas o efectos de filtro que
la cámara admita. La función Z le permite hacer zoom sobre
F22
un sujeto con una menor degradación de la calidad de la fotografía
7
que con el zoom digital. Esta función sólo está disponible si la
0.5 m
cámara la admite. El modo i-Scene solamente está disponible en
0.5 m
algunos modelos de la cámara.
0.28X
1
Gire el selector de modos hasta P, A, S, M o i.
Included
2
Pulse [i-Function] en la lente para seleccionar una
Yes
configuración.
Samsung NX Mount
• Los ajustes disponibles pueden variar según el modo de
67 mm
disparo seleccionado.
72 mm
105.5 mm
Ajustes
Modo de disparo
Ajustes
549 g
E
i
Valor de apertura
0–40 °C
Valor de
Z
P, A, S, M, i
5–85 %
exposición
Balance de
Velocidad del
S, M
obturador
blancos, ISO
3
Gire el anillo de enfoque de la lente para modificar los ajustes
(o para modificar el nivel de zoom en el modo Z).
4
Enfoque y capture la fotografía.
• Para seleccionar los elementos que aparecerán al pulsar
el botón i-Function en la lente, puede utilizar el menú
Personalización iFn de la cámara.
• Las escenas o los efectos de filtro disponibles en el modo
E pueden variar según el modelo de la cámara.
• Si selecciona Z, la resolución de las fotos cambiará
según el nivel de zoom.
Usar la rueda de zoom
Establezca la composición de la foto (la distancia focal de la lente)
girando el anillo de zoom.
Como el enfoque se puede cambiar ligeramente gracias a la
distancia focal cambiada, se recomienda ajustarlo de nuevo antes
de hacer una fotografía si ha cambiado la distancia focal girando
el anillo de zoom.
Bloqueo del zoom
(Ver ilustración D)
Ajuste el bloqueo de zoom para ajustar el ángulo constante del
lente.
Para establecer el bloqueo del zoom, gire el anillo hasta que la
distancia focal alcance los 18 mm, y luego empuje el interruptor
hacia la izquierda.
Uso de la función de estabilización de
imagen óptica (OIS)
(Ver ilustración E)
El usuario puede minimizar el movimiento de la cámara utilizando
la función OIS. Ajuste el interruptor OIS de la lente en ON.
Usar la cubierta de lente
(Ver ilustración F)
Para prevenir que se deteriore la calidad de la imagen bloqueando
la luz innecesaria, utilice una cubierta de la lente.
Si usa el flash en situaciones en las cuales la distancia entre
el objetivo y la cámara es corta, la luz del flash podría verse
bloqueada parcialmente por la lente o la tapa de la lente. Para
garantizar la iluminación correcta, retire la tapa de la lente o ajuste
la distancia entre la cámara y los objetivos.
Usar un filtro (opcional)
Antes de colocar el filtro en la lente, asegúrese de que sea
compatible. Consulte „Especificaciones" para ver los tamaños de
filtro compatibles.
• El filtro es un producto óptico preciso. Manténgalo lejos del
polvo, la suciedad o los arañazos. No intente montar dos o más
filtros al mismo tiempo. Si lo hace podría deteriorar la calidad
de la imagen y provocar un efecto de viñeta (la reducción del
brillo o la saturación de una imagen en la periferia, ocultando el
ángulo de visión del lente).
• En el caso de filtros de marco fino, el efecto viñeta se puede
producir con una lente de gran ángulo.
Especificaciones
SAMSUNG 18-200mm
Nombre de la lente
F3.5-6.3 ED OIS
Distancia focal
18–200 mm
Distancia focal en equivalente a
27,7–308 mm
35 mm
Construcción de la lente -
18
Elementos
Construcción de la lente - Grupos
13
Elementos Asféricos
3
Elementos ED
2
Vista angular
75,9°–8,0°
Apertura máxima
F3.5–6.3
Apertura mínima
F22
Número de láminas del diafragma
7
Distancia mínima de enfoque
0,5 m
Modo de disparo
(Wide)
Distancia mínima de enfoque (Tele)
0,5 m
A, M
Amplificación máxima
0,28X
P, A, S
Cubierta de la lente
Incluida
Estabilizador de imagen óptica
Sí
P, A, S, M
Tipo de montaje
Montaje Samsung NX
Tamaño del filtro
67 mm
Diámetro máximo
72 mm
Distancia
105,5 mm
Peso (Sólo lentes, Aprox.)
549 g
Temperatura de funcionamiento
0–40 °C
Humedad de funcionamiento
5–85%
Las especificaciones pueden cambiar sin aviso previo para un
mejor rendimiento.
Advertisement
Table of Contents

Related Manuals for Samsung 18-200mm F3.5-6.3 ED OIS


![Camera Lens Samsung 45mm F1.8 [T6] 2D/3D User Manual](https://static-data2.manualslib.com/product-images/6ac/1149053/60x60/samsung-45mm-f1-8-t6-2d-3d-camera-lens.jpg)

Summary of Contents for Samsung 18-200mm F3.5-6.3 ED OIS
- Page 1 Visit www.samsung.com to download the firmware. del cuerpo y la lente de la cámara. Visite www.samsung.com para de hacer una fotografía si ha cambiado la distancia focal girando descargar el firmware.
- Page 2 • Pour une utilisation sûre de l’objectif, installez-le ou désinstallez-le lorsque • Samsung no es responsable de los daños causados por el uso con is turned off. • Do not stare at the sun through the lens or camera.
Need help?
Do you have a question about the 18-200mm F3.5-6.3 ED OIS and is the answer not in the manual?
Questions and answers