
Related Manuals for Makeblock mDrawBot Kit


Summary of Contents for Makeblock mDrawBot Kit
- Page 1 Kit Four-In-One Drawbot Kit mScara | mSpider | mEggBot | mCar MAKER WORKS TECHNOLOGY INC Technical support: support@makeblock.cc www.makeblock.cc :@Makeblock : @Makeblock : +Makeblock...
- Page 2 Quick Intro ※mDrawBot is an advanced transformable drawing robot kit based on Makeblock platform. It can be assembled into 4 forms — mScara, mSpider, mEggBot and mCar. It also comes with a matched software named mDraw. Screw M3×5(2) 1.5mm Circle Shaft4×80...
-
Page 3: Part List
Wiring and Software 2× Shaft Connector 4mm 1× Batter y Holder 1× HEX Key 1.5mm 2× Timing Pulley 18T 1× Makeblock Orion 1× Wrench 5mm&7mm · · 2× Me Stepper Motor Driver · mSpider is one form of this four-in-one mEggBot is one form of this four-in-one ·... - Page 4 Assembly Requirement Please assemble the robot in strict accordance with the following three requirements, ※With too many parts contained in this product, please assemble the Drawbot as per the steps Other wise it will result in inaccuracy or unsatisfying performance. indicated in this instruction to avoid confusion.
- Page 5 3.Press downward the parts related to the shaft with force to eliminate the gap before 2.Make sure all parts are placed evenly before tightening the screws. tightening the screw M3x5. Pressure Pressure...
-
Page 6: Table Of Contents
Tools Makeblock Orion & Batter y Holder Pen Lift Mechanism Screw M4×16 15°~45° Assembled Diagram Rubber Bank Makeblock Orion Nut M4(2) Screw M4×8(2) Square Nut M4 Plastic Ring 4×7×3mm Base Bracket Nut M4 Pen Holder and V Clamp(together) Batteries Plastic Rivet R4060 ※Before tightening the two screws, make sure the Pen Holder... -
Page 7: Screw M4×16
mScara The long side is upturned. Structure Diagram Steering Wheel Nut M4(2) Screw M4×16(2) Nut M2(2) Motor B Make sure all the Desk three parts are Screw M2×10(2) properly aligned. The short side is downturned. ※Pay attention to the direction when you installing the Square Nut M4,otherwise the Pen Holder will be broken. - Page 8 Shaft Collar 4mm Screw M3×5(2) Screw M3×5(1) Screw M4×8(2) 1.5mm 1.5mm Nut M4(4) Circle Shaft4×80 ※Use one hand to press the Shaft Screw M4×22(4) Collar downward to minimize the gap betweenthe parts, meanwhile Make sure the end of the shaft is use the other handto tighten the M3x5 screw.
-
Page 9: Screw M3×8
Nut M4(1) Screw M4×16(2) Shaft Collar 4mm ※Use one hand to press the Shaft Collar downward to minimize the gap between the parts, meanwhile use the other hand Timmy Pulley 18T to tighten the M3x5 screw. Screw M3×8(4) Nut M4(4) Screw M3×5(1) Screw M4×16(4) To avoid over-tension,do not tighten... -
Page 10: Screw M4×8
Screw M3×5(1) 1.5mm Nut M4(4) Screw M4×8(8) Screw M4×16(4) Screw M3×8(4) Refer to Page 8 Timmy Pulley 18T 112MXL(1) Nut M4(2) Pen Lift Mechanism Screw M4×8(2) Screw M4×8(2) Nut M4(2) Screw M4×8(2) Nut M4(2) Tight Screw M4×16(2) mScara mSpider mEggbot mCar mScara mSpider... -
Page 11: Screw M4×22
mSpider AC/DC Adapter 12V2A(1) Nut M4(2) 6P6C RJ25 Cable-20cm(2) Structure Diagram Screw M4×16(2) 6P6C RJ25 Cable-35cm(1) Micro USB Cable(1) Assembled Diagram Motor A Motor B String A String B Nut M4(3) Screw M4×35(1) Note: Make sure to assemble the robot in strict accordance with the requirements from P5 - P7, otherwise it may result in inaccuracy or poor performance. - Page 12 ×2 ×2 ×2 Pen Lift Mechanism Screw M3×5(1) Screw M4×16(1) Screw M4×8(2) 1.5mm Screw M4×16(2) Threaded Hole ×2 Nut M4(1) ×2 Nut M4(3) ×2 ×2 ×2 Screw M4×16(3) Screw M3×8(4) String A Motor A Screw M4 ×2 Nut M4(4) Screw M4×8(2) 2m(1) Screw M4×16(4) ※The length of the string is...
- Page 13 RJ25 Adapter(1) Nut M4(2) Screw M4×16(2) Screw M4×8(8) Motor B String B Motor A Refer to Page 8 String A Motor A String B AC/DC Adapter 12V2A(1) 9g Ser vo Extension Cord(1) Software Download > 6P6C RJ25 Cable-20cm(2) Nut M4(4) 6P6C RJ25 Cable-35cm(1) Screw M4×16(4) Micro USB Cable(1)
- Page 14 mEggBot (5~8) mm Nut M4(2) Structure Diagram Screw M3×5(1) Nut M4(2) 1.5mm Screw M4×16(2) Motor B Motor A Flange Bearing Note: Make sure to assemble the robot in strict accordance with the requirements 4×8×3 from P5 - P7, otherwise it may result in inaccuracy or poor performance. Screw M3×8(4) Nut M4(4) Screw M4×22(2)
- Page 15 Spring Nut M4(2) 4×80(1) Screw M4×8(2) adjustable 4×7×10(2) 4×7×3(1) Plastic Gasket 4×7×3 Plastic Gasket 4×7×10 Flange Bearing 4×8×3 Circle Shaft 4×80 Screw M3×5(1) 1.5mm (5~8) mm Compress the spring. Screw M3×5(1) Nut M4(2) Screw M4×8(2) (5~8) mm mScara mSpider mEggbot mCar mScara mSpider...
- Page 16 112MXL(1) 4×7×10(2) Nut M4(1) Nut M4(2) 4×7×3(4) Screw M4×8(2) Nut M4(2) Screw M4×22(2) Screw M3×8(3) Screw M3×5(1) 1.5mm Pen Lift Mechanism Nut M4(2) Screw M4×8(2) Nut M4(2) Screw M4×16(2) Nut M4(2) Screw M3×5(1) Screw M4×16(2) 1.5mm Flange Bearing 4×8×3 mScara mSpider mEggbot mCar...
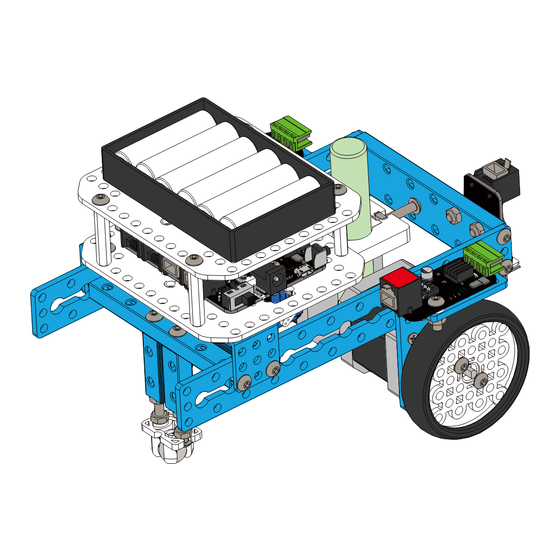
- Page 17 mCar RJ25 Adapter(1) Nut M4(2) Structure Diagram Screw M4×16(2) Screw M4×8(8) Screw M4×16(4) Refer to Page 8 ×2 Motor A Motor B AC/DC Adapter 12V2A(1) Screw M3×8(4) Note: Make sure to assemble the robot in strict accordance with the requirements Software Download >...
- Page 18 Nut M4(2) Nut M4(2) Screw M3×5(2) Screw M4×16(2) Screw M4×16(2) 1.5mm Nut M4(4) 13 mm Screw M4×22(2) Screw M3×5 Screw M4×16(2) RJ25 Adapter(1) ×2 Nut M4(2) Threaded Hole Screw M4×16(2) Screw M4×16(2) mScara mScara mSpider mSpider mEggbot mEggbot mCar mCar mScara mScara mSpider...
- Page 19 (More details are included in the package downloaded from the URL mentiond on Step 1.) mDraw is an open source project hosted on Github. Fork it here: The USB interface of Makeblock Orion uses the chip CH340,you may need to install the chip https://github.com/Makeblock-official/mDrawBot/ Ch340 driver manually.
- Page 20 mDrawBot FCC Information This device complies with part 15 of the FCC Rules. Operation is subject to the following two conditions: (1) This device may not service. Repaired or replaced parts and products are warranted for the remainder of the original warranty period. cause harmful interference, and (2) this device must accept any interference received, including interference that may cause You will be charged for repair or replacement of the product made after the expiration of the warranty period.
Need help?
Do you have a question about the mDrawBot Kit and is the answer not in the manual?
Questions and answers