Dymo letratag User Manual
Hide thumbs
Also See for letratag:
- Instructions for use manual (25 pages) ,
- User manual (21 pages) ,
- Instruction manual (1 page)

Related Manuals for Dymo letratag


Summary of Contents for Dymo letratag
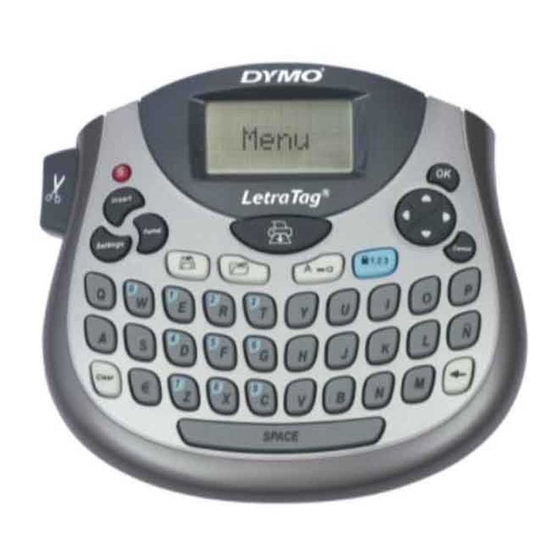
- Page 1 LetraTag User Guide Memory Memory Label Exit Save Recall Print LCD Display Power Cutter Insert Format Navigation Settings Cancel Cancel Num Lock CAPs Clear Clear Backspace Space Bar Figure 1 DYMO LetraTag Label Maker...
-
Page 2: About Your New Label Maker
About Your New Label Maker With your new DYMO LetraTag® label maker, you can create a wide variety of high-quality, self-adhesive labels. You can choose to print your labels in many different font sizes and styles. The label maker uses DYMO LetraTag (LT) 12 mm label cassettes. LT cassettes are available in multiple colors of plastic and metallic tape, and in white iron-on tape. -
Page 3: Inserting The Batteries
Figure 2 period of time. Inserting the Label Cassette Your label maker comes with one label cassette. Visit www.dymo.com for information about purchasing additional label cassettes. To insert the label cassette Figure 3 1. Lift the label cassette cover to... -
Page 4: Selecting A Language
2. Insert the cassette with the label positioned between the print head and pinch roller. 3. Press firmly until cassette clicks into place. Figure 4 4. Close the label cassette cover and press to turn on the power. Selecting a Language The first time you turn on the power, you are asked to select your desired language. -
Page 5: Setting The Date And Time
Setting the Date and Time You need to set the current date and time so that the date is correct if you choose to automatically insert a date on your label. To set the date and time 1. Press 2. Use the up or down arrow key to select Set Date and press The default date is displayed. -
Page 6: Printing Your First Label
Printing Your First Label You are now ready to print your first label. To print a label 1. Enter text to create a simple label. 2. Press 3. Press the cutter button to cut the label. Congratulations! You printed your first label. Continue reading to learn more about the options available for creating labels. -
Page 7: Lcd Display
LCD Display You can enter up to 100 characters and spaces on a label; however, the display will only show a small portion of the characters. And, with DYMO’s exclusive graphical Font size # lines CAPs Num Lock display, any formatting you add is visible instantly. -
Page 8: Navigation Keys
Num Lock key provides access to the numbers located on some of the alphabetic keys. When Num Lock mode is turned on, the Num Lock indicator is shown on the display and the numbers 0 through 9 appear when you press the corresponding letter keys. Num Lock is turned off by default. -
Page 9: Formatting Your Label
Format key displays the Size, Style, and Borders submenus. These formatting features are described later in this User Guide. Insert key allows you to insert symbols, a second line, or the date on your label. Settings key displays the Preview, Language, Set Date, and Set Contrast submenus. -
Page 10: Adding Font Styles
To set the font size 1. Press the key. 2. Use the up or down arrow keys to select Size and press 3. Use the up or down arrow keys to select the desired font size and then press Adding Font Styles You can choose from six different font styles: Normal Bold... -
Page 11: Creating Two-Line Labels
Creating Two-Line Labels You can print a maximum of two lines on labels. To create a two-line label 1. Type the text for the first line and press 2. Use the arrow keys to select Second Line and press multi-line symbol is inserted at the end of the first line, but will not print on the label. -
Page 12: Adding Box And Underline Styles
Adding Box and Underline Styles You can highlight your text by choosing a box or underline style. Underline Edged Square Train Pointed Sweet Hearts Rounded Flowers Crocodile A label can be underlined or enclosed in a box, but not both together. -
Page 13: Using Symbols And Special Characters
Using Symbols and Special Characters Symbols and other special characters can be added to your labels. Adding Symbols The label maker supports the extended symbol set shown below. Position in Row Position in Row... -
Page 14: Adding International Characters
To insert a symbol 1. Press , select Symbols, and press . The first row of symbols shown in the table appears in the display. 2. Use the arrow keys to move to the desired symbol. The left and right arrows move horizontally along a row of symbols. The up and down arrow keys scroll vertically through the rows of symbols. -
Page 15: Printing Options
Printing Options You can preview your label and adjust the printing contrast. Previewing Your Label You can preview the text or format of your label prior to printing. A two-line label is previewed as a single-line label with a line break character between the two lines. -
Page 16: Using Label Maker Memory
Using Label Maker Memory The label maker has a powerful memory feature that allows you to store the text of up to nine labels you use frequently. Storing Label Text You can store up to nine specific labels you use frequently. To store the current label text 1. -
Page 17: Caring For Your Label Maker
Caring for Your Label Maker Your label maker is designed to give you long and trouble-free service, while requiring very little maintenance. Clean your label maker from time to time to keep it working properly. Clean the cutter blade each time you replace the label cassette. The cutter blade is extremely sharp. - Page 18 1. Remove the label cassette. 2. Remove the cleaning tool from inside the label compartment cover. If you do not have a cleaning tool, contact DYMO Customer Care (http://support.dymo.com). 3. Gently wipe the padded side of the tool across the print head. See...
-
Page 19: Troubleshooting
Battery low Batteries almost discharged. Replace batteries. Tape Jam • Remove jammed label; replace label cassette. Motor is stalled due to label jam. • Clean cutter blade. If you still need assistance, contact DYMO Customer Support (http://support.dymo.com). -
Page 20: Documentation Feedback
We also welcome your suggestions about additional topics you would like to see covered in the documentation. Send email messages to: documentation@dymo.com Please keep in mind that this email address is only for documentation feedback. If you have a technical question, please contact Customer Support.
Need help?
Do you have a question about the letratag and is the answer not in the manual?
Questions and answers
I need to print on two lines... It works but only uses half of the lower part of that label. Is there a way to use all height of the label^
To print on two lines using the Dymo LetraTag label maker:
1. Type the first line of text.
2. Press the "N" key to insert a line break (an arrow will appear on the display).
3. Type the second line of text.
4. Print the label.
Note: When using two-line labels, Box/Underline and Style features are not available.
This answer is automatically generated
It is possible to add a non latin alfabet?