Table of Contents
Advertisement
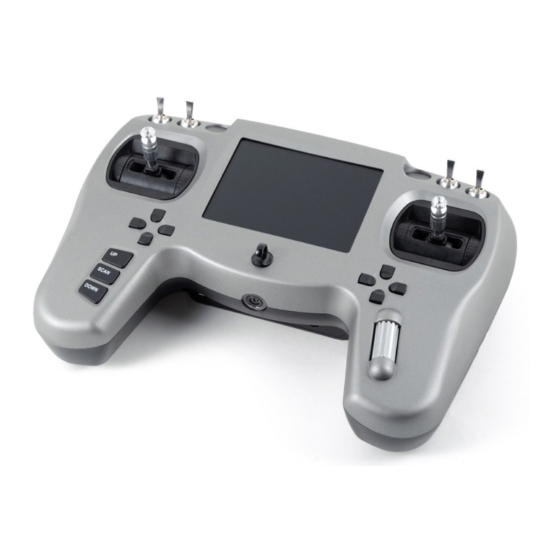
TBS TANGO FPV Remote
All‐in‐one Remote Control System for FPV
The TBS TANGO FPV remote control is an all-in-one system made for FPV enthusiasts. It features built-in
video receiver and a slot for JR-compatible radio modules. Input controls are provided by quality quad
ball-bearing gimbals and camera operation is possible using smooth spring-loaded dials and rocker-switch. A
huge display shows the video stream right on the remote, with an option to connect external goggles.
Key features
•
All-in-one FPV remote control with R/C radio and video receiver built-in
•
JR-compatible slot for any R/C radio module
•
Large 4.2-inch display for live video stream
•
Quality ball-bearing gimbals for control and spring-loaded dials for smooth camera operation
•
High capacity built-in Lithium-ion cells, charges via USB
•
External port for goggles
1
Revision 2016-07-16
Advertisement
Table of Contents

Subscribe to Our Youtube Channel
Related Manuals for TBS TANGO FPV REMOTE

Summary of Contents for TBS TANGO FPV REMOTE
-
Page 1: Key Features
Revision 2016-07-16 All‐in‐one Remote Control System for FPV The TBS TANGO FPV remote control is an all-in-one system made for FPV enthusiasts. It features built-in video receiver and a slot for JR-compatible radio modules. Input controls are provided by quality quad ball-bearing gimbals and camera operation is possible using smooth spring-loaded dials and rocker-switch. -
Page 2: Table Of Contents
Table of content Attention Overview Detailed overview Powering up Remote Control Channel Mapping Configuration menu Main menu Drone menu Remote menu Display menu Setup Installing R/C radio module Transmitter stick mode Connecting goggles Usage Changing video receiver frequency Remote LED status indicator Battery protection Alert prompts Opening up the remote... -
Page 3: Specifications
Specifications Type: All-in-one FPV Remote Control RC system: JR-compatible expansion module, e.g. TBS CROSSFIRE FPV system: 5G8 VRX receiver, 40CH Antenna: R/C: module specific VTX: 5G8 5dBi patch antenna, optional external SMA port FPV Channels: Boscam A, B, E, Fatshark, Raceband Display: LCD 4.2-inch, 640x480p... -
Page 4: Attention
Attention These Long Range Systems are capable to use radio frequency transmissions and output power that may be not allowed in your country. Please always check your local RF legislation to set the frequency and output power according with the regulation. A general rule for RC aircrafts is that they must be controlled always under sight of view, check your RC regulation to keep up to date with regulations. -
Page 5: Overview
Overview The following diagram indicates the essential input controls and features of the radio. -
Page 6: Detailed Overview
Detailed overview JR-module slot, DSC, micro-USB, TBS-port (for Display and neck-strap connector goggles), power button and speaker Left gimbal for throttle and yaw, and digital pad for Right gimbal for aileron and elevator, and digital trims pad for trims Three-position (A/L2), two-position (B/L1) switch, Two-position (C/R1) switch, three-position (D/R2) spring-loaded dial (SW E) and video receiver bay switch and spring-loaded (SW F) dial... -
Page 7: Powering Up
Getting set up and ready to fly is a quick and simple task. In most cases plug&play when using TBS equipment. Power up Press and hold the Power-button for half a second to turn on the remote. The TBS TANGO screen will welcome you and the power button starts to flash green. Factory mode Press the Power-button and Down-button for 2 seconds to enter the factory mode (not factory reset), a confirmation tone will sound. -
Page 8: Remote Control Channel Mapping
Remote Control Channel Mapping The channel arrangement of the PPM output to the RF module is dependant on the kind of flight controller that is hooked-up on the receiver side. In the configuration menu, you can change the mapping by changing the model type to match your particular setup. -
Page 9: Configuration Menu
Configuration menu Changing settings on the TBS TANGO is done using the LCD display and controlled using the rocker-switch and VRX buttons. To enter and navigating the configuration menu system: • Enter configuration menu - long press on the rocker-switch, 3 seconds •... -
Page 10: Drone Menu
Drone menu Specific profile for the model you are controlling • Back - Return to previous menu • Name - Unique name for the model profile • Type [ CleanFlight, DJI NAZA, PixHawk, OP-Taulabs] - Flight controller used on the model, allows further switch/dial mapping on supported FCs (DJI/PX) ... -
Page 11: Display Menu
Display menu Adjust the video display parameters on the remote Back - Return to previous menu • Contrast [055, 0 to 99] • - Tune the contrast • Contrast [050, 0 to 99] - Tune the brightness •... -
Page 12: Setup
Setup Installing R/C radio module A JR-compatible radio module needs to be installed in the slot of the back of the remote. The CROSSFIRE transmitter module is recommended, as it utilizes the latest CRSF-protocol, but any transmitter module with PPM stream will work as well. Check the TBS CROSSFIRE transmitter module manual for further details on setting up and configuring it. -
Page 13: Transmitter Stick Mode
Transmitter stick mode When talking about transmitter stick modes we are referring to how the transmitter is configured to control the airplane i.e. which sticks operate which controls on the aircraft. By default the remote is set up with mode 2, which is the most common type. -
Page 14: Connecting Goggles
Connecting goggles If you like to use FPV goggles, these can be connected to the remote using a special custom flat CAT5 goggle-cable (provided). The cable carries both video and power to compatible Fatshark-video goggles. If you like to turn off the LCD display while using the goggles, enter the configuration menu and go to the LCD Display Turn Off Display option. -
Page 15: Usage
Usage Changing video receiver frequency Use the “SCAN”, “UP”, or “DOWN” buttons on the left-hand side to change the video receiver frequency. UP-button • Long press - Reset the video RX channel to the Home-channel (changed in the configuration menu) •... -
Page 16: Remote Led Status Indicator
Remote LED status indicator When the remote is powered on, the LED behind the button will flash green. The built-in LiPo battery is charged every time a 5V power source is connected to the micro-USB connector. Button LED indicator Status ▀... -
Page 17: Alert Prompts
Alert prompts The remote will raise an alert when one of the following events happen: • Battery low alert - described in the previous section • Telemetry data about the low RSSI, for RF module is set to XJT • Telemetry data about the low battery voltage, for RF module is set to XJT •... -
Page 18: Opening Up The Remote
Opening up the remote To change the stick mode or changing the throttles tick ratchet, you will need to open up the remote control. First remove the seven (7) screws on the backside and locate the area shown in the photo below. If you can’t open up the remote control, you probably forgot the 7th screw, located inside the JR module. -
Page 19: Adjusting Throttle Ratchet Strength
Adjusting throttle ratchet strength Use a screwdriver to adjust the right-most screw; counter-clockwise to decrease the tension and clockwise to increase the tension. If you rather prefer a smooth sliding stick, increase the tension of the other metal bracket. Replacing battery The battery in the radio uses a regular XT30 connector to make it easy to replace or upgrade the stock battery. -
Page 20: Factory Mode
Factory mode The factory mode is only needed when fine-tuning or troubleshooting the remote. Main menu Main menu for the factory mode • Back - Exit out of the factory mode • Calibration - Calibrate the end-points of the sticks, dials and switches •... - Page 21 Flip all the switches to their up-position. • Next - To the next step in the procedure Now, now all the switches through their range until each one turns to green. If a few does not register, try flipping it back to up-position and then move it down again.
-
Page 22: Frsky Xjt
FrSky XJT Despite being one of the most popular R/C systems, FrSky’s RF modules and even receivers are notorious for interfering with 5.8GHz receivers, video transmitters or other 2.4GHz R/C systems. When designing the Tango we have taken every precaution possible to ensure a interference-free operation also with FrSky’s devices, but it is all at the limits. -
Page 23: Firmware Upgrade
Firmware upgrade Updates to the transmitter and receiver is applied using our TBS AGENT software. This takes care of all the downloading of the latest firmware, verification- and upgrade process. Plug in the remote control, start the TBS Agent, and wait for the latest firmware to download. Then click on “UPDATE” to proceed. Installing TBS Agent Download the installer from ... -
Page 24: Good Practices
Good practices We have compiled a list of all of practices which have been tried and tested in countless environments and situations by the TBS crew and other experienced FPV pilots. Follow these simple rules, even if rumors on the internet suggest otherwise, and you will have success in FPV. Start with the bare essentials and add equipment one step at a time, after each new equipment was ●... - Page 25 ● Improving the antenna gain on the receiver end is better than increasing the output power (except in RF-noisy areas). More tx power causes more issues with RF on your plane. 500mW is plenty of power! ● Try to achieve as much separation of the VTx and R/C receiver as possible to lower the RF noise floor and EMI interference.
Need help?
Do you have a question about the FPV REMOTE and is the answer not in the manual?
Questions and answers