Korg nanoKONTROL Studio Owner's Manual
Hide thumbs
Also See for nanoKONTROL Studio:
- Quick start manual (7 pages) ,
- Quick start manual (7 pages) ,
- Quick start manual (7 pages)
Table of Contents
Advertisement
Advertisement
Table of Contents

Related Manuals for Korg nanoKONTROL Studio


Summary of Contents for Korg nanoKONTROL Studio
-
Page 2: Table Of Contents
Table of Contents Thank you for purchasing the Korg nanoKONTROL Studio Mobile MIDI controller. Main Features ..............3 In order to use this product in a computer music environment, Preparation ..............4 you’ll need to adjust the MIDI settings of the host application. -
Page 3: Main Features
A USB connection is useful when you are Compatible software: Cubase, Digital Performer, GarageBand, Live, planning to spend a lot of time using the nanoKONTROL Studio with Logic, Pro Tools, SONAR, Studio One. a desktop computer and do not wish to worry about the battery power level;... -
Page 4: Preparation
USB connection. In addition, the the correct polarity, insert the batteries, and then close the battery nanoKONTROL Studio cannot be used as a USB-MIDI de- cover. vice, even if it is connected to a computer using a USB ca- If a malfunction occurs that cannot be resolved no matter ble. -
Page 5: Using A Usb Connection
Using a USB Connection Wireless Connection Setup In order to use the nanoKONTROL Studio wirelessly, a wireless con- nection must be established. Refer to “Using a wireless connection” Making Connections and Turning On the Power in the Quick Start Guide to set up the wireless connection. -
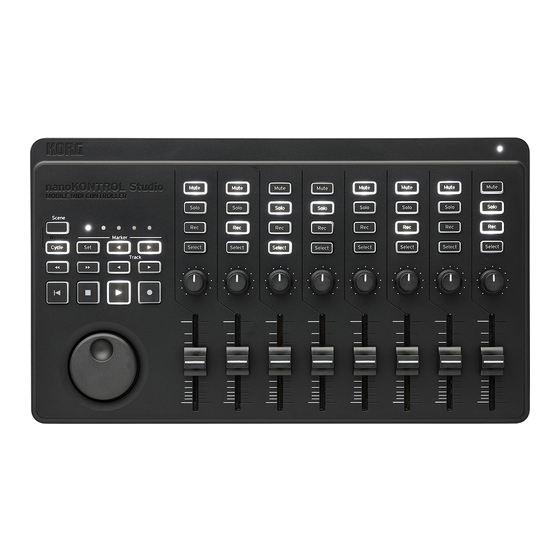
Page 6: Part Names
Part names Mode switch USB port Scene LEDs Scene button Transport buttons Track / buttons Marker buttons Jog wheel Power LED 10. Mute buttons 11. Solo buttons 12. Rec buttons 13. Select buttons 14. Knobs 15. Sliders... -
Page 7: Operating Modes And Software Setup
DAW software titles. For details on specifying settings and using the DAW software, refer to the instruction manual for the software. In this mode, the controllers of the nanoKONTROL Studio will be automatically set up for mixer control by the DAW software. You can... -
Page 8: Pro Tools
Performer mode, it will continue operating in that mode. the nanoKONTROL Studio has been set to Live mode, it will Using a USB connection continue operating in that mode. • Open “Applications” → “Utilities”, start In Live, open the “Preferences” window, and then select “Audio MIDI Setup”, open the “MIDI Studio”... -
Page 9: Setup For Using The Nanokontrol Studio In The Assignable Mode
While holding down the Scene and Cycle buttons, turn the “Controller/Surface” and the nanoKONTROL Studio ports nanoKONTROL Studio on to set it to assignable mode. Once the for “Input Port” and “Output Port”. nanoKONTROL Studio has been set to the assignable mode, it will TIP The Marker Set button does not operate with SONAR. -
Page 10: Customizing Controllers
Studio, regardless of the TIP For details on installing and using the KORG KONTROL Edi- selected scene. tor software, refer to the instruction manual for that soft- Scene Parameters ware. -
Page 11: Scene Parameters
Scene Parameters Slider Slider Enable .......... [Enable, Disable] Knobs This parameter specifies whether the Slider operations are enabled or disabled. Knob Enable ........... [Enable, Disable] When set to “Disable”, a MIDI message will not be transmitted, This parameter specifies whether the Knob operations are en- even if you operate a Slider. -
Page 12: Jog Wheel
Buttons Button Behavior ......[Momentary, Toggle] The button can be set to either of these modes: Assign Type ....[Note, Control Change, No Assign] Momentary When “Assign Type” is set to “Note”, a note-on message is transmitted This parameter specifies the MIDI messages assigned to but- when you press the Button, and a note-off message is transmitted when you release the Button. -
Page 13: Jog Wheel
Max Value ............. [0...127] Sign Magnitude Control change messages with the values 1 through 64 will be trans- mitted when the Jog Wheel is turned clockwise and with the values This parameter specifies the maximum control change value 65 through 127 will be transmitted when the Jog Wheel is turned that is transmitted when “Jog Wheel Type”... -
Page 14: Global Parameters
This parameter specifies the Global MIDI channel that the ly, this is set to “Internal”; however, by specifying the appropri- nanoKONTROL Studio is operating on. This can be set to match ate settings, the nanoKONTROL Studio can behave as if it is the MIDI channel of your software. - Page 15 Auto Power Off to “Disable.” To turn the This parameter specifies the device name displayed when a nanoKONTROL Studio back on after the Auto Power Off func- wireless connection is being used. tion has turned it off, set the mode switch to “Standby”, and Up to 25 alphanumeric characters can be entered.
- Page 16 Set this to “Enable” so that the LEDs will light up or to “Disable” so that they will not light up. If the nanoKONTROL Studio is operated while the LED Illumination is active, it will return to its previous condition.
-
Page 17: Appendix
With a USB connection will be restored to the factory settings when the blinking stops. • If the nanoKONTROL Studio is connected to a computer via a Restoring the factory settings takes several seconds after USB hub, the nanoKONTROL Studio may not turn on due to insuf- the nanoKONTROL Studio is turned on. - Page 18 MIDI port setup of your software. • Check the settings for “Controller Mode” (page 14) and “LED • In order to use the functions of the nanoKONTROL Studio, your Mode” (page 14). software must be set up. For the setup, refer to “Operating Modes and Software Setup”...
-
Page 19: Specifications
(wireless connection): iPhone/iPad installed with iOS 8 or later Quick Start Guide and compatible with Bluetooth 4.0 For the purpose of improvement, the specifications and nanoKONTROL Studio operation is not guaranteed with all appearance are subject to change without notice. devices that satisfy these operating requirements. - Page 20 ©2016 KORG INC. www.korg.com...
Need help?
Do you have a question about the nanoKONTROL Studio and is the answer not in the manual?
Questions and answers