Table of Contents
Advertisement
Quick Links
Advertisement
Table of Contents

Related Manuals for Korg KR-11


Summary of Contents for Korg KR-11
- Page 1 Owner's Manual *Before using the KR-11, please read the Precautions (PDF) carefully to ensure proper use. Supplementary contents Quick Start Guide (Precautions), Owner’s Manual Frequently asked questions Product website Published 3/2024 ©2024 KORG INC.
-
Page 2: Table Of Contents
KR-11 - Table of contents Table of contents Introduction ........................4 Part names........................5 Getting ready........................6 Installing the batteries ..................6 Making connections ..................7 Turning the power on/off ....................8 Turning the power on/off................. 8 Playing back a rhythm pattern ..................9 Selecting and playing back a pattern ............9 Setting the tempo ..................... - Page 3 KR-11 - Table of contents Global settings ......................21 Global settings: overview of operations ............21 Adjusting the pad velocity sensitivity............21 Adjusting the metronome volume for recording........22 Setting the auto power-off feature..............22 Using the pedal switches ..................23 Playing this unit by operating the pedal switches........23 Assigning functions to the pedal switches..........24...
-
Page 4: Introduction
KR-11 - Introduction Introduction Thank you for purchasing the Korg KR-11 Compact Rhythm Box. To ensure years of trouble-free operation, please read this Owner's Manual carefully before use. Conventions in this manual • Specifications and appearance of this product are subject to change without notice. -
Page 5: Part Names
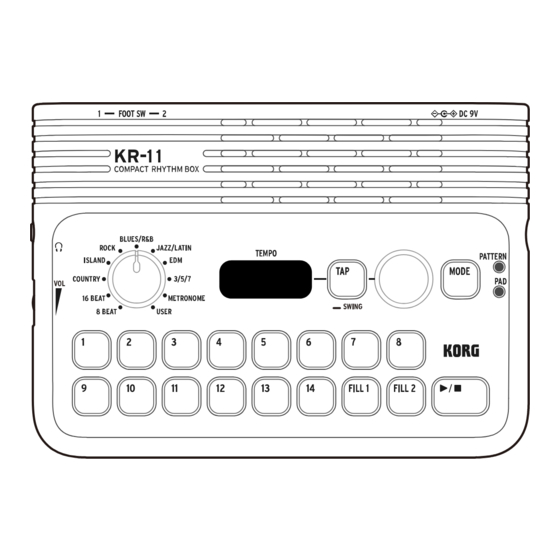
KR-11 - Part names Part names Genre selector Display TAP button Tempo knob DC 9V jack Speaker Power button PATTERN LED PAD LED MODE button (playback and stop) button FILL 1 button, FILL 2 button (pads) 1–14 buttons (pads) Volume dial... -
Page 6: Getting Ready
Make sure that the unit is off when you replace the batteries. Depleted batteries should be removed from the unit. You should also remove the batteries if you won’t be using the KR-11 for an extended period of time. When the batteries run low, blinks on the display. -
Page 7: Making Connections
Connecting pedal switches (sold separately) You can connect a pedal switch (Korg PS-1 or PS-3, sold separately) to this unit to play back or stop patterns, insert a fill-in, control the tempo or trigger a pad sound. Connect the pedal switches (sold separately) to the FOOT SW 1 and 2 jacks. -
Page 8: Turning The Power On/Off
Keep holding down the power button until the display goes dark. appears on the display, and the power turns off. Never turn off the power of the KR-11 while data is being written, such as when patterns you’ve created are being saved, or while the unit is initializing. -
Page 9: Playing Back A Rhythm Pattern
KR-11 - Playing back a rhythm pattern Playing back a rhythm pattern Selecting and playing back a pattern Press the MODE button to select pattern play mode (the PATTERN LED lights up). Press the MODE button to toggle between pattern play mode and pad play mode. -
Page 10: Adding A Fill-In
KR-11 - Playing back a rhythm pattern Adding a fill-in A fill-in is a phrase used to accentuate the breaks in the rhythm, the start of a measure and so on. When you press the FILL 1 or FILL 2 button during playback, a fill-in is added at the appropriate timing. -
Page 11: Adding A Swing Feel To The Pattern
KR-11 - Playing back a rhythm pattern Adding a swing feel to the pattern You can change the rhythm’s nuance by adding swing for a syncopated, energetic feel. Long-press the TAP button to show the swing value in the display. -
Page 12: Using The Metronome
KR-11 - Using the metronome Using the metronome Turn on the metronome Press the MODE button to select pattern play mode (the PATTERN LED lights up). Use the genre selector to select METRONOME. Use the 1–14 buttons and the FILL 1/2 buttons to select the beat, rhythm and metronome sound. -
Page 13: Playing With The Buttons (Pads)
KR-11 - Playing with the buttons (pads) Playing with the buttons (pads) You can use the 1–14 buttons and the FILL 1/2 buttons as pads for finger drumming. Percussion sounds including drums are preregistered to these 16 buttons. Selecting and playing the drum kits (pad play mode) Press the MODE button to select pad mode (the PAD LED lights up). -
Page 14: List Of Drum Kits
KR-11 - Playing with the buttons (pads) List of drum kits The drum kits that correspond to the genre selector are shown below. The default setting is “8 BEAT”. Some sounds differ depending on the drum kit. Note: The reference tone (sine wave) is used for the metronome. -
Page 15: Play A Reference Tone
KR-11 - Play a reference tone Play a reference tone Press the MODE button to select pad play mode (the PAD LED lights up). Use the genre selector to select METRONOME. The reference pitch’s frequency appears on the display. Use the tempo knob to set the reference pitch. -
Page 16: Creating A Rhythm Pattern
KR-11 - Creating a rhythm pattern Creating a rhythm pattern You can create your own rhythm patterns based on existing patterns and fill-ins, and you can also cre- ate a blank rhythm pattern from scratch. Here are some of the things you can do. - Page 17 KR-11 - Creating a rhythm pattern Press the button to put the unit in record standby mode (the button blinks red). The pattern returns to the top after recording stops. The pattern you recorded is deleted if you select a different pattern without saving your Note: recorded data, or if you switch to a different mode.
-
Page 18: Creating A New Pattern
KR-11 - Creating a rhythm pattern Creating a new pattern Press the MODE button to select pad play mode (the PAD LED lights up). Turn the genre selector to select the drum kit to use. To record the pattern, press the button while holding down the MODE button. - Page 19 KR-11 - Creating a rhythm pattern Quantize This feature lets you smooth out inconsistencies in the timing of what you play. Turn the tempo knob while holding down the 9 button to set the quantization. The available setting values are 1, 2, 3, 4, 6, 8, 12, 16 and 96.
-
Page 20: Listening To The Demo Performances
KR-11 - Listening to the demo performances Listening to the demo performances Playing back the demo performances The rhythm patterns for each genre play back in order. Press the power button while holding down the MODE button to enter demo mode. -
Page 21: Global Settings
KR-11 - Global settings Global settings In the global settings, you can configure the pad velocity sensitivity, the volume of the metronome during recording and the auto power-off time. Global settings: overview of operations Press the MODE button to select pattern play mode (the PATTERN LED lights up). -
Page 22: Adjusting The Metronome Volume For Recording
KR-11 - Global settings Adjusting the metronome volume for recording This sets the volume that the digital metronome plays while recording from a value of 0 to 15. During recording, only the digital metronome plays, without following a specific number of beats per measure. -
Page 23: Using The Pedal Switches
KR-11 - Using the pedal switches Using the pedal switches You can connect a pedal switch (sold separately) to the FOOT SW 1 and 2 jacks to play back or stop patterns, insert a fill-in or trigger an instrument sound. -
Page 24: Assigning Functions To The Pedal Switches
KR-11 - Using the pedal switches Assigning functions to the pedal switches Turn off the power, and connect a pedal switch (sold separately) to either or both the FOOT SW 1 or 2 jacks. →Connecting pedal switches (sold separately) Turn on the power. -
Page 25: Restoring The Factory Default Settings
- Restoring the factory default settings Restoring the factory default settings This operation restores all of the KR-11’s settings to their factory defaults, including erasing the user patterns, restoring the pedal switch and global settings and so forth. Never turn off the power while initialization is in progress. -
Page 26: Troubleshooting
KR-11 - Troubleshooting Troubleshooting The unit does not turn on • Are the batteries facing the correct way? • Have you inserted the specified type of batteries, or are you using the specified AC adapter? No sound • The volume dial might have been set to minimum. -
Page 27: Specifications
KR-11 - Specifications Specifications Patterns Preset: 126 patterns (9 genres × 14) User: 14 patterns Fill-ins 2 types of fill-ins per pattern Metronome Beats: 0, 2–8 Rhythm: quarter notes, eighth notes/triplets/triplet swing, sixteenth notes/sixteenth-note swing Tempo 30–252 bpm Jacks Headphones/line out jack, FOOT SW 1 jack, FOOT SW 2 jack, DC 9V jack... - Page 28 2024 Published 3/2024...
Need help?
Do you have a question about the KR-11 and is the answer not in the manual?
Questions and answers