Table of Contents
Advertisement
Quick Links
Advertisement
Table of Contents

Subscribe to Our Youtube Channel
Related Manuals for John Lewis JLBIGGH 704


Summary of Contents for John Lewis JLBIGGH 704
-
Page 1: Instruction Manual
JLBIGGH 704 Electronic gas hob Instruction manual... - Page 2 John Lewis branch from which you purchased the the meanings of these warnings contact the John Lewis branch from which you purchased the the meanings of these warnings contact the John Lewis branch from which you purchased the...
-
Page 3: Table Of Contents
Contents Contents Contents Contents Contents For the User For the User For the User For the User For the User Guide to Use the instructions Guide to Use the instructions Guide to Use the instructions Guide to Use the instructions Guide to Use the instructions Important Safety Information Important Safety Information... -
Page 4: Description Of The Appliance
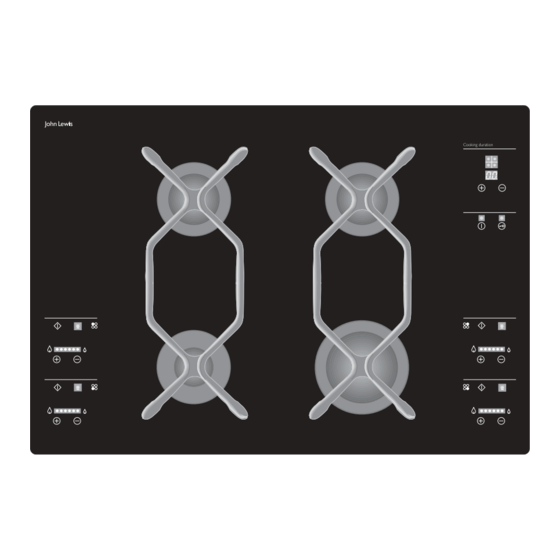
Description of the Description of the Appliance Description of the Appliance Appliance Appliance Description of the Description of the Appliance 1. Semi-rapid burner 2. Semi-rapid burner Rear left burner control zone Front left burner control zone Auxiliary burner 6. Rapid burner Front right burner control zone... -
Page 5: Installation Possibilities 1
Installation Installation Installation Installation Installation It is dangerous to alter the specifications or attempt to modify this product in any way. Care must be taken to ensure that the appliance does not stand on the electrical supply cable. Any electrical work required to install this appliance should be carried out by a qualified electrician or competent person. - Page 6 Electrical Connection Electrical Connection Electrical Connection Electrical Connection Electrical Connection P P P P P ermanent connection ermanent connection ermanent connection ermanent connection ermanent connection In the case of a permanent connection, it is necessary that THIS HOB MUST BE EAR THIS HOB MUST BE EAR THED THED...
-
Page 7: Repairs - Repairs - After Sales Ser After Sales Ser After Sales Service Vice 2
Wiring Diagram Wiring Diagram Wiring Diagram Wiring Diagram Wiring Diagram... - Page 8 Impor Impor tant Saf tant Saf ety Requir ety Requir ements ements Impor tant Saf tant Saf ety Requir ety Requir ements ements Impor Impor tant Saf ety Requir ements This hob must be installed in accordance with the Gas Safety (Installation and Use) Regulations (Current Edition) and the IEE Wiring Regulations (Current Edition).
- Page 9 Connection Connection Connection Connection Connection IMPORTANT: IMPORTANT: IMPORTANT: IMPORTANT: IMPORTANT: This hob must be installed by a competent person to the relevant Gas Standards. Any gas installation must be carried out by a competent person. The manufacturer will not accept liability, should the above instructions or any of the other safety instructions incorporated in this book be ignored.
- Page 10 Con v v v v v ersion fr ersion fr ersion fr om Natural Gas to LPG om Natural Gas to LPG ersion fr om Natural Gas to LPG om Natural Gas to LPG ersion fr om Natural Gas to LPG Replacing the injectors Replacing the injectors Replacing the injectors...
- Page 11 Setting the hob for the new gas type Setting the hob for the new gas type Setting the hob for the new gas type Setting the hob for the new gas type Setting the hob for the new gas type 1.
- Page 12 Minimum flame adjustment Minimum flame adjustment Minimum flame adjustment Minimum flame adjustment Minimum flame adjustment If it is necessary to adjust the minimum flame setting, proceed as follows: 1. Carry out the steps described in the paragraph “Setting the hob for the new gas type” - points 1, 2, 3, 4 and 5. 2.
- Page 13 Building In Building In Building In Building In Building In Dimensions are given Dimensions are given Dimensions are given Dimensions are given Dimensions are given A A A A A = = = = = Auxiliary burner Auxiliary burner Auxiliary burner Auxiliary burner Auxiliary burner in millimetres...
- Page 14 Fitting the hob to the worktop Fitting the hob to the worktop Fitting the hob to the worktop Fitting the hob to the worktop Fitting the hob to the worktop Before fitting the hob into the cut out, an adhesive seal must be fitted to the underside outside edge of the hob.
- Page 15 Installation P Installation P ossibilities Installation P ossibilities ossibilities ossibilities Installation P Installation P ossibilities Building over a kitchen unit with door Building over a kitchen unit with door Building over a kitchen unit with door Building over a kitchen unit with door Building over a kitchen unit with door Proper arrangements must be taken in designing the furniture unit, in order to avoid any contact with the bottom of the...
-
Page 16: The Control Panel
The Contr The Contr ol Panel ol Panel The Contr ol Panel ol Panel The Contr The Contr ol Panel Before using the appliance, remove all packaging, including the advertising labels and any protective film. Keep packaging away from children. T T T T T ouch contr ouch contr ouch contr... -
Page 17: How To Light A Burner
" How to light a burner How to light a burner How to light a burner How to light a burner How to light a burner 1. Touch the main ON/OFF Control for about 3 seconds to switch on the hob. The red indicator above the touch control lights up, an acoustic signal sounds and the hob is ready to use. -
Page 18: How To Turn Off A Burner
" How to turn off a burner How to turn off a burner How to turn off a burner How to turn off a burner How to turn off a burner 1. To turn off a burner press the relevant Burner Ignition Touch Control . -
Page 19: How To Turn Off All The Burners At Once
" How to turn off all the burners w to turn off all the burners w to turn off all the burners w to turn off all the burners w to turn off all the burners at once at once at once at once at once... -
Page 20: Child Safety Function
" Child safety function Child safety function Child safety function Child safety function Child safety function To avoid children operating the hob controls, it is possible to lock them. 1. Touch the “Key” Control for about 3 seconds. The red indicator above the “Key” symbol lights up and an acoustic signal sounds. -
Page 21: How To Programme The Burner To Switch Off
" How to programme a burner to How to programme a burner to How to programme a burner to How to programme a burner to How to programme a burner to switch off switch off switch off switch off switch off To programme a burner to switch off, proceed as follows: 1. -
Page 22: How To Set The Minute Minder Function
" Ho w t o w t o w t o w t o w t o set the min set the min set the min set the minute minder set the min ute minder ute minder ute minder ute minder f f f f f u n c t i o n u n c t i o n u n c t i o n... - Page 23 ety and energ ety and energ y-sa y-sa ving advice ving advice Saf ety and energ ety and energ y-sa y-sa ving advice ving advice ety and energ y-sa ving advice F F F F F or a cor or a cor or a cor or a cor or a corr r r r r ect use of the hob...
-
Page 24: Cooking Table 2
Cooking table Cooking table Cooking table Cooking table Cooking table Recommended Recommended Recommended Recommended Recommended cooking time cooking time cooking time cooking time cooking time (Where no D I S H E S D I S H E S D I S H E S D I S H E S D I S H E S BURNER PO... -
Page 25: Maintenance And Cleaning 2
Maintenance and Cleaning Maintenance and Cleaning Maintenance and Cleaning Maintenance and Cleaning Maintenance and Cleaning Before any maintenance or cleaning can be carried out, you must DISCONNECT the hob from the electricity supply and wait until it has cooled down. This appliance cannot be cleaned with steam or with a steam cleaning machine. -
Page 26: W W W W Orking Orking 2
Something Not Something Not W W orking orking orking Something Not Something Not Something Not W orking orking If the hob is not working correctly, please carry out the following checks, before contacting your local Service Force repair agent. In the event of any other fault codes that arise, disconnect the appliance from the electrical supply for a few seconds (take outthe fuse from the housing wiring system). -
Page 27: Spare Parts
Repairs - Repairs - Repairs - After Sales Ser After Sales Ser After Sales Ser vice After Sales Ser vice vice vice Repairs - Repairs - After Sales Ser vice Spare parts Spare parts Spare parts Spare parts Spare parts If your hob is not performing satisfactorily;... - Page 28 John Lewis Partnership John Lewis Partnership John Lewis Partnership John Lewis Partnership John Lewis Partnership 171 Victoria Street London SWIE 5NN www.johnlewis.com 35692-8601 07/06...
Need help?
Do you have a question about the JLBIGGH 704 and is the answer not in the manual?
Questions and answers