Table of Contents
Advertisement
Quick Links
Advertisement
Table of Contents

Related Manuals for RTX 8630


Summary of Contents for RTX 8630
-
Page 1: Handset Operations Manual
Handset Operations Manual RTX 8630 Version 1.4 Page | 1... -
Page 2: Table Of Contents
Contents Handset Operations Manual ........................1 Contents ..............................2 About This Document ......................... 5 1.1 Audience ............................5 1.2 Abbreviations ........................... 5 1.3 References/Related Documentations ....................5 1.4 Document History ..........................5 Making Handset Ready ........................6 2.1 Package - Contents/Damage Inspection ..................6 2.1.1 Before Package Is Opened ...................... - Page 3 Basic Operation ..........................16 5.1 How to Switch the Handset On/Off ....................16 5.2 Lock/Unlock the Keypad ........................ 16 5.3 Entering a number in idle ......................16 Menu Operation ..........................17 6.1 Contacts ............................18 6.1.1 Add Contact ..........................18 6.1.2 Call/Edit a Contact ........................
- Page 4 6.6.8 Sent Messages ........................56 6.6.9 Settings ........................... 57 6.7 Alarms ............................58 6.8 F-Keys ............................. 60 6.9 Alarm List ............................62 6.9.1 The Alarm List Menu ....................... 62 6.9.2 An Incoming Alarm ......................... 62 Calls Operations ..........................64 7.1 Incoming call ..........................64 7.1.1 Answering an Incoming Call ....................
-
Page 5: About This Document
1 About This Document This document describes the features and functionalities available in the RTX SME VoIP DECT 8630 Handset. We describe how to operate the handset without going into details of its mechanical features. The reference for features and operation in this manual is RTX generic mode. -
Page 6: Making Handset Ready
2 Making Handset Ready In this chapter we briefly describe how to prepare the handset for use, install, and how to insert and charge new batteries. 2.1 Package - Contents/Damage Inspection 2.1.1 Before Package Is Opened Examine the shipping package for evidence of physical damage or mishandling prior to opening. If there is proof of mishandling prior to opening, you must report it to the relevant support center of the regional representative or operator. -
Page 7: Damage Inspection
2.1.3 Damage Inspection The following are the recommended procedure for you to use for damage inspection: 1. Examine all relevant components for damage. 2. Make a “defective on arrival - DOA” report or RMA to the operator. Do not move the shipping carton until it has been examined by the operator. -
Page 8: How To Open
2.2.4 How to Open Back Cover 1. Press down the back cover lock and lift back cover away from the handset. 2. Remove Back Cover from Handset 2.2.5 How to Replace Battery Remove the back cover from the handset as showed in section 2.2.4 How to Open Back Cover above. Then remove the old battery and replace with a new one. -
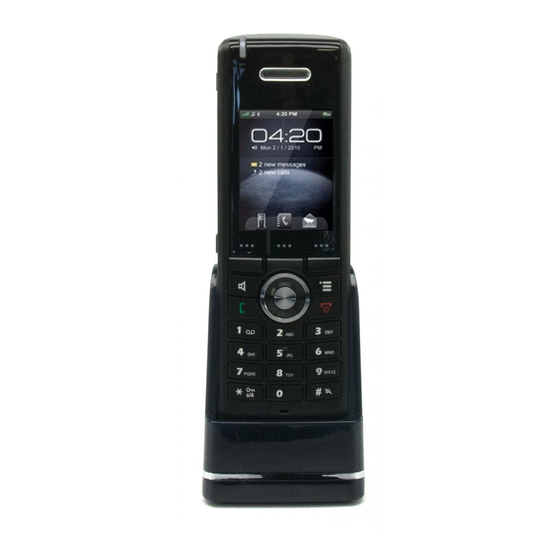
Page 9: Phone Overview
3 Phone Overview This section contains an overview of the handset from a front and a rear view. 3.1 Handset – Front View 1. Earpiece Speaker 2. Screen 3. Navigation Keys (Up/Down/Right/left) 4. Selection Key (Centre of Navigation Keys) 5. Call Key/ Accept Call Key (Off-hook key) To answer a call, and functions as a short cut to the Call list. -
Page 10: Rear View - Handset
3.2 Rear View - Handset 11. Headset connector (3.5mm) This is for connecting a headset. The connector is protected against dust by the headset connector cover. 12. Volume Up Key (Side Key) To increase the volume during call. 13. Volume Down Key (Side Key) To decrease the volume during call. -
Page 11: Display
4 Display This section contains a description of the different icons seen in the idle and in the menu. 4.1 Icons and Text in the Display All functions and settings available to the handset user are shown as icons and text in the display. The icons and text in the display indicate functions and settings to which you have access. -
Page 12: Menu Icons
“Message” icon is displayed in the status bar when there are messages on the handset that have not been read. “Alarm” icon is displayed in the status bar and indicates that an alarm has been set on the handset. “Silent Alarm” icon is displayed in the status bar when the handset is in silent mode, or if the volume is set to the mute and an alarm is enabled. -
Page 13: Keys And Buttons
The “Calls” menu contains call lists and call times. The “Connectivity” menu contains options to register/deregister the handset and network options. The “Settings” menu contains personal handset settings such as time/date, language, handset name, etc. The “Messaging” menu contains messages received on and sent from the handset along with the available messaging settings. -
Page 14: Off-Hook Key
4.3.5 Off-hook Key This key is used for answering an incoming call, or dialing a number either directly from the idle, or from the contact list, call list, or central directory. Pressing this key in idle opens the call list. 4.3.6 On-hook, and On/Off Key The On-hook key is used for disconnecting calls, and returning to the previous menus when... -
Page 15: The Keypad
4.4 The Keypad The keypad is used when entering a name or number, and the sketch below shows the available characters on the handset. NOTE: Depended on the selected menu language, other characters can be available. Therefore the character order can differ from the table above. 4.4.1 Idle Mode, and Number Input Mode When in idle a short press on a key enters the digits “0”... -
Page 16: Basic Operation
5 Basic Operation The following explain three basic operations of the handset: how to switch the handset on/off, how to lock/unlock the keypad, and the available options when entering a number in idle. 5.1 How to Switch the Handset On/Off Switching on the handset To switch the handset on long press the on-hook key to switch the handset on. -
Page 17: Menu Operation
6 Menu Operation In the following a description of the different menus and submenus on the handset will be given. Before the functions of every menu are explained a menu tree will be showed at top to give an overview of how to enter the different menus. From idle it is possible to enter some of the menus directly via the three softkeys as displayed on the image below. -
Page 18: Contacts
6.1 Contacts In this menu all the local contacts on the handset are displayed. Below both a full and an empty local phonebook is displayed. 6.1.1 Add Contact To add a new contact press the right softkey “More”, select “Add contact”, and the information displayed in the menu tree below can be filled out for the contact. -
Page 19: Send Message To Contact
Pressing “Call” initiates a call to this contact. When pressing “Edit” it is possible to edit the name, work, mobile, home, other, or ringtone for the highlighted contact. 6.1.3 Send Message to Contact From Contacts it is possible to send a message directly to a contact in the list. How to do this is displayed in the images below: In this way, it is possible to send a text message directly to a specific contact. -
Page 20: Speed Dial/One Touch Dial
Edit before call This function makes it possible to edit the number of the contact before calling the contact. Edit contact This has the same function as pressing “Edit” directly from the “Contacts” menu, and makes it possible to edit the name, work, mobile, home, other, or ringtone for the contact. Delete contact By selecting this feature, the following text message is displayed: “Delete current contact from local contact list?”... - Page 21 6.1.4.1 How to setup speed dial Prerequisite: There must be at least one contact in the contact list. Steps: 1. Go to the contact list > Move to the contact that you want to assign a speed dial number to. 2.
-
Page 22: Central Directory
6.2 Central Directory In the “Central directory” menu different contacts can be called according to which list the system administrator has setup in the base system. This menu can be entered directly from idle with the middle softkey , or from the menu by pressing the menu activity key and choosing “Central directory”. -
Page 23: Calling A Contact In The Central Directory
The search function is similar in these two modes. When typing something in the search field, and pressing search the results of the search will be displayed. This is showed in the following images. To scroll through the search results use the navigation keys up and down and you will scroll through the list. -
Page 24: Line
If a contact has more numbers added a green arrow is shown to the right of the contact, and by pressing the right/left navigation keys it is possible to navigate between the different numbers assigned to that contact. The number that currently appears on the screen is the one that is called. 6.2.3 Line By pressing the left softkey “Line”... -
Page 25: Call
All calls: This list consists of all the different call types (including both outgoing and incoming) that have been made on the handset. Answered calls: This lists all the incoming calls that have been answered. Dialed calls: All the calls that have been dialed from the handset are listed. Missed calls: This lists all the incoming calls to the handset that have not been answered. -
Page 26: View
A call can also be made to the highlighted entry by pressing the green off-hook key 6.3.2 View The middle softkey enters a “View” function for each entry. With this feature the following details of the call can be seen: number, line number, status (answered, dialed, missed), duration, and time stamp as displayed in the image below. - Page 27 View details This shows the same details about the call as the “View” function explained in 7.3.1 Call/View. Save as contact With this feature it is possible to save the number in the call list as a contact. Append to contact This function makes it possible to add the number in the call list to an existing contact.
-
Page 28: Connectivity
6.4 Connectivity The “Connectivity” menu is entered in the menu by pressing the menu activity key in idle. In this menu it is possible to register or deregister the handset to a certain base system. Moreover, the “Select network” function makes it possible to register the handset to more than one base system. 6.4.1 Register When a handset is to be registered on a base system, the user will be prompted for an access code (base registration PIN) before the registration procedure is started. -
Page 29: Deregister
NOTE: For the handset to function on different base systems, the handset must be completely out of range of system 1 to connect to system 2. 6.4.2 Deregister The handset can be deregistered from a registration. The user will in this case be prompted for a PIN code (base deregistration PIN), the PIN code is default “0000”... -
Page 30: Select Pbx
For the handset to automatically select a network “Auto. select” can be selected. In this way, the handset automatically chooses the network in range. 6.4.4 Select PBX In the “Select PBX” menu it is possible to select another PBX for the handset to use. With this feature it is possible to connect the handset to another PBX than the one used by the base station system. -
Page 31: Audio Settings
Reset settings Status Auto answer Silent charging Do not disturb Hide number Call Forward Idle Screen Saver Idle Clock Push To Talk Each of these settings will be described in the following. 6.5.1 Audio Settings The “Audio settings” menu contains different settings for the sounds on the handset. 6.5.1.1 Silent The “Silent”... - Page 32 In the “Audio settings” menu only “Ring emergency”, “Vibrator” and “Noise reduction” can be entered when the “Silent” profile is enabled. NOTE: With the “Silent” profile enabled, a ring melody will still be played when the handset receives an emergency alarm message. 6.5.1.2 Ring Volume and Ring Melody When the handset receives an incoming call, message, or alarm different ring volumes and melodies can be selected.
- Page 33 Ring melody A number of different ring melodies can be chosen for the handset to play when receiving an incoming call. A list of melodies is displayed when entering the menu. Each displayed melody on the list can be selected by pressing the left softkey “Select”. To hear the melody before selecting it, each melody in the list can be played by selecting the right softkey “Play”.
- Page 34 6.5.1.4 Ring emergency With the “Ring emergency” menu it can be chosen which melody should be played when the handset receives an alarm message. The ring melody is chosen in the same way as the ring melody for incoming calls. For additional information on the handset alarm feature reference is made to chapter 6.9 Alarms List.
- Page 35 displayed when entering the menu. Each displayed melody in the list can be selected by pressing the left softkey “Select”. To hear the melody before selecting it, each melody on the list can be played by selecting the right softkey “Play”. The softkey “Play” changes to “Stop” during playback and the playback can then be stopped by pressing this button.
-
Page 36: Confirmation Sound
6.5.1.7 Key Sound The “Key Sound” settings controls if a key sound is heard as the keys are pressed on the handset, or if no sound is made. The following three different options can be selected for the key sounds: Silent If this feature is chosen, there will not be heard any sounds when pressing the keys on handset. -
Page 37: Coverage Warning
6.5.1.9 Coverage Warning A coverage warning can be set to occur when the handset is out of range of a base station in the system. When the feature “Coverage warning” is enabled (On) an audible indication is given in the earpiece of the handset when the user is close to the maximum range of the nearest base station in the system. -
Page 38: Time & Date
6.5.2 Time & Date To set the time and date in the handset select the “Time & date” menu. Below it is shown how the time and time format can be changed. To change the time use the keypad, or the navigation keys to set the time to be what you want, and press save;... -
Page 39: Led Signal
Norsk Russian-1 Russian-2 Hrvatski Srpski Slovinsky The currently applied language is displayed when highlighting the menu “Language”. When entering this menu a specific language can be selected by scrolling through the menu using the up/down navigation keys, and pressing the left softkey “Select” when the desired language is highlighted. -
Page 40: Power Save
Low battery The LED signals blinks in the chosen colour when the battery is low (below 20% battery on the handset). The LED signal is disabled, and does not blink in any situation. 6.5.5 Power Save The power save option makes the handset less battery consuming by turning off the display after a certain amount of time. -
Page 41: Handset Name, Line, Reset Settings, Status
highlighted. Afterwards, when the handset has been inactive in the selected time interval the keypad will lock automatically. NOTE: It is not possible to use the keys when these are locked. The user has to unlock the keys by long- pressing . - Page 42 As seen above, an editor is displayed when entering the menu. The handset name is typed in by using the numeric keys and afterward pressing the left softkey “Save”. The handset name is displayed in the third line of the idle display. Line If the handset is used in a multiline environment, it is possible to select preferred lines for the handset to make outgoing calls from in this “Line”...
-
Page 43: Auto Answer
As it can be seen above, the handset PIN code is required to reset the handset to its default settings. After such a reset the handset is still registered. The base is not reset to default when selecting this feature. Status The menu “Status”... -
Page 44: Silent Charging
The “Auto answer” feature makes it possible for the handset to automatically answer an incoming call. This setting can be set to the following conditions: Normal With this enabled the handset does not answer a call automatically, but the user must always press the green “Off-hook”... -
Page 45: Do Not Disturb
Silent The handset receives an incoming call as normal, but it does not ring (i.e. no audio alert but the incoming call screen is displayed). 6.5.10 Do Not Disturb This “Do not disturb” feature is to be used when the handset user does not want to be disturbed. With this feature disabled, the handset reacts as normal on all incoming activity. -
Page 46: Call Forward
Always on With the “Always on” enabled, the caller ID will be hidden for the counterpart for all outgoing calls initiated until this feature is disabled again. NOTE: When hide number enabled, base sends SIP header “Privacy: id” to address sip:anonymous@anonymous.invalid The PBX must support anonymous calls otherwise the call will be rejected, and the handset cannot make an outgoing call if this feature is enabled. -
Page 47: Idle Screen Saver
By enabling “Forward No Answer” incoming calls to the handset is forwarded if the call has not been answered during a certain time period as for example 30 seconds [Forward After (s)]. This feature is setup in the same way as “Forward Unconditionally” as displayed above. Forward Busy The “Forward Busy”... -
Page 48: Idle Clock
Idle clock (dimmed) By choosing this option the handset will show the idle screen with dimmed lights when the handset enters power save mode when in charger. Startup image (dimmed) If this option is selected the handset will show the startup image with dimmed lights when the handset enters power save mode when in charger. -
Page 49: Messaging
By selecting “Push To Talk” it can be disabled or enabled by selecting either “Off” or “On”, respectively. For this feature to work it needs to be enabled on at least two handsets on the system. When the “Push To Talk” feature has been enabled in “Settings” enter idle to use it. In idle, press and hold the mute-button on the left side of the handset and a “Calling”... -
Page 50: How To Setup Text Messaging
6.6.1 How to Setup Text Messaging For the text messaging function to work on the handset, this needs to be enabled on the base station web interface. As seen above the text messaging feature is enabled on the handsets via “Management” on the base station web interface. -
Page 51: How To Write A New Message
Additionally, it is possible to send the text messages via a text messaging server (MobiCall server) which enables handsets on different systems of base stations to send text messages to one another. When using a text messaging server for text messaging the “Text Messaging” must be “Enabled”, the “Text Messaging &... -
Page 52: How To Send A New Message
As displayed above, pressing ’New’ makes it possible to write a new message using the keypad. The maximal message text length is 160 characters, and the number of characters typed are displayed at the bottom right corner of the text field. To choose other symbols than those available on the keypad press the middle softkey ‘Symbol’, and an amount of symbols will be available to select. -
Page 53: How To Open And Reply To A Message
Contacts By selecting this option the contact list is displayed, and the message can be sent to one of the local contacts in the contact list. Enter number In this option it is possible to enter a number, and thereby sending a message to this number. Send to many By choosing ‘Send to many’... -
Page 54: Drafts
are used to navigate between them. The content of these four submenus are described in the following sections. 6.6.6 Drafts ‘Drafts’ is the submenu that is opened when the ‘Messaging’ menu is selected. In this menu drafts are saved if a message has been written, but was not sent. When pressing select on a highlighted draft, this is opened according to the last time that it was edited, and it is possible to edit it, and send it again. -
Page 55: Inbox
6.6.5.2 What is Stored in Drafts? When writing a new message and then exiting with the red on-hook key before the message is sent, this message can be saved as a draft. This is displayed below. By pressing the left softkey ‘Yes’ the message is saved as a draft, and can be opened again in the ‘Drafts’... -
Page 56: Sent Messages
Reply With this option it is possible to reply the counterpart of the received message. Forward By selecting ‘Forward’, the newly received message is entered again, and can be edited and forwarded to another number. Save as contact With the function ‘Save as contact’ it is possible to save the number that the message was received from in the local phonebook. -
Page 57: Settings
To open a sent message scroll up/down to highlight it, and then press the left softkey ‘Select’. By pressing the middle softkey, the message is opened, and it is possible to forward it to another handset than it was originally sent to. 6.6.8.1 The More Option When pressing the right softkey ‘More’... -
Page 58: Alarms
Overwrite old If this option is set to ‘On’ with the left softkey, then the oldest messages is overwritten if the maximum number of messages is reached. The maximum number of messages that can be stored in drafts, inbox, and sent messages is 250. If the number of 250 messages is exceeded, and the option is set to ‘Off’... - Page 59 Alarm When “Alarm” is selected it is possible to set a time for an alarm to occur, and then press left softkey “Save” to save the alarm. An alarm will then occur at the time that has been set. The time can both be set with the numeric keypad, or with the up/down navigation keys.
-
Page 60: F-Keys
This means that when the alarm occurs the user can either “Dismiss” it with the right softkey, or “Snooze” it with the left softkey. In this case the snooze time gives the time before the alarm occurs again. 6.8 F-Keys The “F-Keys”... - Page 61 Add F-Key To add a new F-key press the right softkey “More” and it is possible to add a new functional key. In the case of e.g. adding a user’s mailbox, pressing the right softkey “Edit” makes it possible to enter the name and number, respectively.
-
Page 62: Alarm List
6.9 Alarm List The handset can receive emergency alarms. These different emergency settings are defined and controlled from the web interface of the base station. For further explanation about the emergency settings and the different types of alarms, please see the base station manual via reference [3]. 6.9.1 The Alarm List Menu The “Alarm List”... - Page 63 The color of the alarm represents what priority the alarm has. The priority of different scenarios to start the alarm is set on the server, and it is defined what should send a green, yellow, or red alarm to the handset. Additionally, an alarm can be sent out to either one handset, or more handsets which is also defined in the server settings.
-
Page 64: Calls Operations
7 Calls Operations In this section the different types of calls and call handling will be described. 7.1 Incoming call As the handset receives an incoming call an alerting screen will be displayed as displayed below. This will be accompanied by a ring signal and/or a vibrating handset according to the respective settings on the handset. -
Page 65: Silencing An Incoming Call
NOTE: An incoming call can also be rejected by pressing the red “On-hook” key. 7.1.3 Silencing an Incoming Call When the handset is alerting it is possible to press the left softkey “Silent” whereas the handset will continue to alert, but without any heard ringing. 7.1.4 Ending a Call To end an ongoing call press the red “On-hook”... -
Page 66: Initiating A Call From Contacts
3. The handset will show a “Calling” screen as seen above. 4. When the counterpart answers the call the screen will show “Connected”, and the two parts are now in call. 7.2.1.1 Line Call If the handset is used in a multiline environment, it is possible to make a call from different lines by pressing the middle softkey “Line”, and choose the line according to which system the call should be made from. -
Page 67: Call Holding/Retrieving
7.3 Call Holding/Retrieving It is possible to hold a call which means that the one party of the call is put on hold and cannot hear the other party, but can only hear a repeated short tone on hold until the call is retrieved. 1. -
Page 68: Unattended Transfer
2. Press the right softkey “Transfer” on either of the handsets in call, and the counterpart of the call is put on hold. 3. Enter the number that the transfer should be made to, and press the green “Off-hook” button 4. -
Page 69: Swap Between Two Calls
1. Initiate a call with a counterpart so that the handset displays “Connected” as shown above. 2. Press the right softkey “Transfer” on either of the handsets in call, and the counterpart of the call is put on hold. 3. Enter the number that the transfer should be made to, and press transfer. 4. -
Page 70: Call Waiting
5. As the second party answers the call a blue “Connected” screen as above is displayed. 6. By pressing the left softkey “Swap” the green “Connected” screen is displayed instead which indicates that the ongoing call is now between the first party whereas the second party is now put on hold. -
Page 71: Conference Call
This indicates that the party 2567 now has two ongoing calls with one of them on hold, and it is possible to swap between them, make a conference, or transfer one of the parties. 7.7 Conference Call In a conference call there are always at least three parties in the same conversation. Hereby, this feature enables the user to have an ongoing call with more than one person –... -
Page 72: Terminating A Conference Call
5. When the called party answers the call the second party is still on hold, and the conversation is only between the third party and the first party, i.e. initiator of the conference. 6. To start conversation between the three parties – i.e. a conference – press the middle softkey “Conf.”... - Page 73 NOTE: Different configurations on the PBX that the base system uses may result in different terminations of a conference call. E.g. the configuration of some PBX’s could cause that the whole conference call is not terminated if the initiator of the conference presses the red “On-hook” key to terminate.
-
Page 74: Shared Call Appearances
When shared call appearances are configured on the BroadWorks application server and enabled and properly setup on the RTX base, the RTX SME VoIP 8630 handset supports all the above aspects of the feature by providing the following: ... -
Page 75: Shared Line Selection
possibly also start blinking. In the above screenshot, only two shared call appearances have been defined for the handset. The first is in an active call but the handset is not part of it, indicated by the red color, and the second is idle (grey). The possible colors and blink modes for the LEDs and their respective meanings are as follows: ... -
Page 76: Detailed View
8.3 Detailed View The detailed view displays more information regarding which extension is using which shared lines and also provides the handset with SCA specific functionality like barge-in and retrieve of remote calls. The first line of text in the detailed view displays the name and appearance-index of the currently selected SCA. -
Page 77: Barge-In
8.3.2 Barge-In Barge-in is available for SCAs in the active state. Pressing the left soft key initiates an outgoing call to the remote end which the BroadWorks server handles by effectively creating a conference call between the participants in the original call and the handset that barges in. Notice that the LED for the active SCA changes color from red to green in the process because the handset goes from not participating in the call to being a participant. -
Page 78: Accessories
9 Accessories It is possible to get different accessories to the RTX SME VoIP 8630 handset. These different accessories are listed in the following: Dual Charger Single Charger Adapter for Charger Vertical Leather Pouch Horizontal Leather Pouch Belt Clip Swivel Belt Clip... -
Page 79: Troubleshooting
Troubleshooting This troubleshooting section contains information on how to solve some operational problems that you may experience on the handset. 9.1 Operational problems State: The handset does not ring Problem cause: The sound off icon is seen in the status bar; hence the handset is silent mode. Action: Increase the volume in Audio Settings, or long press the #-key in idle.
Need help?
Do you have a question about the 8630 and is the answer not in the manual?
Questions and answers