Telstra T-Hub 2 User Manual
Hide thumbs
Also See for T-Hub 2:
- User manual (25 pages) ,
- Manual (24 pages) ,
- Quick start manual (17 pages)
Table of Contents
Advertisement
Advertisement
Table of Contents

Related Manuals for Telstra T-Hub 2


Summary of Contents for Telstra T-Hub 2
- Page 1 GettinG to know your teLstra t-Hub ®...
- Page 2 The T-Hub 2 is a unique combination of Phone and ® Tablet, designed specifically for Telstra’s home phone and internet services. This guide will help you get started as quickly and easily as possible. It’ll help you get connected and show you all kinds of ways to get the most from your T-Hub 2.
- Page 3 Let’s get started Your T-Hub 2 Getting connected A closer look at the Tablet...
- Page 4 Let’s Get started tHe t-Hub 2 is desiGned to work exCLusiveLy ® witH teLstra serviCes usinG: • A full service Telstra HomeLine plan. ® • BigPond or Telstra Broadband service. ® • T-Gateway™, Home Network Gateway, or other compatible Wi-Fi modem (Wi-Fi modems that support 802.11b/g/n are compatible).
- Page 5 pLease CHeCk you Have tHe FoLLowinG: 1. Tablet 7. Telephone connection adaptor 2. Tablet Dock 8. Handset 3. Tablet power supply 9. Handset batteries 4. Base Station 10. Handset Dock 5. Base Station / Handset power x 2 11. Ethernet cable 6.
- Page 6 your t-Hub ® On your T-Hub 2 Tablet you can make calls and ® browse the internet wirelessly. tabLet Home Button - This button will return you to the Home Screen when pressed regardless of what application is running. Search Button - When pressed, the web search feature will appear. Menu Button - Will bring up a menu with additional options relevant to the screen you are on.
- Page 7 Audio out jack Behind this flap you can access the Tablet micro USB, micro HDMI ® DC In connections Retractable stand SD card slot Handy Hint An SD card key has been included to help you insert and remove SD cards from the tablet.
-
Page 8: Connection Options
ConneCtion options As you step through the setup instructions over the next few pages, you will be offered a choice of two connection options: option (1): Customers witHout a t-Gateway™ Choose this option if you have: • An ADSL broadband service (with any Wi-Fi modem other than a T-Gateway™ – such as a Home Network Gateway or other Wi-Fi modem) •... - Page 9 option (2): Customers witH a t-Gateway™ Choose this option if you have : • Purchased a T-Gateway™ with your ADSL broadband service, or • Purchased a T-Gateway™ with your NBN broadband service If you aren’t sure whether you have a T-Gateway™ device, you should compare it with the following T-Gateway™...
-
Page 10: Getting Connected
GettinG ConneCted 1. insert Handset battery • Remove handset back cover. • Insert batteries in handset and replace the cover. • Place the handset into the handset dock and connect the dock to mains power using one of the power supplies provided. •... - Page 11 option (1): Customers witHout a t-Gateway™ 2. ConneCt base station Power adaptor Ethernet cable Phone cable • Connect the base station to the mains power using one of the smaller power adaptors. • Connect the base station to your Home Network Gateway or Wi-Fi modem using the provided ethernet cable.
- Page 12 3. deCidinG wHere to pLaCe your Handset You can choose to place your handset anywhere in your home – depending on whether or not you want to “dock” it together with your base station. The advantage of docking your handset with your base station is that you only need one power supply (which saves on clutter).
- Page 13 option (2): Customers witH a t-Gateway™ 2. deCidinG wHere to pLaCe your Handset You can choose to place your handset anywhere in your home – depending on whether or not you want to “dock” it together with your T-Gateway™. The advantage of docking your handset with your T-Gateway™ is that you only need one power supply (which saves on clutter).
- Page 14 option (2): Customers witH a t-Gateway™ 3. reGisterinG tHe Handset witH your t-Gateway™ Before you can make a call, the handset needs to be “registered” or “paired” with the T-Gateway™ using the following steps: 1) When the handset powers up, it will normally say “Searching for base”. Press the left soft key, select “Register handset”, and press OK.
- Page 15 4. ConneCt tabLet • Place the tablet into the tablet dock and connect the dock to the mains power using the larger of the power adaptors. • Turn on the tablet by holding down the power button on the top right hand corner for about 3 seconds.
- Page 16 option (1): Customers witHout a t-Gateway™ Your tablet should already be “registered” or “paired” with your base station – so you will not normally need to register your tablet as you step through the Installation Wizard screens. option (2): Customers witH a t-Gateway™ Your tablet will need to be “registered”...
- Page 17 3) Press the “Register” button at the bottom of the tablet screen to start registration – this may take up to 60 seconds to complete. 4) Continue stepping through the Installation Wizard screens to complete setup. 5. CHeCk aLL items are set up CorreCtLy option (1): Customers witHout a t-Gateway™...
- Page 18 option (2): Customers witH a t-Gateway™ • Once everything is connected, all the power supplies and cables should be correctly installed and the tablet, handset and T-Gateway™ turned on. DECT Handset DECT & Wi-Fi Small power Tablet adapter Handset Dock DECT &...
-
Page 19: Installation Wizard
PIN during installation. It is usually the last six digits of your telephone number. As it will take a minimum of 3 hours to activate your Telstra messaging service, you will need to set up Voicemail after completing the Installation Wizard. -
Page 20: Basic Navigation
a CLoser Look at tHe tabLet Battery level Base Station signal strength Wi-Fi signal strength Quick launch bar Screen location icon Notification bar basiC naviGation Screen Scrolling: Scroll between screens by dragging your finger across the screen. Scrolling Web Pages or other applications: To scroll web pages or other applications drag your finger up to scroll down or drag down to scroll up. -
Page 21: Notification Bar
sCreen LoCation iCon This icon indicates which of the five screens you are on by displaying a dot to represent how many screens there are to the right and left of the screen you are on. You can customise each screen with your favourite applications for easy access. notiFiCation bar The notification bar is located at the top of the screen and includes details such as battery life and phone, Wi-Fi and data signal strength. -
Page 22: Quick Launch Bar
Browse the Internet. Important Note If you connect your tablet to a T-Gateway™ the SMS icon will not appear in the Quick Launch Bar. For more information on SMS usage with a T-Gateway™ refer to the FAQ available at telstra.com/thub... - Page 23 usinG tHe pHone on your tabLet Select the phone icon to make a call, access call log and contacts. • Use the tabs along the top of the screen to access Call log, Contacts, Groups and Favourites. • You can also access Contacts by selecting the Contacts Application from the Home screen.
- Page 24 • Touch the message to play individual message. Or touch the menu button on the right hand side of your tablet to select option to play all new messages. • Voicemail messages will be deleted automatically after the message expiry date (according to the terms of your Telstra messaging service).
-
Page 25: Applications Menu
appLiCations menu Touch the Applications menu icon to access a list of all applications installed on the tablet. Scroll up or down to view the full list of applications. Create a shortcut to your favourite applications • From the Home Screen scroll right or left to choose one of the five screens where you would like to place your shortcut. -
Page 26: Using The Web Browser
Please note that you can send SMS from your T-Hub 2 Tablet to most standard Australian ® numbers, and receive SMS from phones connected to the Telstra network. You cannot send or receive SMS on your T-Hub 2 Handset. ®... -
Page 27: Tips And Tricks
tips and triCks Onscreen Keyboard Use the onscreen keyboard to input text when required. To access the keyboard touch any text field. For example, touch the web address field in the web browser to bring up the keyboard. Add to Home Screen You can add shortcuts, widgets, folders and wallpaper to the T-Hub 2 screens by holding ®... -
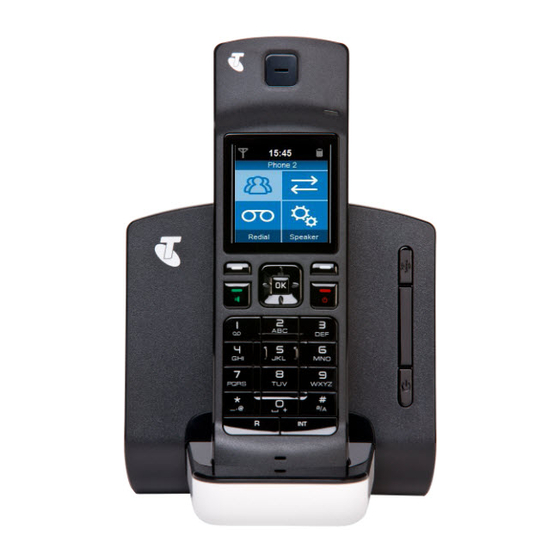
Page 28: At The Handset
a CLoser Look at tHe Handset... - Page 29 LED Indicator The LED indicator shows the status of the Handset. LED INDICATOR HANDSET STATUS Solid green Batteries near to fully charged. Flashing green on dock Batteries charging. Flashing blue You are receiving an internal or external call. You have one or more missed calls. You have one or more voice mails pending.
- Page 30 OK/Select button • To confirm or select. • From standby, to display new event messages on the display. • To scroll up through menus/lists. • From standby, to open the Dialled calls list. • During a call, to increase the volume of the callers voice.
-
Page 31: Making Calls
makinG CaLLs • Use keypad to dial number or select from Contact List. • Press Call button to make call. • To access contacts use scroll keys to select Contacts icon and press OK. Scroll through Contact List and press Call button to call or press OK to select from a list of numbers. reCeivinG CaLLs •... - Page 32 usinG Handset FunCtions Missed call indicator Contacts Call log New voicemail indicator Voicemail Settings ContaCts You can add, delete and view contacts by selecting the Contacts icon using the scroll keys and the enter button on the handset. From here you can view contacts shared between the handset and other T-Hub 2 devices ®...
-
Page 33: Call Log
CaLL LoG The Call Log details the list of calls that you have made, received and missed. • To access recent calling history on your handset, select the Call Log icon using the arrow keys and the enter button . •... - Page 34 Voicemail will only work if you have MessageBank or Telstra Home ® Messages 101 activated on your service. To activate contact Telstra on 13 2200. ® Handy Hint You can also access Voicemail on the Tablet which provides a visual display of all messages.
- Page 35 notes...
- Page 36 notes...
- Page 37 HDMI is a trademark of HDMI Licensing LLC. Bluetooth is a trademark of Bluetooth SIG Inc. Google Play is a trademark of Google Inc. ™ and are trade marks and registered trade marks of Telstra Corporation Limited, ® ABN 33 051 775 556.
- Page 38 For more inFormation: CaLL 1300 136 841 visit telstra.com/thub visit a teLstra store or partner...
Need help?
Do you have a question about the T-Hub 2 and is the answer not in the manual?
Questions and answers