Telstra T-HUB 2 User Manual
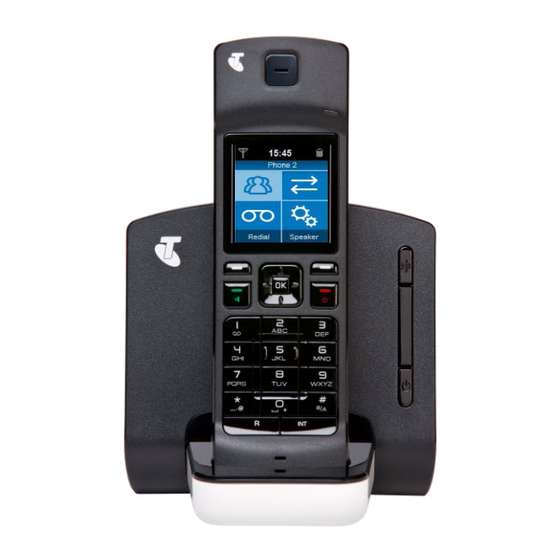
T-hub 2 handset
Hide thumbs
Also See for T-HUB 2:
- User manual (39 pages) ,
- Manual (24 pages) ,
- Quick start manual (17 pages)

Related Manuals for Telstra T-HUB 2


Summary of Contents for Telstra T-HUB 2
- Page 1 ® handSet for more information: CaLL 1300 136 841 ViSit telstra.com/thub ViSit a teLStra Store...
-
Page 2: Table Of Contents
® Registering your T-Hub 2 handset Handset. You’ll be making calls in no time. Handset setup A closer look at the T-Hub 2 handset For more information on using your T-Hub ® 2 Handset visit telstra.com/thub or visit Telstra Crowd Support at Battery www.crowdsupport.telstra.com.au. -
Page 3: Preparing The Handset
Let’S get Started Call log PreParing the handSet Contacts 1. Remove the back cover of the handset. Contact synchronisation 2. Insert batteries in the handset 3. Replace the handset cover. Contact list 4. Place the handset into the handset dock and connect the dock to mains power Edit a contact using one of the power supplies provided. - Page 4 LED light is flashing blue. If your T-Hub 2 Handset came as part of a T-Hub 2 Kit, it will already be registered to the T-Hub 2 Base Station. You can always tell if your handset is registered as it will always display the home screen.
-
Page 5: Handset Setup
handSet SetuP ConneCting the handSet to the t-gateway You can choose to place your handset anywhere in your home – depending on whether or not you want to “dock” it together with the base To connect the handset to the T-Gateway: station or T-Gateway. - Page 6 a CLoSer LooK at the thub 2 handSet LED Indicator The LED indicator shows the status of the Handset. LED INDICATOR HANDSET STATUS Solid green Batteries near to fully charged. Flashing green on dock Batteries charging. Flashing blue You are receiving an internal or external call. You have one or more missed calls.
- Page 7 • During a call, to increase the volume of the callers voice. The T-Hub 2 Handset will run for 3 hours of continuous use when fully charged. When it is not in the dock being charged, it will last Down •...
-
Page 8: Taking A Call
If there is a match between the incoming number and a contact Softkeys in the T-Hub 2 Contacts, the first name and last name will be displayed. If there is no match, the number will be displayed. When a call is received with an unknown number the handset will display Unavailable in the incoming call screen. -
Page 9: Rejecting, Answering And Ending The Call
rejeCting, anSwering and ending the CaLL inComing CaLL during a CaLL Rejecting a Call To take an incoming call when on another call, select Answer on left soft key. Once the incoming call has been accepted, swap between the incoming call and the Reject a call by pressing the Power key or pressing the left soft key named other call by pressing the Swap button. -
Page 10: Outgoing Call
outgoing CaLL Dialling from Contacts Search for a contact by selecting the Contacts icon from the handset and begin typing Making a Call the contacts name using the keypad. Alternatively, scroll down the list of contacts. Start dialling the numbers and press the Talk key to make a call. -
Page 11: Internal Call
internaL CaLL tranSferring a CaLL between handSetS • To transfer a call to another handset or tablet that is registered to the base station or Press the INT key to make an internal call to another handset or T-Gateway, select the Options soft key tablet registered to the base station or T-Gateway. -
Page 12: Call Waiting
CaLL waiting Swap between callers by selecting the Swap soft key. Beeps will sound during a call if another call is received. The name of the number or name of the caller will be displayed. Select Answer to answer the call. If the call waiting is answered, the first call is put on hold and the call is established with the second call. -
Page 13: Way Call
3-way CaLL maKe 2nd CaLL Once the call waiting call has been answered and there is one call on hold, Initiate a second call by selecting Options and Make 2nd call. merge both calls to set up 3-Way call by selecting Merge calls in the Options menu. Once the dial tone is heard, begin dialling the number or select the person to call by The call will to continue with the remaining caller if one of the callers hangs up. - Page 14 Add, delete and view contacts by selecting the Contacts icon using the scroll keys and the OK button on the handset. View up to 1000 contacts that are shared between the T-Hub 2 handset and other tablets registered to the same base station or T-Gateway.
-
Page 15: Contacts List
ContaCtS LiSt Once the contact is selected, press the Options soft key and another menu will pop up. From the handset home screen, the contacts list can be accessed by scrolling to the Add contact to add a new contact into Contacts. Contacts icon and pressing OK. -
Page 16: Edit A Contact
edit a ContaCt deLete a ContaCt To edit a contact: • To delete a contact, select Contacts from the handset Home Page. • Select the contact, select the Options soft key and select Edit • Select the contact to delete. •... - Page 17 Sound Ring Volume Modify the volume of the ringtone. By default it is set on Level 3. Modify the ringtones, ringtone volume, handset and speakerphone volume and alert tones. Handset volume Modify the volume of the handset when on a call. By default it is set on Level 3. Speaker volume Modify the volume of the call when it is on hands free.
- Page 18 Voicemail alert diSPLay Turn the voicemail alert tone to off or on. It is set as On by default. Wallpaper The wallpaper can be selected from the 6 available wallpapers, with blue being the default: Voicemail Alert Handset tones Turn the Keypad, Low Battery and Out of Range handset tones to off or on. Wallpaper Options All tones are set as On by default.
- Page 19 Brightness LED Indicator Modify the brightness of the display by selecting Settings from the Home Screen, Turn the LED indicator off or on. By default the LED in turned on. followed by Display and then Brightness. Modify the brightness to one of five levels. LED Settings Handset Brightness Night Mode...
- Page 20 T-Gateway. If the handset is registered to a T-Hub 2 Base Station, the time on the handset will be automatically synchronised with the base station which receives the time from the internet.
-
Page 21: Call Features
CaLL featureS • Immediate – forwards all calls immediately to a nominated number Modify the call waiting, call forwarding and other call features. Call Waiting - turns Call Waiting on or off. Immediate Off Set Immediate On Call Immediate On •... - Page 22 Base IP address: this give the IP address of the base station or T-Gateway. Note: the IP address will not be presented if the T-Hub 2 Base Station is not connected to a modem/router using an Ethernet (yellow) cable...
-
Page 23: Keypad Lock
A press on the OK button will return the display to the Home Screen. Important Note If the T-Hub 2 Handset is registered to a T-Hub 2 Base Station, the T-Hub 2 Base Station must be connected to a modem/router using an Ethernet (yellow) cable if the Base and Handset is to receive the latest software updates. -
Page 24: Troubleshooting
ContaCtS regiStration I can’t see the contacts that are on my T-Hub 2 Tablet on my T-Hub 2 Handset? How can I connect an existing cordless telephone to the T-Hub Base Station? Only those contacts that are created on the tablet and synchronised with the... -
Page 25: Product Warranty
Alternatively, you may return the product and all the components from the original purchase to a Telstra Shop to make a claim under this Voluntary Product Warranty. ™ and are trade marks and registered trade marks of Telstra Corporation Limited, ABN 33 051 775 556. ®...
Need help?
Do you have a question about the T-HUB 2 and is the answer not in the manual?
Questions and answers