Advertisement
Advertisement
Table of Contents

Related Manuals for Bissell POWERWASH DELUXE


Summary of Contents for Bissell POWERWASH DELUXE
- Page 1 3278...
- Page 2 4. 4. www.BISSELL.com...
- Page 3 www.BISSELL.com...
-
Page 4: Important Safety Instructions
» Use only the type and amount of liquids ONLY ON SURFACES MOISTENED BY THE CLEANING specified under the Operations section PROCESS. USE ONLY BISSELL CLEANING PRODUCTS of this guide. INTENDED FOR USE WITH THIS MACHINE. » Do not leave appliance when plugged in. -
Page 5: Symbol Definitions
Your BISSELL deep cleaner is well made, and we back it with a limited two-year guarantee. We also stand behind it with a knowledgeable, dedicated Consumer Care department, so, should you ever have a problem, you’ll receive fast, considerate assistance. -
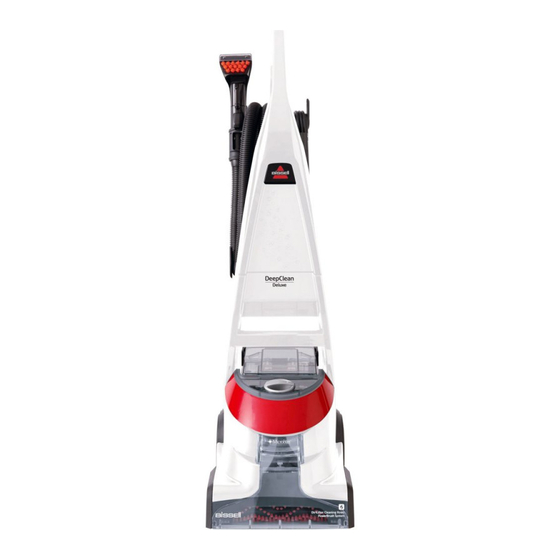
Page 6: Product View
Cleaning fluid This deep cleaner features Heatwave Technology that helps to maintain the Keep plenty of genuine BISSELL 2X formula temperature of the hand hot tap water you on hand so you can clean and protect put in it to provide constant heat as you clean. - Page 7 2. With your foot, press gray recline pedal (a) located on back of machine next to red power pedal. To reduce the risk of fire, use only BISSELL deep 3. While pressing spray trigger, make one cleaning formula for full size machines in your slow forward wet pass and another back.
-
Page 8: Cleaning Setting
2. Fill the bladder with clean hot tap water and set aside. 3. Set ReadyTools dial to TOOLS setting. 3. Fill BISSELL 2X Hard Floor Solutions This will allow spray and suction from hose. Formula to the indicated fill line in the pro- 4. -
Page 9: Care And Storage
To reduce the risk of electric shock, push power If you have any questions or are having button o and disconnect plug from trouble removing, replacing or reinstalling electrical outlet before performing maintenance your brush belt or brush, please contact or troubleshooting checks. BISSELL. www.BISSELL.com... - Page 10 9. Reattach belt access door assembly to end of brush and rotate back into place. Replace screws. NOTE: Do not over tighten screws. If you have any questions or are having trouble removing, replacing or reinstalling your brush belt, please contact BISSELL. www.BISSELL.com...
-
Page 11: Consumer Care
NOT EXCEED THE PURCHASE PRICE OF THE PRODUCT. Consumer Care or contact your local distributor. BISSELL DOES NOT EXCLUDE OR LIMIT IN ANY WAY ITS LIABILITY FOR This Guarantee is given to the original purchaser of the product from (A) DEATH OR PERSONAL INJURY CAUSED BY OUR NEGLIGENCE OR THE new and is not transferable.
Need help?
Do you have a question about the POWERWASH DELUXE and is the answer not in the manual?
Questions and answers