
Related Manuals for Quickie Neon 2


Summary of Contents for Quickie Neon 2
- Page 1 MANUAL WHEELCHAIR FAUTEUIL ROULANT MANUEL HANDBEWOGEN ROLSTOEL INSTRUCTIONS FOR USE MANUEL D'UTILISATION Neon GEBRUIKERSHANDLEIDING 000690960.02...
-
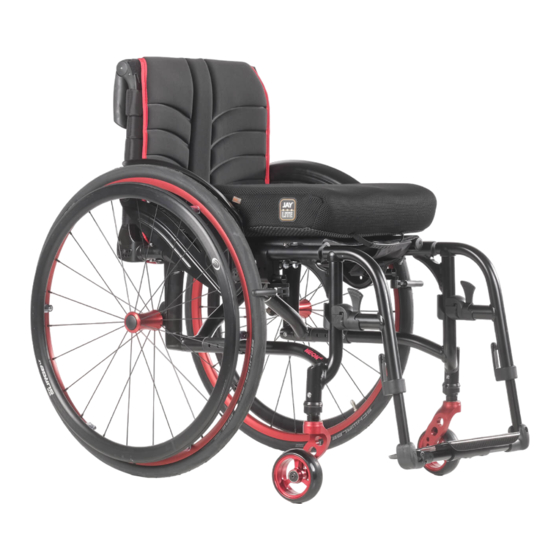
Page 2: Wheelchair Components
Wheelchair Components We at SUNRISE MEDICAL have been awarded the ISO-9001 certificate, which affirms the quality of our products at every stage, from R & D to production. This products meet the requirements in accordance with EC guidelines. Options or accessories shown are available at extra cost. - Page 3 CAUTION! Some of the screws used during manufacturing are coated with thread-locking fluid (blue dot on the thread) and can only be adjusted up to 3 times before they need to be replaced by new thread-locking screws. Alternatively, the screws can be re-mounted using Loctite™...
- Page 4 ° 1020 1150 +120 10° 10° 10° 0° 0° 0° 110° 15° 103° 100° 0° 75° ---- 2,1 KG 11,5...
- Page 5 3” 111mm 340-420 340-430 340-440 340-450 350-460 123mm 340-440 340-450 350-460 360-470 138mm 340-450 350-460 360-470 370-480 174mm 370-480 380-490 390-500 400-510 410-520 4” 111mm 340-430 340-440 340-450 350-460 360-470 123mm 340-440 340-450 350-460 360-470 138mm 340-450 350-460 360-470 370-480 174mm 390-500 400-510...
- Page 6 5” 111mm 350-460 360-470 370-480 380-490 123mm 350-460 360-470 370-480 380-490 138mm 360-470 370-480 380-490 390-500 400-510 174mm 380-490 390-500 400-510 410-520 420-530 430-540 6” 111mm 370-480 380-490 123mm 370-480 380-490 390-500 138mm 370-480 380-490 390-500 400-510 410-520 174mm 390-500 400-510 410-520 420-530...
- Page 7 M5 = 5.0 Nm. M6 = 7.0 Nm. M8 = 10.0 Nm. 7 Nm 7 Nm 7Nm 5 Nm 25 Nm 1.5 Nm 5 Nm 5 Nm 7 Nm 7 Nm...
-
Page 8: Foreword
Sunrise Medical Thorns Road Brierley Hill West Midlands DY5 2LD England Phone: 0845 605 66 88 Fax: 0845 605 66 89 www.SunriseMedical.co.uk IMPORTANT: DO NOT USE YOUR WHEELCHAIR UNTIL THIS MANUAL HAS BEEN READ AND UNDERSTOOD. NEON 2 SA Rev.1.0... -
Page 9: Table Of Contents
Please keep a note of your local service agent’s address and telephone number in the space provided. In the event of a breakdown, contact them and try to give all relevant details so they can help you quickly. Dealer signature and stamp NEON 2 SA Rev.1.0... -
Page 10: General Safety Notes And Driving Restrictions
• Do not hang heavy items such as shopping bags or backpacks, on the push handles, head rest or backrest of the wheelchair. • These can change the tipping point and there is a risk of Fig. A tipping backwards. NEON 2 SA Rev.1.0... - Page 11 • Any combination with other medical devices requires the approval of Sunrise Medical. • Be careful with fire, in particular with burning cigarettes. Seat and back slings can be set alight. NEON 2 SA Rev.1.0...
- Page 12 • When using add-on mobilty devices, such as hand bikes, power add-ons etc, ensure that your wheelchair is equipped with appropriate castor forks intended for such use. Lifetime • The expected lifetime of this product is 5 years. NEON 2 SA Rev.1.0...
-
Page 13: Transportability
ISO 7176-19:2001 or SAE (Fig. A). J2249. Fig.B UPPER TORSO RESTRAINT BELT PELVIC RESTRAINT BELT Fig.A NEON 2 SA Rev.1.0... - Page 14 The upper torso restraint belt must fit over the shoulder Position of the rear wheelchair tie down restraint, (Fig H). and across the shoulder as illustrated in Fig D and E. Fig.C Fig. G Fig.E PREFERED ZONE Fig.D Fig. H Fig.F NEON 2 SA Rev.1.0...
-
Page 15: Guarantee
4. The benefits to you given by this warranty are in addition to your other rights and remedies under a law in relation to the goods to which the warranty relates. NEON 2 SA Rev.1.0... -
Page 16: Handling
• Always place your feet securely on the ground for transferring into or out of the wheelchair. • Always engage the wheel locks when transferring in or out of the wheelchair. NEON 2 SA Rev.1.0... -
Page 17: Quick Release Wheels
The quick-release button should snap back to its original position. • Risk of injury. Do not get your fingers caught in the rotating wheel. Always stop wheel rotation before removing the wheels. NEON 2 SA Rev.1.0... -
Page 18: Options
This might cause the wheel lock extension lever to break! • Leaning onto the wheel lock extension lever while transferring will cause the lever to break! Splashing water from tires might cause the wheel lock to malfunction. NEON 2 SA Rev.1.0... - Page 19 To readjust, loosen screws, (1) and set the appropriate interval. Tighten screw, Fig.6.2.4 - 6.2.5 (see the page on torque). 3.0 mm CAUTION! After each adjustment of the rear wheels, check the interval to the wheel locks and readjust if necessary. NEON 2 SA Rev.1.0...
-
Page 20: Footrests
Check that the footrest is correctly engaged. The footrest will be limited by the hanger stop (Fig.6.3.1) in a 90° position. This ensures that the break will not be inadvertantly released when the hanger is swung out. NEON 2 SA Rev.1.0... - Page 21 (Fig. 6.3.4 to Fig.6.3.5). When finished, make sure that all screws have been properly tightened (see the page on torque). A minimum interval of 2.5 centimetres from the ground should always be maintained. NEON 2 SA Rev.1.0...
- Page 22 Fig. 6.3.10 • The footrests are not designed to be used to lift or carry the wheelchairs with an occupant. • When getting into or out of the chair, never stand on the footboards. NEON 2 SA Rev.1.0...
-
Page 23: Seating
(blue dot on the thread) and can only be adjusted up to 3 times before they need to be replaced by new thread-locking screws. Alternatively, the screws can be re-mounted using Loctite™ 243 threadlocker. NEON 2 SA Rev.1.0... - Page 24 (blue dot on the thread) and can only be adjusted up to 3 times before they need to be replaced by new thread-locking screws. Alternatively, the screws can be re-mounted using Loctite™ 243 threadlocker. Fig. 6.4.8 NEON 2 SA Rev.1.0...
-
Page 25: Castors
(blue dot on the thread) and can only be adjusted up to 3 times before they need to be replaced by new thread-locking screws. Alternatively, the screws can be re-mounted using Loctite™ 243 threadlocker. NEON 2 SA Rev.1.0... -
Page 26: Backrest
This may lead to an unstable wheelchair likely to tip and may rquire the use of anti-tip tubes. Adjustable back-sling Fig. 6.6.3 The adjustable back-sling can be adjusted for tension by using several straps. (Fig. 6.6.4). Fig. 6.6.4 NEON 2 SA Rev.1.0... -
Page 27: Headrests
The headrest (Fig. 6.7.1) can be raised and moved horizontally both forwards and backwards. To do this, loosen the screw (1,2 or 3). Now you can adjust to the desired position. Tighten screws again (see the page on torque). NEON 2 SA Rev.1.0... -
Page 28: Wheel Alignment
(blue dot on the thread) and can only be adjusted up to 3 times before they need to be replaced by new thread-locking screws. Alternatively, the screws can be re-mounted using Loctite™ 243 threadlocker. NEON 2 SA Rev.1.0... -
Page 29: Sideguards
1. Outer armrest rails 2. Height adjustment of the locking lever 3. Locking lever 4. Armrest Pad 5. Transfer bar 6. Sideguard 7. Receiver 8. Adjustment clamp 9. Parts to adjust the receiver 10. Clamp screws NEON 2 SA Rev.1.0... -
Page 30: Push Handles
If the folding push handles are not required, they can be flipped downwards by pushing the button (1). When they are required again, Fig. 6.10.2 flip the push handles up, until they click into place. (Fig. 6.10.2). NEON 2 SA Rev.1.0... -
Page 31: Crutch Holder
(such as kerbs), to prevent them from interfering with the manoeuvre. DANGER! If the anti-tip tubes are not fitted, or have been fitted incorrectly, there is a risk of tipping over and of injury. NEON 2 SA Rev.1.0... -
Page 32: Stabilising Bar
They are therefore, out of the way when riding, transporting, or when tipping to pass over obstacles. DANGER! Fig. 6.14.2 • Without rear wheels, your wheelchair has no wheel locks. • There is a risk of the chair tipping backwards. NEON 2 SA Rev.1.0... -
Page 33: Pelvic Restraint Belt
Feed free belt back through male buckle and slide adjusters. Ensure belt is not looped at male buckle, (Fig. 6.15.3) Feed free belt through slide adjusters and male buckle to provide more belt length, (Fig. 6.15.4 to 6.15.6). Fig. 6.15.5 Fig. 6.15.6 Fig. 6.15.1 NEON 2 SA Rev.1.0... - Page 34 Sunrise Medical also recommends that the length and fit of the belt is checked on a regular basis to reduce the risk of the end user inadvertently re-adjusting the belt to an excessive length. NEON 2 SA Rev.1.0...
-
Page 35: Daily Checks
In general, a complete disinfection cannot be guaranteed on seams. We therefore recommend that you dispose of seat and back slings to avoid microbacterial contamination with active agents according to § 6 infection protection law. NEON 2 SA Rev.1.0... -
Page 36: Troubleshooting
• Apply small amount of lubrication to spots where movable parts come in contact with one another Wheelchair begins to wobble • Check angle at which castors are set • Check tyre pressure • Check to see if rear wheels are adjusted differently NEON 2 SA Rev.1.0... -
Page 37: Nameplate
14.0 Technical Specifications Maximum weight limit: The nameplate is located on either the cross-tube Neon 2 up to a load of 140 kg assembly or the transverse frame tube, as well as on a Seat heights: label in the owner’s manual. The nameplate indicates... -
Page 38: Avant-Propos
Sunrise Medical S.A.S ZAC de la Vrillonnerie 17 Rue Mickaël Faraday 37170 Chambray-Lès-Tours Tel : + 33 (0) 247554400 Fax : +30 (0) 247554403 www.sunrisemedical.fr IMPORTANT : N'UTILISEZ PAS VOTRE FAUTEUIL AVANT D'AVOIR LU ET COMPRIS CE MANUEL. NEON 2 SA Rev.1.0... - Page 39 • En cas de panne, contactez-le en lui donnant le plus d’informations possible sur la nature de la panne pour qu’il puisse vous aider efficacement et rapidement. Tampon et signature du revendeur NEON 2 SA Rev.1.0...
-
Page 40: Consignes De Sécurité Et De Conduite
• N'accrochez pas d'objets lourds (sac de courses ou sac à dos) aux poignées, à l'appui-tête ou au dossier du fauteuil. • Ils peuvent modifier le point de bascule et faire basculer le fauteuil en arrière. NEON 2 SA Rev.1.0... - Page 41 Pensez toujours à actionner les deux freins simultanément, autrement votre fauteuil pourrait basculer. • Les freins d’immobilisation ne sont pas destinés à être utilisés comme des freins de service. NEON 2 SA Rev.1.0...
- Page 42 • La durée de vie anticipée de ce produit est de 5 RISQUE D'ÉTOUFFEMENT – Ce fauteuil est composé années. de petites pièces qui, dans certaines conditions, peuvent présenter un risque d'étouffement pour les jeunes enfants. NEON 2 SA Rev.1.0...
-
Page 43: Transportabilité
à moins qu'ils ne soient conformes à la ne doit être envisagé en aucun cas (Fig. A). norme ISO 7176-19:2001 ou SAE J2249, ce qui doit être spécifiquement indiqué sur l'étiquette. Fig. B CEINTURE THORACIQUE CEINTURE PELVIENNE Fig. A NEON 2 SA Rev.1.0... - Page 44 La ceinture thoracique doit passer par-dessus l'épaule et en travers de l'épaule, comme illustré aux Fig. D et E. Fig. G Fig. C Fig. E ZONE DE PRÉFÉRENCE Fig. D Fig. H Fig. F NEON 2 SA Rev.1.0...
-
Page 45: Garantie
Les réparations ont été effectuées avant d'en avoir informé le service client. 7. Cette garantie est soumise à la loi du pays d'achat du produit auprès de Sunrise Medical* * C’est-à-dire le site Sunrise Medical depuis lequel le produit a été acheté. NEON 2 SA Rev.1.0... -
Page 46: Manipulation
• Posez vos pieds au sol lorsque vous montez ou descendez du fauteuil. • Enclenchez toujours les freins d'immobilisation lorsque vous montez ou descendez du fauteuil. NEON 2 SA Rev.1.0... -
Page 47: Roues À Déverrouillage Rapide
Relâchez le bouton pour verrouiller l'axe. Le bouton d'arrêt doit revenir dans sa position de départ. • Risque de blessure. Faites attention de ne pas vous coincer les doigts dans les roues en rotation. Immobilisez toujours les roues avant de les déposer.. NEON 2 SA Rev.1.0... -
Page 48: Options
Veillez à ne pas prendre appui sur la rallonge du levier lorsque vous montez ou descendez du fauteuil, car vous risqueriez de la casser ! L’eau projetée par les pneus peut réduire l’efficacité des freins d’immobilisation. NEON 2 SA Rev.1.0... - Page 49 Resserrez de nouveau la vis, Fig. 6.2.4 - 6.2.5 (Voir la page couples de serrage). 3,0 mm ATTENTION ! Vérifiez le réglage des freins après chaque modification de la position de la roue arrière et refaites votre réglage, si nécessaire. NEON 2 SA Rev.1.0...
-
Page 50: Repose-Pieds
Vérifiez que les repose-pieds sont bien fixés. Le repose-pieds est limité par la butée de la potence (Fig. 6.3.1) à une position à 90°. Cette précaution a pour but d'éviter de relâcher accidentellement le frein lorsque le repose-pieds est escamoté. NEON 2 SA Rev.1.0... - Page 51 Lorsque vous avez terminé, n’oubliez pas de bien revisser toutes les vis (Voir la section sur la force de torsion). Il faut toujours conserver un intervalle minimum de 2,5 centimètres entre les repose-pieds et le sol. NEON 2 SA Rev.1.0...
- Page 52 • Les repose-pieds n’ont pas été conçus pour soulever ou porter le fauteuil avec un utilisateur assis dedans. • Ne prenez jamais appui sur le repose-pied pour monter ou descendre du fauteuil NEON 2 SA Rev.1.0...
-
Page 53: Assise
(point bleu sur le filetage) ; elles ne peuvent être ajustées que 3 fois, après quoi il convient de les remplacer par de nouvelles vis à frein- filet. Les vis peuvent également être réutilisées avec du frein-filet Loctite™ 243. NEON 2 SA Rev.1.0... - Page 54 (point bleu sur le filetage) ; elles ne peuvent être ajustées que 3 fois, après quoi il convient de les remplacer par de nouvelles vis à frein-filet. Les vis peuvent également être réutilisées avec du frein-filet Loctite™ 243. NEON 2 SA Rev.1.0...
-
Page 55: Roues Avant
(point bleu sur le filetage) ; elles ne peuvent être ajustées que 3 fois, après quoi il convient de les remplacer par de nouvelles vis à frein- filet. Les vis peuvent également être réutilisées avec du frein-filet Loctite™ 243. NEON 2 SA Rev.1.0... -
Page 56: Dossier
éviter tout risque de basculement. L'ajout de roulettes anti- bascule doit être envisagé. Fig. 6.6.3 Toile du dossier réglable Vous pouvez régler la tension de la toile du dossier à l'aide des sangles. (Fig. 6.6.4). Fig. 6.6.4 NEON 2 SA Rev.1.0... -
Page 57: Appui-Têtes
Vous pouvez régler la hauteur de l’appui-tête (Fig. 6.7.1) et l’incliner horizontalement vers l’avant ou l’arrière. Pour cela, desserrez la vis correspondante (1,2 ou 3) et réglez à la position désirée. Revissez les vis (Voir la section sur la force de torsion). NEON 2 SA Rev.1.0... -
Page 58: Alignement Des Roues
(point bleu sur le filetage) ; elles ne peuvent être ajustées que 3 fois, après quoi il convient de les remplacer par de nouvelles vis à frein-filet. Les vis peuvent également être réutilisées avec du frein-filet Loctite™ 243. NEON 2 SA Rev.1.0... -
Page 59: Protège-Vêtements
2. Levier de réglage de la hauteur 3. Levier de verrouillage 4. Manchette de l'accoudoir 5. Barre de transfert 6. Protège-vêtement 7. Récepteur 8. Mâchoire de réglage 9. Vis de réglage du récepteur d'accoudoir 10. Vis de serrage NEON 2 SA Rev.1.0... -
Page 60: Poignées De Poussée
Poignées rabattables Fig. 6.10.2 Si vous n'avez pas besoin des poignées, vous pouvez les abaisser en appuyant sur le bouton (1). Lorsque vous en avez à nouveau besoin, relevez les poignées jusqu'à ce qu'elles s'enclenchent. (Fig. 6.10.2). NEON 2 SA Rev.1.0... -
Page 61: Porte-Canne
être en position relevée lorsque vous négociez des obstacles relativement hauts, comme des trottoirs, afin d'éviter qu'elles n'entravent la manoeuvre. DANGER ! En l'absence de roulettes anti-bascule, ou si celles-ci ont été mal installées, le fauteuil risque de basculer et de provoquer des blessures. NEON 2 SA Rev.1.0... -
Page 62: Tendeur De Dossier
DANGER ! Fig. 6.14.2 • Sans ses roues arrière, votre fauteuil n’a pas de freins d’immobilisation. • Le fauteuil risque de basculer vers l'arrière. NEON 2 SA Rev.1.0... -
Page 63: Ceinture Pelvienne
Assurez-vous que la ceinture n'ait pas de nœud au niveau de l'attache male, (Fig. 6.15.3) Passez la ceinture par les dispositifs de réglage coulissant et l'attache male afin d'obtenir plus de longueur de ceinture, (Fig. 6.15.4 à Fig. 6.15.6). Fig. 6.15.5 Fig. 6.15.6 Fig. 6.15.1 NEON 2 SA Rev.1.0... - Page 64 Sunrise Medical recommande également que la longueur et l'ajustement de la ceinture soient vérifiés régulièrement afin de réduire le risque de voir l'utilisateur final régler par inadvertance la ceinture à une longueur excessive. NEON 2 SA Rev.1.0...
-
Page 65: Contrôles Quotidiens
à l’article 6 de la réglementation relative à la protection contre les infections, il est recommandé de mettre au rebut la toile du siège et du dossier afin d'éviter toute contamination micro-bactérienne par les agents actifs. NEON 2 SA Rev.1.0... -
Page 66: Dépannage
Le fauteuil a du jeu • Vérifiez l’angle des roues avant • Vérifiez la pression des pneus • Regardez si les roues arrière sont réglées de différente manière NEON 2 SA Rev.1.0... -
Page 67: Plaque Signalétique
14.0 Caractéristiques techniques Charge maximale : La plaque signalétique se trouve sur les tubes du Neon 2 jusqu'à 140 kg croisillon , ainsi que sur une étiquette dans le manuel Hauteurs du siège : d’utilisation. La plaque indique la dénomination exacte Le châssis, la fourche, les roues avant et la taille des... -
Page 68: Voorwoord
-omgeving. 3433 PE NIEUWEGEIN The Netherlands T: +31 (0)30 – 60 82 100 F: +31 (0)30 – 60 55 880 E: info@sunrisemedical.nl www.SunriseMedical.nl BELANGRIJK: GEBRUIK UW ROLSTOEL NIET TOT U DEZE GEBRUIKSAANWIJZING HEEFT GELEZEN EN BEGREPEN. NEON 2 SA Rev.1.0... - Page 69 Noteer het adres en telefoonnummer van uw plaatselijke dealer in de daarvoor bestemde ruimte. Neem in het geval van storingen contact met de dealer op en probeer zoveel mogelijk relevante informatie te geven zodat hij u snel kan helpen. Stempel en handtekening dealer NEON 2 SA Rev.1.0...
-
Page 70: Algemene Veiligheidsinstructies En Besturingsrestricties
• Hang geen zware voorwerpen, zoals boodschappentassen Fig. A of rugzakken, aan de duwhandvatten, hoofdsteun of rugleuning van de rolstoel. • Hierdoor kan het zwaartepunt van de rolstoel veranderen en ontstaat het risico op achterover kantelen. NEON 2 SA Rev.1.0... - Page 71 Wanneer u op een oneffen oppervlak stopt, dient u altijd uw parkeerremmen te gebruiken om wegrollen te voorkomen. Gebruik altijd beide parkeerremmen anders kan uw rolstoel kantelen. • De parkeerremmen zijn niet bedoeld om als rem voor een bewegende rolstoel te dienen. NEON 2 SA Rev.1.0...
- Page 72 VERSTIKKINGSGEVAAR - In dit mobiliteitshulpmiddel zijn kleine onderdelen verwerkt die onder bepaalde Levensduur omstandigheden een verstikkingsgevaar voor kleine • De verwachte levensduur van dit product is 5 jaar. kinderen kunnen vormen. NEON 2 SA Rev.1.0...
-
Page 73: Transport
(Fig. A). heupgordels) mogen niet worden gebruikt als veiligheidsgordel voor een rolstoelgebruiker, tenzij deze voldoen aan de normen zoals gespecificeerd in ISO 7176-19:2001 of SAE J2249. Fig. B GORDEL VOOR BOVENLICHAAM HEUPGORDEL Fig. A NEON 2 SA Rev.1.0... - Page 74 (Fig. G). afbeeldingen D en E. De plaats van de verankeringsbanden aan de achterzijde van de rolstoel (Fig. H). Fig. G Fig. C Fig. E VOORKEURSGEBIED Fig. D Fig. H Fig. F NEON 2 SA Rev.1.0...
-
Page 75: Garantie
Reparaties zijn uitgevoerd voordat onze Klantenservice is geïnformeerd over de omstandigheden. 7. Deze garantie wordt beheerst door het recht van het land waarin het product van Sunrise Medical werd aangekocht. * Dit betekent de Sunrise Medical faciliteit waarvan het product werd aangekocht. NEON 2 SA Rev.1.0... -
Page 76: Gebruik
• Zet altijd uw voeten stevig op de grond voordat u in of uit de rolstoel stapt. • Vergrendel altijd de wielen bij het in- of uitstappen uit de rolstoel. NEON 2 SA Rev.1.0... -
Page 77: Quick-Release Wielen
De quick release knop zou weer op zijn oorspronkelijke plaats moeten klikken. • Gevaar op letsel. Let op dat uw vingers niet beklemd raken in het draaiende wiel. Stop altijd het draaien van het wiel voordat u de wielen verwijdert. NEON 2 SA Rev.1.0... -
Page 78: Opties
Hierdoor kan de verlengde hendel breken! • De hendel kan ook breken wanneer u op de verlenging gaat leunen tijdens transfers! Opspattend water en vuil van de banden kan slecht functioneren van de wielvergrendelingen veroorzaken. NEON 2 SA Rev.1.0... - Page 79 Draai de schroef weer vast, Fig. 6.2.4 - 6.2.5 (zie de pagina over torque sleutel). OPGELET! Telkens wanneer u de achterwielen hebt bijgesteld, moet u nagaan of de afstand tot de wielvergrendelingen in orde is. Pas die indien nodig aan. NEON 2 SA Rev.1.0...
-
Page 80: Voetensteunen
Controleer of de voetsteun correct is gemonteerd. De voetsteun wordt beperkt door de hangerstop (Fig. 6.3.1) tot een positie van 90°. Dit voorkomt dat de rem per ongeluk wordt ontgrendeld wanneer de hanger naar buiten wordt geklapt. NEON 2 SA Rev.1.0... - Page 81 Hiertoe moet de voetenplaat omhoog worden geklapt, (Fig. 6.3.4 tot Fig. 6.3.5). Als u klaar bent, moet u controleren of alle schroeven stevig aangedraaid zijn (zie de pagina over torque sleutel). Er moet altijd 2,5 cm ruimte boven de grond worden aangehouden. NEON 2 SA Rev.1.0...
- Page 82 De voetsteunen zijn niet ontworpen om de rolstoel aan op te tillen of te dragen, terwijl er een persoon in de rolstoel zit. • Ga nooit op de voetplaten staan wanneer u in of uit de rolstoel stapt. NEON 2 SA Rev.1.0...
-
Page 83: Zitting
(blauwe stip op de draad) en kunnen slechts drie keer worden versteld waarna ze vervangen moeten worden door nieuwe schroeven met schroefdraadborgingsmiddel. Eventueel kunnen de schroeven opnieuw worden gebruikt waarbij het schroefdraadborgingsmiddel Loctite™ 243 wordt gebruikt. NEON 2 SA Rev.1.0... - Page 84 (blauwe stip op de draad) en kunnen slechts drie keer worden versteld waarna ze vervangen moeten worden door nieuwe schroeven met schroefdraadborgingsmiddel. Eventueel kunnen de schroeven opnieuw worden gebruikt waarbij het schroefdraadborgingsmiddel Loctite™ 243 wordt gebruikt. NEON 2 SA Rev.1.0...
-
Page 85: Zwenkwielen
(blauwe stip op de draad) en kunnen slechts drie keer worden versteld waarna ze vervangen moeten worden door nieuwe schroeven met schroefdraadborgingsmiddel. Eventueel kunnen de schroeven opnieuw worden gebruikt waarbij het schroefdraadborgingsmiddel Loctite™ 243 wordt gebruikt. NEON 2 SA Rev.1.0... -
Page 86: Rugleuning
Aanpassingen van het zwaartekrachtpunt kan leiden tot een instabiele Fig. 6.6.3 rolstoel met kans op omkantelen; het gebruik van anti-tipwielen kan vereist zijn. Instelbare rugleuningband De spanning van de rugleuning kan worden ingesteld met gebruik van diverse banden. (Fig. 6.6.4). Fig. 6.6.4 NEON 2 SA Rev.1.0... -
Page 87: Hoofdsteun
De hoofdsteun (Fig. 6.7.1) kan omhoog gezet worden en hori- zontaal voorwaarts en achterwaarts worden bewogen. Hiertoe draait u de schroef (1, 2 of 3) los. Nu kunt u de gewenste positie instellen. Draai de schroef weer vast. (zie de pagina over torque sleutel). NEON 2 SA Rev.1.0... -
Page 88: Wielaanpassing
(blauwe stip op de draad) en kunnen slechts drie keer worden versteld waarna ze vervangen moeten worden door nieuwe schroeven met schroefdraadborgingsmiddel. Eventueel kunnen de schroeven opnieuw worden gebruikt waarbij het schroefdraadborgingsmiddel Loctite™ 243 wordt gebruikt. NEON 2 SA Rev.1.0... -
Page 89: Zijkanten
1. Buitenste geleiders van de armsteun 2. Instelling van de hoogte van de vergrendelingshendel 3. Vergrendelingshendel 4. Armsteunkussen 5. Overstapstang 6. Zijbescherming 7. Houder 8. Stelklem 9. Onderdelen om de houder aan te passen 10. Klemschroeven NEON 2 SA Rev.1.0... -
Page 90: Duwhandvatten
Wanneer de neerklapbare handvatten niet nodig zijn, kunnen ze naar beneden worden geklapt door op de knop (1) te duwen. Wanneer ze weer nodig zijn, kunnen ze omhoog worden geduwd tot ze op hun plaats 'klikken'. (Fig. 6.10.2). NEON 2 SA Rev.1.0... -
Page 91: Krukkenhouder
GEVAAR! Indien geen anti-tip wielen zijn aangebracht, of indien deze niet correct zijn aangebracht, ontstaat het gevaar op kantelen en letsel. NEON 2 SA Rev.1.0... -
Page 92: Stabilisatiestang
Fig. 6.14.2 GEVAAR! • Uw rolstoel heeft geen wielvergrendelingen wanneer u de transitwielen gebruikt. • Het gevaar bestaat dat de rolstoel naar achteren kantelt. NEON 2 SA Rev.1.0... -
Page 93: Heupgordel
Controleer of de gordel niet om de sluiting is gedraaid, (Fig. 6.15.3). Om de gordel langer te maken, haalt u het niet-gebruikte deel van de gordel door de geleiders en gesp, (Fig. 6.15.4 tot Fig. 6.15.6). Fig. 6.15.5 Fig. 6.15.6 Fig. 6.15.1 NEON 2 SA Rev.1.0... - Page 94 De heupgordel moet naar wens van de gebruiker worden aangepast, zoals hierboven wordt getoond. Sunrise Medical adviseert de lengte en bevestiging van de gordel regelmatig te controleren om te voorkomen dat de gordel onbedoeld te lang wordt. NEON 2 SA Rev.1.0...
-
Page 95: Dagelijkse Controle
Over het algemeen kan op de naden van de rolstoel geen volledige ontsmetting worden gegarandeerd. Daarom wordt geadviseerd de zitting en rugleuning te vervangen om microbacteriële besmetting te voorkomen. (In overeenstemming met de Wet Medische hulpmiddelen). NEON 2 SA Rev.1.0... -
Page 96: Oplossen Van Problemen
Als Rolstoel begint te wiebelen alternatief kunt u uw handbike ook terugbrengen naar uw • Controleer hoek waarin voorwielen ingesteld zijn dealer voor verdere afvalverwerking. • Controleer bandendruk • Controleer of achterwielen verschillend ingesteld zijn NEON 2 SA Rev.1.0... -
Page 97: Sticker
14.0 Technische specificaties Maximale belasting: De sticker bevindt zich of op het kruisframe, of op de Neon 2 tot een gebruikersgewicht van 140 kg dwarsstang van het frame. Ook vindt u een sticker met Stoelhoogtes: gegevens in de gebruikershandleiding. Op de sticker... - Page 100 Sunrise Medical AS Sunrise Medical GmbH & Co. KG Dynamitveien 14B Kahlbachring 2-4 1400 SKI 69254 Malsch/Heidelberg Norway Deutschland Telef: +47 66963800 Tel.: +49 (0) 7253/980-0 Faks: +47 66963880 Fax: +49 (0) 7253/980-222 www.SunriseMedical.no www.SunriseMedical.de Sunrise Medical AB Sunrise Medical Box 9232 Thorns Road 400 95 Göteborg...
Need help?
Do you have a question about the Neon 2 and is the answer not in the manual?
Questions and answers