Table of Contents

Related Manuals for Quickie Quickie P-222 SE


Summary of Contents for Quickie Quickie P-222 SE
- Page 1 T I O N E N G L I S H P-222 SE Quickie P-222 SE ® Supplier: This manual must be given to the user of this wheelchair. User: Before using this wheelchair read this entire O w n e r ’ s M a n u a l manual and save for future reference.
-
Page 2: For Answers To Your Questions
Sunrise supplier. Please feel free to write or call us at the address and telephone number below: Sunrise Medical Customer Service Department 2842 Business Park Ave Fresno, CA 93727 800.333.4000... -
Page 3: Table Of Contents
P-222 II. TABLE OF CONTENTS III. YOUR CHAIR AND ITS PARTS........4 VIII. TIPS FOR ATTENDANTS ..........12 IV. NOTICE– READ BEFORE USE........5 A. TO CLIMB A CURB OR SINGLE STEP......12 A. CHOOSE THE RIGHT CHAIR & SAFETY OPTIONS ..5 B. TO DESCEND A CURB OR SINGLE STEP ....12 B. -
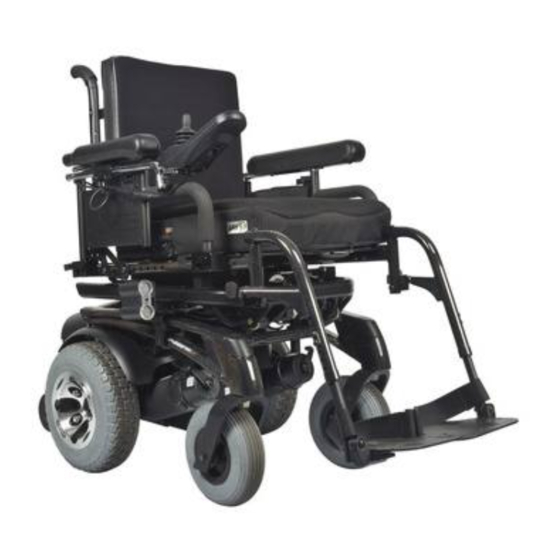
Page 4: Your Chair And Its Parts
9" (225mm)airless insert Seat height: Standard - 18" (458 mm), option- 19" (483 mm), 20" (508 mm) The Quickie P-222 SE is a class B wheelchair as Armrests Seat sling: Standard - parapak, Standard - dual post with standard or full length... -
Page 5: Notice- Read Before Use
P-222 IV. NOTICE– READ BEFORE USE A. CHOOSE THE RIGHT CHAIR & SAFETY D.WARNINGS OPTIONS The word “WARNING” refers to a hazard or unsafe practice that may cause severe injury or death to you or to other persons. The Sunrise provides a choice of many power wheelchair styles, sizes and “Warnings”... -
Page 6: D.distance From The Source
3. The configuration tested and found to be immune to at least 20 V/m is: Quickie P-222 SE power wheelchair with a right- hand mounted RNET remote joystick system, 18" seat width, 18" seat depth, dual post height adjustable armrests, swing- away tapered legrests with one piece solid footplate, and Gp 24 gel cell batteries. -
Page 7: General Warnings
P-222 VI. GENERAL WARNINGS C. WEIGHT LIMIT WARNING Heed all warnings in this section. If you fail to do so a WARNING fall, tip-over or loss of control may occur and cause 1. The rider plus items carried should never exceed a total weight of 300 lbs/136 kg (P-222 SE) and 350 lbs/159 kg (P- severe injury to you or others. -
Page 8: G.changes & Adjustments
P-222 VI. GENERAL WARNINGS G. CHANGES & ADJUSTMENTS J. TERRAIN WARNING WARNING 1. This chair is designed for use on firm, even surfaces such as Never use non-Quickie parts or make a changes to your concrete, asphalt and indoor flooring. chair unless authorized by Sunrise. -
Page 9: N.transfers
P-222 VI. GENERAL WARNINGS N.TRANSFERS IF YOU MUST REACH OR LEAN; DO SO AT YOUR OWN RISK. WARNING It is dangerous to transfer on your own. It requires Remember to: 1. Move your chair as close as you can to the object you wish good balance and agility. -
Page 10: Ramps, Slopes & Sidehills
P-222 VI. GENERAL WARNINGS S. RAMPS, SLOPES & SIDEHILLS At A Minimum: 1. Open sides of ramp must have side rails to prevent your WARNING chair from going over the edge. The center of balance of your chair changes when you 2. -
Page 11: Warnings: Components & Options
P-222 VII. WARNINGS: COMPONENTS & OPTIONS F. FOOTRESTS WARNING Note: If you use parts or make changes not authorized WARNING by Sunrise it may create a safety hazard and will void 1. At the lowest point, footrests should be at least 2 1/2 inch- es (65 mm) off the ground. -
Page 12: Push Handles
P-222 VII. WARNINGS: COMPONENTS & OPTIONS seat. If this occurs, you may suffer chest compression or suf- side to slip and may allow the wheel to turn when you do focate due to pressure from the belt. not expect it. 2. -
Page 13: Set-Up, Adjustment & Use
P-222 IX. SET-UP, ADJUSTMENT & USE NOTES 1. Work Surface For Set-Up: Use a flat surface, such as a table, to assemble, adjust and check your chair. This makes the steps easier and helps ensure a correct set-up. 2. Fasteners: •... -
Page 14: Power Drive Unit
Batteries may weigh up to 55 lbs. (25 kg). Care must be taken to avoid injury when lifting. C. FOLDING BACKREST Quickie P-222 SE wheelchairs are shipped with backrest in folded position. 1. Upright Positioning a. Lift backrest to upright position so that latch handles (G) lock into place. -
Page 15: E Elevating Legrest
P-222 IX. SET-UP, ADJUSTMENT & USE E ELEVATING LEGREST (Optional) 1. Installation To install or remove Elevating Legrest (ELR) see instructions for Swing-away Footrest installation. new drawing 2. Adjustment a. To raise legrest, lift to desired position. Legrest will automatically lock in place. b. -
Page 16: Single Post Height-Adjustable Armrests
P-222 IX. SET-UP, ADJUSTMENT & USE H.SINGLE POST HEIGHT-ADJUSTABLE ARMRESTS (OPTIONAL) 1. Installation a. Slide the outer armpost into the receiver mounted to the wheel chair frame. b. The armrest will automatically lock into place. 2. Height Adjustment a. Rotate release lever to stop. b. -
Page 17: Dynamic Stabilizer
Lift seat and main frame off of power unit. c. Set power unit aside. N. WHEEL LOCKS Wheel locks are installed by Sunrise when requested on the Quickie P-222 SE. Adjustment The wheel locks mount on a split clamp system. Use a torque of 100 in./lbs. (11.3Nm) when adjusting the position of the wheel locks. -
Page 18: Anti-Tip Tubes
P-222 IX. SET-UP, ADJUSTMENT & USE P . ANTI-TIP TUBES Sunrise recommends anti-tip tubes for all wheelchairs. NOTE– Use a torque setting of 100 in.-lbs. when setting-up anti-tip receivers. 1. Inserting Anti-Tip Tubes Into Receiver a. Press the rear anti-tip release lever on the anti-tip tube so that both release pins are drawn inside. -
Page 19: Operating Guide
P-222 X. OPERATING GUIDE X. OPERATING GUIDE A. PERFORMANCE CONTROL SETTINGS NOTE– Seek advice regarding checking and adjusting settings. 1. It is vital to match control settings to your level of function and ability. 2. Consult your health care professional and your supplier to select the best control set- tings for you. -
Page 20: D.joystick Stationary
P-222 X. OPERATING GUIDE D. JOYSTICK STATIONARY Your chair has an available programming feature called “Joystick Stationary” which can be set by your dealer. This feature senses when the joystick is displaced from neutral, yet left in a steady position for a predetermined period of time. The controller will automatically turn off if the set time has been reached. -
Page 21: R-Net Joysticks & Omni Controller
P-222 X. OPERATING GUIDE 5. Joystick (G) The joystick controls the direction and speed of your chair. Turn the chair on and move the joystick in the direction you want to go. • Moving the joystick from the neutral (center) position disengages the motor locks, allowing the chair to move. -
Page 22: Rnet Controller
P-222 X. OPERATING GUIDE G. RNET CONTROLLER Joystick The Rnet control system has two versions of the Joystick Module – with and without lighting con- trol. Most of the controls are common to both; however, the lighting buttons are only included on the Joystick Module with lighting control. -
Page 23: Led Joystick
P-222 X. OPERATING GUIDE H. LED JOYSTICK 1. On/Off Button The on/off button applies power to the control system electronics, which in turn supply power to the wheelchair’s motors. Do not use the on/off button to stop the wheelchair unless there is an emergency. (If you do, you may shorten the life off the wheelchair drive components.) 2. -
Page 24: Lcd Screen
P-222 X. OPERATING GUIDE I. LCD SCREEN Restart When the control system requires a reboot; for The status of the control system can be understood by observing example, after a module re-configuration, this the LCD screen. symbol will be flashed. Screen Symbols Fault The Drive screen for the R-net has common components, which... -
Page 25: Color Lcd Screen
P-222 X. OPERATING GUIDE J. COLOR LCD SCREEN This section covers those joystick modules that are fitted with a color LCD screen. The color LCD screen is split into three areas of information. The Top Bar, the Base Bar and the Main Screen Area. -
Page 26: Brake Lever
P-222 X. OPERATING GUIDE K. BRAKE LEVER Disengage the brake lever when you need to manually push the chair. (For example, in an emergency, or if batteries fail). WARNING 1. Do not disengage brake lever unless power to the chair is off. 2. -
Page 27: Introduction
P-222 XI. BATTERIES A. INTRODUCTION • Keep cord out of the way, where it will not be stepped on, tripped over, or damaged. 1. Notes– 3. Caution — To Avoid Damage to the Battery: • Batteries supply the power for your chair. They contain a •... -
Page 28: Batteries
P-222 XI. BATTERIES tery cables with caution. Connect the positive lead to the pos- Always: itive terminal and the negative lead to the negative terminal. 1. Use the charger that comes with your wheelchair. Read and Do this for each battery. follow all instructions and warnings. -
Page 29: Maintenance
P-222 XII. MAINTENANCE A. NOTES 2. Adding Water: (Wet Cells Only) • Wet-type lead acid batteries need periodic replacement of 1. Proper maintenance will improve performance and extend water due to evaporation. the useful life of your chair. NOTE– Use distilled water only. 2. -
Page 30: G.ordering Parts
P-222 XII. MAINTENANCE f. Reassemble the caster wheel; make sure the bearing spacer is in place and all four bolts are tightened to a torque of 60 in.-lbs. (6.8 N.m). g. Mount caster wheel onto fork. Install washers correctly tight- en bolt to 240 in.-lbs. -
Page 31: Wiring Diagrams
P-222 XIII. WIRING DIAGRAMS VR2-90 R-NET EL-90 930476 Rev. E... - Page 32 P-222 XIII. WIRING DIAGRAMS Output Module Intelligent Seating Module (ISM) R-NET BUS CONNECTIONS PM DRIVE ONLY AND THRU-DRIVE ACTUATOR CONNECTIONS 930476 Rev. E...
- Page 33 P-222 XIII. WIRING DIAGRAMS SWITCH DRIVEN SINGLE ACTUATOR DRIVER CONNECTIONS R-NET ISM ACTUATOR CONNECTIONS 930476 Rev. E...
- Page 34 P-222 XIII. WIRING DIAGRAMS LIGHTS & INDICATORS 930476 Rev. E...
-
Page 35: Sunrise Limited Warranty
3. This warranty applies in the USA only. Check with your sup- plier to find out if international warranties apply. 4. This warranty is not transferable and only applies to the first consumer purchase of this wheelchair through an authorized Sunrise Medical dealer. 930476 Rev. E... -
Page 36: 930476 Rev. E
Sunrise Medical • 2842 Business Park Ave. • Fresno, CA 93727 • USA In Canada (800) 263-3390 Customer Ser vice: 800.333.4000 ©2012 Sunrise Medical (US) LLC www.SunriseMedical.com 05.12 930476 Rev. E...
Need help?
Do you have a question about the Quickie P-222 SE and is the answer not in the manual?
Questions and answers