
Related Manuals for Cloud CX261


Summary of Contents for Cloud CX261
- Page 1 CX261 MP3/Zone Mixer Installation and User Guide CX261 Installation and User Guide v1.5...
-
Page 2: Table Of Contents
Microphone Inputs ..............................15 Phantom Power ................................. 15 Gain & level ................................15 EQ ....................................15 High Pass Filter ................................15 Microphone Limiter ..............................16 Use of Mic 1 input with a telephone system ...................... 16 CX261 Installation and User Guide v1.5... - Page 3 Control of music source and level via external DC ..................18 Fitting loudspeaker EQ cards ............................ 19 APPENDIX ........................... 20 PCB jumper location and settings ..........................20 Ground loops ................................21 EMC considerations ..............................21 Technical Specifications .............................. 22 CX261 Installation and User Guide v1.5...
-
Page 4: Safety Information
WARNING: SHOCK HAZARD - DO NOT OPEN the unit may be degraded. The product conforms to the following European electrical AVIS: RISQUE DE CHOQUE ÉLECTRIQUE - NE PAS OUVRIR safety standard: BS EN 60065:2012 CX261 Installation and User Guide v1.5... -
Page 5: Safety Considerations And Information
Disconnect the power cable from the unit before removing the top panel and do not make any internal adjustments with the unit switched on. Only reassemble the unit using bolts/screws identical to the original parts. CX261 Installation and User Guide v1.5... -
Page 6: Overview
What’s in the box OVERVIEW Unpack the CX261 and its accessories with care. It is always a Introduction good idea to store all packaging (if practical), in case you ever need to return the unit to your Cloud dealer for any reason. -
Page 7: Block Diagram
Block Diagram CX261 Installation and User Guide v1.5... -
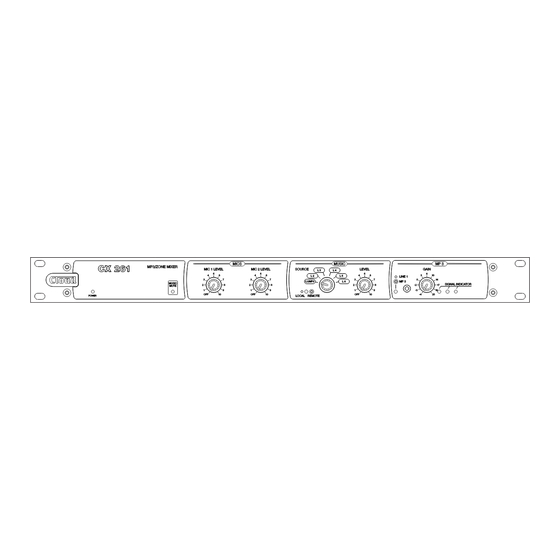
Page 8: Description Of Front Panel
11. POWER – green LED, confirms power is applied to the unit. 12. Rack mounting ears – the unit may be rack-mounted in a standard 19” equipment rack. It requires 1U of rack height. CX261 Installation and User Guide v1.5... -
Page 9: Description Of Rear Panel
15. RSL-6 – remote music control connector for RL-1 or RSL-6 remote control plates. 16. LOC/REM – disables front panel controls when remote control is in use. 17. MUTE CONTACTS – emergency control input for muting music source. 18. IEC mains input. 19. Mains fuse. CX261 Installation and User Guide v1.5... -
Page 10: Installation
Always avoid using pre-made leads of an unnecessary Hardware Considerations length. The CX261 Zone Mixer is built in a 1U-high 19” rack mount If it is necessary to connect an item of source equipment enclosure. It is recommended that the Zone Mixer is installed with a balanced output, the ideal method is to use a balancing in a 19”... -
Page 11: Front Panel Mp3 Input
Front panel MP3 input Use of Mic 1 input with telephone system MIC 1 input on the CX261 may be reconfigured to accept To facilitate easy connection of digital audio devices such as an audio input directly from a compatible telephone system. -
Page 12: Main Output
2 cold pin 3 hot Music Control Like many other Cloud products, the CX261 allows remote control of music level and source selection. Cloud remote When using single-core cable, control plates from the RL-1 Series (music level only) and don’t connect ‘cold’... -
Page 13: Music Mute
Before the RSL-6 will operate, the RSL-6 port must be enabled by setting the adjacent LOC/REM push-button switch ([16] on page 9) to REM (i.e., pressing it in). In this setting, the front panel MUSIC LEVEL and SOURCE controls become inoperative. CX261 Installation and User Guide v1.5... -
Page 14: Setting Up & Operation
Local/remote control To avoid dramatic changes in volume when switching between sources, the CX261’s music inputs are provided with preset If an RL-1 or RSL-6 Series remote control plate is in use, gain trim controls ([2] on “Description of rear panel” on the rear panel LOC/REM push-button must be set to REM page 9). -
Page 15: Music Eq
Music Limiter Gain & level The music channel of the CX261 incorporates a limiter circuit to help prevent inadvertent overloading of subsequent Each microphone input is provided with a rear panel preset GAIN control ([6] at page 9). A wide range of gain is... -
Page 16: Microphone Limiter
The CX261 offers several options for determining what happens to music signals when announcements are made. The The CX261 is a 2-channel device, and is intended to be used options are selected via internal jumpers, and should be set where full stereo reproduction of music sources is desirable. If... -
Page 17: Microphone Priorities
In such a case, longer restoration times of 6 In installations where both mic inputs are being used, it or 12 seconds may be set to ensure that the CX261 does not is possible for announcements to clash if the mics are revert back to the selected music source in between tracks. -
Page 18: Options And Additional Information
RL-1 Series and RSL-6 Series remote control plates – general considerations Cloud RL-1 Series and RSL-6 Series remote control plates are available in three form factors: two fit single-gang UK or American electrical back boxes respectively, while the third is a 50 x 50 mm “Media” module, suitable for “Euro-module” mounting frames available in most European countries. -
Page 19: Fitting Loudspeaker Eq Cards
Note that there is no provision for fitting an equalisation module to the MOH/Auxiliary output. Please check the Cloud website (www.cloud.co.uk/accessories) for makes and models of loudspeakers for which EQ cards are available. Switch off the power and isolate the CX261 from the mains. -
Page 20: Appendix
APPENDIX PCB jumper location and settings The CX261 has various internal PCB-mounted jumpers, the setting of which may require alteration during installation. The table below lists each switch and jumper and its purpose, together with the factory default setting. JUMPER... -
Page 21: Ground Loops
(see “Music Sources” on page 10). EMC considerations The Cloud CX261 fully conforms to the relevant electromagnetic compatibility (EMC) standards and is technically well behaved; you should experience no operational problems and under normal circumstances, no special precautions need to be taken. -
Page 22: Technical Specifications
46.5 mA at 240 V Fuse rating Fuse type T1A, 20 x 5 mm 482.6 mm x 44 mm (1U) x 152.5 mm Dimensions (WxHxD) 19” x 1.73” (1U) x 6” 2.13 kg Weight 4.69 lb CX261 Installation and User Guide v1.5... - Page 23 CX261 Installation and User Guide v1.5...
- Page 24 www.cloudusa.pro...
Need help?
Do you have a question about the CX261 and is the answer not in the manual?
Questions and answers