
Related Manuals for Tait TP8110


Summary of Contents for Tait TP8110
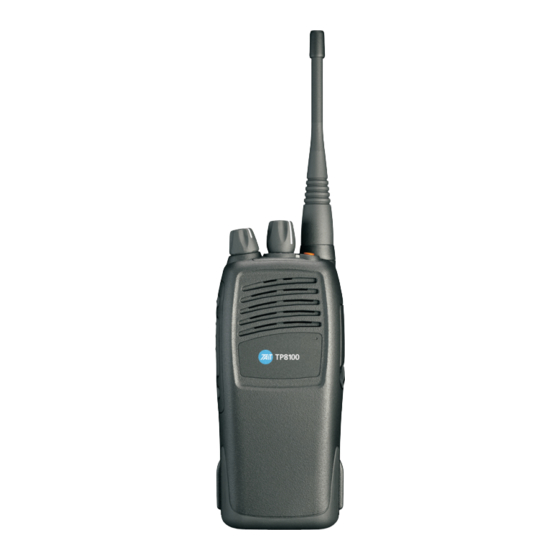
- Page 1 TP8110 Conventional Portable Radios User’s Guide MPC-00026-07 · Issue 7 · January 2013...
-
Page 2: Directive 1999/5/Ec Declaration Of Conformity
Directiva 1999/5/CE. Español Veja também: www.taitradio.com/eudoc Por medio de la presente Tait Limited declara que el TPCB1A, TPCC0A, TPCH5A & Svensk Härmed intygar Tait Limited att denna TPCH6A cumple con los requisitos esenciales TPCB1A, TPCC0A, TPCH5A & TPCH6A står I y cualesquiera otras disposiciones aplicables överensstämmelse med de väsentliga... -
Page 3: Table Of Contents
Contents Directive 1999/5/EC Declaration of Conformity ..........3 For your safety ................... 10 Safety warnings used in this guide ............10 Radio frequency exposure information ..........10 Compliance with RF energy exposure standards ........12 Radio frequency emissions limits in the USA ......... 12 Radio frequency emissions limits in Canada .......... - Page 4 Removing a belt clip ................26 Installing an accessory ................27 Getting started ................... 28 About the radio controls ............... 29 Understanding the radio indicators ............31 Accessing frequently used features ............32 Turning the radio on and off ..............33 Adjusting the volume ................
- Page 5 Disposing of batteries ................60 Troubleshooting ..................61 When your radio won’t turn on ............62 Troubleshooting your charger ............... 62 General care ..................63 Function key options .................. 64 Common functions ................64 Tait Software Licence Agreement ............... 66...
- Page 6 Tait Limited. The word TAIT and the TAIT logo are trademarks of Tait Limited. All trade names referenced are the service mark, trademark or registered trademark of the respective manufacturers.
- Page 7 For more information about how to dispose of your unwanted Tait product, visit the Tait WEEE website at www.taitradio.com/weee. Please be environmentally responsible and dispose through the original supplier, or contact Tait Limited.
- Page 8 Tait Limited also complies with the Restriction of the Use of Certain Hazardous Substances in Electrical and Electronic Equipment (RoHS) Directive in the European Union. In China, we comply with the Measures for Administration of the Pollution Control of Electronic Information Products. We will comply with environmental requirements in other markets as they are introduced.
-
Page 9: For Your Safety
For your safety Before using the radio, please read the important safety and compliance information in the following sections. Before using an intrinsically safe (IS) radio, see also "Intrinsically Safe radios" on page Safety warnings used in this guide Please follow exactly any instruction that appears in the text as an ‘alert’. - Page 10 If you wear your radio, you must always put it in a carrying ■ accessory that has been specifically approved by Tait for this radio. Using non-approved body-worn accessories may mean you expose yourself to higher levels of RF than recommended...
-
Page 11: Compliance With Rf Energy Exposure Standards
FCC’s occupational/controlled environment RF exposure limits. Ensure you only use Tait-approved antennas, batteries, ■ and accessories. For more information on what RF energy is and how to control your exposure to it, visit the FCC website at www.fcc.gov/oet/rfsafety/rf-faqs.html. -
Page 12: Frequency Band Reserved For Distress Beacons
Frequency band reserved for distress beacons Frequency band 406 to 406.1MHz is reserved for use by distress beacons. Transmissions should not be made within this frequency band. Australia and New Zealand citizens band (476.4 to 477.4MHz) AS/NZS 4365 deals with the use of frequencies in the 476.425 to 477.400 MHz band. -
Page 13: Health, Safety And Electromagnetic Compatibility In Europe
Health, safety and electromagnetic compatibility in Europe In the European Community, radio and telecommunications equipment is regulated by Directive 1999/5/EC, also known as the Radio and Telecommunications Terminal Equipment (R&TTE) directive. The requirements of this directive include protection of health and safety of users, as well as electromagnetic compatibility. -
Page 14: Interference With Electronic Devices
Interference with electronic devices Warning Some electronic devices may be prone to malfunction due to the lack of protection from RF energy that is present when your radio is transmitting. Examples of electronic devices that may be affected by RF energy are: aircraft electronic systems ■... -
Page 15: Potentially Explosive Atmospheres And Blasting Areas
APPROVED An IS radio must be serviced only by an agency certified by both the approval authority and by Tait Limited. Any unauthorized repair or substitution of parts invalidates the intrinsic safety rating and the third party IS approval. To have an IS radio serviced, return it to an authorized Tait branch or subsidiary. -
Page 16: Radio Installation And Operation In Vehicles
Use only IS-approved accessories with IS radios. For an up-to-date list of FM-approved accessories, go to the Tait website or contact your nearest Tait office. Warning IS certification applies only while the product is used in accordance with these instructions. -
Page 17: Vehicle Charger Installation And Operation
The radio is designed to satisfy the applicable compliance regulations. Do not make modifications or changes to the radio that are not expressly approved by Tait Limited. Failure to do so could invalidate compliance requirements and void the user’s authority to operate the radio. -
Page 18: Use Of Lithium-Ion Batteries
paper label to extend beyond the recessed label area or to conceal relevant product information. Use of lithium-ion batteries Warning A damaged battery can cause an explosion or fire, and can result in personal injury and/or property damage. To prevent personal injury and/or damage to property, read the important safety information supplied with the battery. -
Page 19: Charger Compliance Information
Charger compliance information United States This battery charger has been tested and found to comply with the limits for a Class B digital device, in accordance with part 15 of the FCC Rules. These limits are designed to provide reasonable protection against harmful interference in a residential installation. -
Page 20: Custom Radio Settings
Custom radio settings Use the following table to list your radio’s programmed settings Top key short press: top key long press: Function key 1 short press: long press: Function key 2 short press: long press: Channel selector... -
Page 21: About This Guide
About this guide This user’s guide provides information about the TP8110 portable radio. The radio behavior described in this guide applies to radios with firmware version 1.07 or higher. If your radio does not operate as you expect, contact your radio provider for assistance. -
Page 22: Before Using Your Radio
Before using your radio Once you have unpacked your radio, there are a few tasks you must do before you can use it. The most important of these is to charge your battery for the first time—allow 2.5 hours for this. Warning Fit only an IS-approved battery and IS-approved acces- sories to an intrinsically safe (IS) radio. -
Page 23: For Your Safety-Battery Warning
If the vent on the radio is obstructed, audio quality and/ or key function may deteriorate and radio seals may be damaged. Notice Tait recommends that you do not affix additional labels to the surfaces between the radio chassis and the battery. The fit... -
Page 24: Charging The Battery Before First Use
Charging the battery before first use Before using your battery for the first time, you must charge it. Follow the instructions included with your Tait charger. For best charging performance, switch off the radio before placing it in the charger. -
Page 25: Removing The Battery
Removing the battery The battery is secured to the radio by a battery catch in the radio’s rear panel. To remove the battery from the radio, so that the battery can be charged or replaced: Slide the battery catch up. From the sides, pull the battery away from the radio. -
Page 26: Installing An Accessory
Installing an accessory Warning Use only IS-approved accessories with IS radios. For an up-to-date list of FM-approved accessories, go to the Tait website or contact your nearest Tait office. For detailed information about IS radios and how to identify them, see "Intrinsically Safe radios"... -
Page 27: Getting Started
Getting started This section provides a brief description of your radio’s controls and indicators. This section covers: About the radio controls ■ Understanding the radio indicators ■ Accessing frequently used features ■ Turning the radio on and off ■ Adjusting the volume ■... -
Page 28: About The Radio Controls
About the radio controls The radio controls are the PTT key, power/volume control, channel selector, top key and function keys. Some keys may have functions assigned to both short and long key presses: a short key press is less than one second, and ■... - Page 29 channel selector top key power/ volume control status LED accessory function key 1 connector (out-of-sight) PTT key (press-to-talk) speaker/ function key 2 microphone...
-
Page 30: Understanding The Radio Indicators
Understanding the radio indicators The status LED and the radio’s audible tones all combine to give you information about the state of your radio. The most common way the indicators work is described in the following sections. The way these indicators behave may be affected by the way your radio is programmed. -
Page 31: Accessing Frequently Used Features
Color Flash rate Meaning orange medium Activity detected on one of a group of channels being scanned orange fast A call with special signaling has been received red/ fast Radio programmed incorrectly or faulty. green Contact your radio provider. Audible tones The radio uses a variety of beeps and tones to supplement the information provided by the status LED. -
Page 32: Turning The Radio On And Off
Turning the radio on and off The radio may not turn on if your battery is very low. Rotate the power/volume control switch clockwise to turn the ■ radio on. Rotate the switch counterclockwise to turn the radio off. After an IS radio is turned on, it takes about two seconds longer to power-up than a non-IS radio. - Page 33 Low power transmit If you are using your radio in conditions where signal strength is high, you can extend the shift life of your battery by transmitting at low power. While low power transmit is active, transmissions are made at low power rather than at the preset power level.
-
Page 34: Basic Operation
Basic operation This section covers: Selecting a channel ■ Selecting a group ■ Checking that a channel is clear ■ Communicating directly with other radios ■ Activating the repeater before a call ■ Making a call ■ Receiving a call ■... -
Page 35: Selecting A Channel
Selecting a channel In order to make and receive calls, you first need to select a channel, using the channel selector. Each position on the channel selector denotes a channel. To select a channel: Turn the channel selector clockwise or counterclockwise to the ■... -
Page 36: Communicating Directly With Other Radios
Communicating directly with other radios You may be able to bypass the radio repeater and communicate directly with another radio. This feature is known as ‘repeater talkaround’. You can do this, for example, when you are out of range of the repeater. To activate repeater talkaround: Press the assigned function key. -
Page 37: Making A Call
Making a call To make a call to another radio or group of radios: Select the required channel or group (see "Selecting a channel" "Selecting a group" on page 36). Check that the channel is clear (see "Checking that a channel is clear"... -
Page 38: Receiving A Call
Receiving a call When there is valid activity on your radio’s currently selected channel or group, the radio unmutes and you can hear the call. If the incoming call contains special signaling that matches the signaling programmed for your radio, your radio may give a ringing tone. -
Page 39: Using Encryption
Using encryption To make communications with other users on your system completely private, your radio may be able to encrypt outgoing calls, using a confidential encryption code. The radio receiving your call must have the same encryption code before it can decipher your encrypted call. -
Page 40: Hearing Faint And Noisy Signals
Hearing faint and noisy signals Your radio’s squelch mute (known as ‘squelch’) prevents you from hearing faint or noisy calls on a channel. On occasions when you want to hear everything that is being said on a channel, even if it is hard to understand, you may be able to use the squelch override function to force the mute open. -
Page 41: Scanning A Group Of Channels
Scanning a group of channels The scan function is used to monitor a group of channels for activity. When there is activity on a channel in the group, the radio stops on that channel. The radio then unmutes and you can hear the call. - Page 42 Making a call while scanning If you want to make a call while your radio is scanning: Press the PTT key to transmit. If standard scan is active, your radio calls either the currently selected channel or a programmed ‘home’ channel. If background scan is active, your radio calls the channel that was selected before background scan was activated, or the channel on which it last received a call.
-
Page 43: Making And Receiving Different Types Of Calls
Making and receiving different types of calls The types of calls available to your radio depend on the way in which it is programmed and the way the radio system operates. This section covers: Making an individual or group call ■... -
Page 44: Making An Individual Or Group Call
Making an individual or group call You may be able to use your radio to make preset calls to an individual or a specific group using special signaling known as ‘Selcall’. Making a preset individual or group call A maximum of three preset individual or group calls can be assigned to each channel. -
Page 45: Receiving An Individual Or Group Call
Receiving an individual or group call When a call is received that contains your radio’s identity, the radio gives a ringing tone. To accept a call: Press the PTT key and begin speaking. If the call is a group call, ■... -
Page 46: Calling A Telephone Or A Remote Device
Calling a telephone or a remote device DTMF is the tone-based system of the world’s telephone networks. If your radio has access to a network that makes use of DTMF tones, your radio may be able to make a call to a telephone or send control codes to a remote device. -
Page 47: Making An Emergency Call
Making an emergency call You may be able to activate emergency mode by using an assigned function key. The emergency function key may be programmed for either a short key press or long key press. Press the assigned function key and an emergency call is sent to your dispatcher, or some other predetermined location. -
Page 48: Using The Lone Worker Emergency Features
Using the lone worker emergency features Your radio may be programmed with ‘lone worker’ emergency features, designed for people who work alone in potentially hazardous areas. If you become incapacitated, the radio automatically sends an emergency call to alert other users to your situation, and then enters emergency mode. - Page 49 Activating lone worker To turn the lone worker feature on and off: Press the assigned function key. ■ Your radio may be programmed so that lone worker is active as soon as your radio is turned on. Key press monitoring Once lone worker is activated, the radio prompts you for a response at regular intervals, by sounding a series of loud warning beeps.
- Page 50 Man down monitoring Warning The radio uses an accelerometer to accurately detect motion. The accelerometer is calibrated when the radio is first programmed, and must be tested at regular intervals to ensure correct operation. Consult with your radio provider or system administrator about a regular testing regime.
-
Page 51: Charging And Caring For Batteries
Charging and caring for batteries This section describes how to charge your Tait radio battery as well as care for it, to ensure safe operation, maximum performance and prolonged battery life. This section covers: About the chargers ■ Special conditions when using IS radios ■... -
Page 52: About The Chargers
About the chargers Unless otherwise indicated, the charging advice and instructions apply to all chargers. There are three types of charger available for your Tait radio battery: Desktop charger: Small enough to fit on a ■ desk, it charges one battery at a time. -
Page 53: Special Conditions When Using Is Radios
Special conditions when using IS radios Warning Fit only an IS-approved battery to an IS radio. Fitting a battery or accessory that is not IS-approved exposes the customer to a risk of explosion which could cause serious injury or death. For detailed information about identifying IS radios, see "Intrinsically Safe radios"... - Page 54 Charging temperatures Notice Do not expose a battery to very high or very low temper- atures for extended periods of time. Doing so will shorten the usable life (‘service life’) of the battery. To achieve the best results when charging your battery: Before you begin to charge your battery, make sure that the ■...
- Page 55 Vehicle charger only It is safe to switch off the ignition while there is still a battery in the charger. But if the vehicle will not be used again for some time, check whether charging will continue while the ignition is off, and consider what effect this might have on the vehicle battery.
-
Page 56: Charging The Battery
Notice For best charging performance, switch off the radio before placing it in the charger (desktop charger or multicharger only). Desktop charger: Connect the charger to the correct Tait power adaptor. Multicharger and vehicle charger: Power on the charger. Initially, all three LEDs are lit for two seconds. - Page 57 No action is required by you. There is a fault. Contact your local regional Tait office. If the charger does not behave as expected: Make sure the radio or battery is seated properly in the ■...
-
Page 58: Maintaining Battery Life And Performance
Maintaining battery life and performance With proper care and maintenance you will maintain the performance and life of the battery. It is recommended that you: Use only Tait chargers and batteries. ■ Do not expose a battery to very high or very low temperatures ■... -
Page 59: Storing Batteries
Storing batteries When not in use for a month or more, batteries should be stored correctly to prolong their life. Remove the battery from the radio before storage. ■ Fully charge the battery if storing for less than one month. ■... -
Page 60: Troubleshooting
Tait Limited. Any unauthorized repair or substitution of parts inval- idates the intrinsic safety rating and the third party IS approval. To have an IS radio serviced, return it to an authorized Tait branch or subsidiary. For detailed information about IS radios and how to identify them, "Intrinsically Safe radios"... -
Page 61: When Your Radio Won't Turn On
When your radio won’t turn on If the red LED on the radio does not light up when the radio is turned on, it is probable that power is not reaching the radio. Check the following: Is the battery firmly attached to the radio? ■... -
Page 62: General Care
Meaning Possible reason(s) and solution Fault The battery is not compatible with the charger. ■ Use only Tait chargers and batteries. There is insufficient voltage to the charger. Check you ■ are using the correct power adaptor. The battery may be deeply discharged (less than 3V). -
Page 63: Function Key Options
Function key options Some functions are not permitted in some countries. The features below can be assigned to the top key top key and the function keys when the radio is programmed. If you do not know which features have been programmed for your radio, contact your radio provider or system administrator. - Page 64 Function Description low power Overrides the radio’s programmed transmit power transmit setting. See "Low power transmit" on page monitor Turns monitor on and off, so that the user can hear all traffic on a channel. See "Checking that a channel is clear"...
-
Page 65: Tait Software Licence Agreement
“Confidential Information” means all or works from, the Software or Documentation, any information supplied to or received by whether made by Tait or another party, or any Licensee from Tait, whether before or after improvements that result from Tait processes installation or use and whether directly or indi- or, provision of information services. - Page 66 Agreement enhancements, new versions and new and the terms and conditions of the any releases of the software provided by Tait; and applicable Open Source Software Licenses, (iii) may contain one or more items of the terms and conditions of the Open Source software owned by a third-party supplier.
- Page 67 Software in a manner that would result Section 5 OWNERSHIP AND TITLE in the production of a copy of the Software by Tait, its licensors, and its suppliers retain all of any means whatsoever other than what is their Intellectual Property Rights in and to the permitted in this Agreement.
- Page 68 Security Vulnerabili- radio products to a third party, Licensee may ties. If Tait cannot correct the defect within a assign its right to use the Software which is reasonable time, then at Tait option, Tait will embedded in or furnished for use with the...
- Page 69 Documentation may be terminated immedi- limited at the option of Tait to the repair or ately upon notice by Tait. replacement of the Software or the refund of the purchase price of the Software. 8.2. Within thirty (30) days after termination...
- Page 70 Agreement to the specific subject matter of this Agree- between it and Tait in relation to the Soft- ment, this Agreement prevails. ware. This Agreement supersedes any 11.8. SECURITY. Tait uses reasonable means...
- Page 71 72 Tait general software licence agreement...
Need help?
Do you have a question about the TP8110 and is the answer not in the manual?
Questions and answers