Tait TP9300 User Manual
Dmr portable radios
Hide thumbs
Also See for TP9300:
- Manual (14 pages) ,
- User manual (186 pages) ,
- Battery charging manual (75 pages)

Related Manuals for Tait TP9300


Summary of Contents for Tait TP9300
- Page 1 TP9300 DMR Portable Radios User’s Guide MPD-00001-02 · Issue 2 · September 2013 (DRAFT)
-
Page 3: Table Of Contents
Contents For your safety............10 Menu maps............20 About this guide ..........22 Safety warnings used in this guide ......... 22 Related documentation........... 22 Before using your radio ........24 For your safety — battery warning........25 Attaching labels to the radio or battery ......25 Attaching a label to the front panel ...... - Page 4 Using a wireless headset ..........44 Wearing the headset ..........45 Pairing a wireless headset with the radio ....45 Managing your headsets ..........47 Changing the radio’s operating mode ......49 Operating in trunked mode .........51 Checking that your network is available ......52 Changing your network ..........
- Page 5 Placing the radio in do-not-disturb mode......69 Using a function key ........... 69 Using the Main menu ..........70 Calls to conventional channels or conventional groups.. 70 Dialing calls in trunked mode ......71 MPT 1343 dialing............72 Finding your radio’s MPT number ......72 MPT 1343 dialed calls ..........
- Page 6 Identifying the radio’s audible tones ......119 Checking the version of your radio....... 120 General care..............120 Cleaning the contacts of the battery......121 Cleaning the radio ............ 121 Directive 1999/5/CE Declaration of Conformity 122 Tait Software Licence Agreement......123 Contents...
- Page 7 Tait Limited. The word TAIT and the TAIT logo are trademarks of Tait Limited. All trade names referenced are the service mark, trademark or registered trademark of the respective manufacturers.
- Page 8 For more information about how to dispose of your unwanted Tait product, visit the Tait WEEE website at www.taitradio.com/weee. Please be environmentally responsible and dispose through the original supplier, or contact Tait Limited.
- Page 9 markets as they are introduced.
-
Page 10: For Your Safety
For your safety Before using your radio, please read the following important safety and compliance information. Radio frequency exposure information For your own safety and to ensure you comply with the Federal Communication Commission’s (FCC) radio frequency (RF) exposure guidelines, please read the following information before using this radio. - Page 11 If you wear your radio, you must always put it in a ■ carrying accessory that has been specifically approved by Tait for this radio. Using non- approved body-worn accessories may mean you expose yourself to higher levels of RF than recom- mended by the FCC’s occupational/controlled...
- Page 12 American National Standards Institute (ANSI) / ■ Institute of Electrical and Electronic Engineers (IEEE) C95.1-1992. Institute of Electrical and Electronic Engineers ■ (IEEE) C95.1-1999 Edition. European Directive 2004/40/EC on minimum ■ health and safety requirements regarding the exposure of workers to the risks arising from phys- ical agents (electromagnetic fields).
- Page 13 Radio frequency emissions limits in the USA CFR Title 47 Part 15.19 (a) (1) - Receivers Part 15 of the FCC Rules imposes RF emission limits on receivers. This radio complies with Part 15 of the FCC Rules. Operation is subject to the condition that this device does not cause harmful interference.
- Page 14 USA public safety bands (764 –776 MHz and 794 – 806 MHz) The Code of Federal Regulations (CFR) Title 47 Subpart R deals with the use of frequencies in the 764 to 776 MHz and 794 to 806 MHz bands. Low-power channels This radio complies with §...
- Page 15 Frequency band reserved for distress beacons Frequency band 406 to 406.1 MHz is reserved for use by distress beacons. Transmissions should not be made within this frequency band. Health, safety and electromagnetic compatibility in Europe In the European Community, radio and telecommunications equipment is regulated by Directive 1999/5/EC, also known as the Radio and Telecommunications Terminal Equipment (R&TTE)
-
Page 16: Declaration Of Conformity
Declaration of conformity Brief Declarations of Conformity appear on page 122 of this booklet. To download the formal declaration of conformity, go to http:// eudocs.taitradio.com/. Interference with electronic devices Warning Some electronic devices may be prone to malfunction due to the lack of protection from RF energy that is present when your radio is transmitting. - Page 17 If there is interference between your hearing aid and the radio, please discuss an alternative solution with the hearing aid manufacturer. Potentially explosive atmospheres and blasting areas Warning Unless the radio is specifically certified for use in a potentially explosive atmosphere, turn off the radio before entering such an atmosphere.
- Page 18 The radio is designed to satisfy the applicable compliance regulations. Do not make modifications or changes to the radio that are not expressly approved by Tait. Failure to do so could invalidate compliance requirements and void the user’s authority to operate the radio.
- Page 19 Caution Tait recommends that you do not affix additional labels to the surfaces between the radio chassis and the battery. The fit between these...
-
Page 20: Menu Maps
Menu maps This section shows the menus and submenus that may be programmed for your radio. Some features are controlled by software licenses and may not be available with your model. Main menu (trunked mode) Preset calls Radio settings Set zone Functions Set workgroup Scrambler... - Page 21 Main menu (conventional mode) Channels Advanced Program groups Zones Address book Set scan key Local calls GPS info Set status Change mode Dial radio call Dial patch call Wireless headset Connect Reconnect last Disconnect Connection info Manage headsets Find new devices Options Power-on option Confirm connect...
-
Page 22: About This Guide
About this guide This user’s guide provides information about the TP9300 portable radios. If your radio does not operate as you expect, contact your radio provider for assistance. Safety warnings used in this guide Please follow exactly any instruction that appears in the text as an ‘alert’. - Page 23 Safety and Compliance Information—supplied ■ with each radio. (The same information is included in this user’s guide.) Li-ion Battery Safety Information—supplied with ■ each Li-ion battery. Battery Care and Charging Guide—supplied with ■ each charger. (The same information is in the sec- tion "Charging and caring for batteries".)
-
Page 24: Before Using Your Radio
Before using your radio Once you have unpacked your radio, there are a few tasks you must do before you can use it. The most important of these is to charge your battery for the first time — allow 2.5 hours for this. This section covers: For your safety —... -
Page 25: For Your Safety - Battery Warning
Notice Tait recommends that you do not affix additional labels to the surfaces between the radio chassis and the battery. The fit between these... -
Page 26: Attaching A Label To The Front Panel
0.03 in Charging the battery before first Before using your battery for the first time, you must charge it. Follow the instructions included with your Tait charger. This information is repeated in the section “Charging and caring for batteries” on page 109. -
Page 27: Attaching The Battery
Attaching the battery Notice Fit the bottom edge of the battery to the radio, then the top edge. Attempting to fit the top edge first may damage the contacts. 1 Rotate the power/volume control switch counterclockwise to turn off the radio. If the battery has been attached while the radio is turned on, turn the radio off and then on again before use. -
Page 28: Removing The Antenna
Removing the antenna Use a firm grip and turn the antenna counterclockwise half a turn. Use a lighter grip to fully unscrew the antenna, and carefully remove it. Attaching a belt clip To attach a belt clip to the radio: 1 Slide the belt clip into the two grooves at the top of the battery. - Page 29 1 Use a coin or other blunt object to loosen the screw that secures the accessory cover to the radio. 2 Remove the accessory cover and store it in a safe place. 3 Plug the accessory into the accessory connector. 4 Tighten the screw.
-
Page 30: Getting Started
Getting started This section gives an overview of your DMR radio, describes the radio’s controls and indicators, and explains how the radio menus are organized. This section covers: About your DMR digital radio ■ About the radio controls ■ Understanding the radio display ■... -
Page 31: About Your Dmr Digital Radio
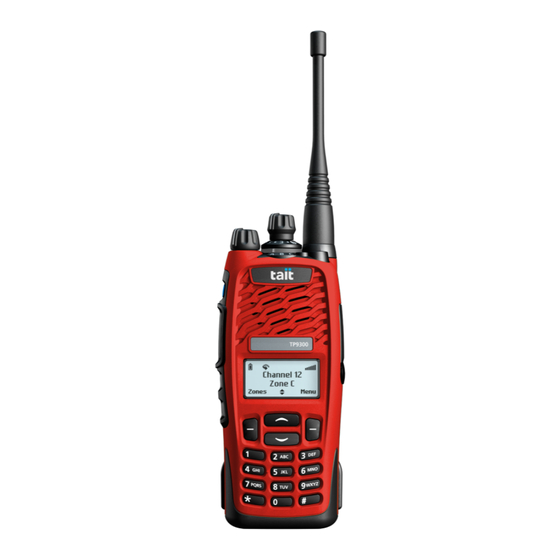
About your DMR digital radio Your digital radio may be programmed for DMR (digital) trunking, MPT (analog) trunking, or both (dual mode). Dual mode networks are able to receive both digital and analog calls. Fully-featured conventional analog operation is also available. You may notice differences between analog and digital calls in terms of: static noise in low signal areas, and... - Page 32 The radio controls and their functions are described in the following sections. channel 3-way selector control (optional) function key 1 power / volume status LED control function key 2 speaker / microphone PTT key (press-to-talk) display function key 3 scroll keys function key 4 right selection key left selection key...
-
Page 33: Understanding The Radio Display
Name Function PTT key Press and hold to transmit and release to listen Power/volume Rotate to turn the radio on and change control the speaker volume Channel Select and change channels selector 3-way selector Select frequently used features (optional) Left and right Action determined by the text above the selection keys selection key... -
Page 34: Radio Display Icons
Radio display icons These are some of the icons you may see on your radio display: Icon Meaning Battery indicator: shows how much charge is available in the battery Scanning: your radio is monitoring a group of channels or workgroups for activity Silent operation: your radio’s audible tones have been turned off Low-power transmit: your radio is set to transmit on low... -
Page 35: Understanding The Radio Indicators
Icon Meaning Trunking: your radio has established a call and you are now able to speak to the other party Conventional mode icons Monitor or squelch override: monitor or squelch override is turned on Scanning: your radio is monitoring a group of channels for activity, and the currently selected channel is a member of the scan group. -
Page 36: Status Indicators
Status indicators status LED Color Meaning Glowing: your radio is transmitting (transmit) Green Glowing: the current channel is (receive) busy Flashing: you have received a call Orange Flashing: you are registered on a (network) trunked network All LEDs off Trunked: network not available, or your radio is attempting to register on a trunked network Conventional: receive standby... - Page 37 Radio controls and keypress tones—the tones ■ and beeps you hear when you press your radio’s keys or use the controls. Incoming call tone—when the radio is receiving ■ a call. Warning tones—when there is an error, or the bat- ■...
-
Page 38: Using Function Keys To Access Frequently Used Features
Using function keys to access frequently used features The function keys provide access to some of the features you will use most often. These features are assigned to the function keys when the radio is programmed. Some keys may have a feature associated with both a short key press and a long key press. -
Page 39: Navigating The Radio's Menus
Navigating the radio’s menus Your radio has a number of menus, each containing lists or submenus. The menus available depend on the way your radio is programmed. Using the Main menu To access the Main menu, press the right selection key whenever Menu appears above it. -
Page 40: Accessing Frequently Used Menus
Accessing frequently used menus Depending on how your radio is programmed, you may have two different Quick Access menus. One Quick Access menu is displayed when you press a scroll key, and the other when you press the left selection key. These give you easy access to the menus you use most often. -
Page 41: Using The Alphanumeric Keys To Search A List
Using the left selection key Quick Access menu The text above the left selection key corresponds to the Quick Access menu, for example, Zones. To use this Quick Access menu: Press the left selection key and the associated ■ menu appears. Channel 12 Zone 11 Zones... -
Page 42: Basic Operation
Basic operation This section describes the basic operation of your radio, including turning on the radio, adjusting the volume, locking the keypad, using a wireless headset, and changing the operating mode of the radio. This section covers: Turning the radio on and off ■... -
Page 43: Turning The Radio On And Off
Turning the radio on and off Rotate the power/volume control switch clockwise to turn the radio on. Rotate the switch counterclockwise to turn the radio off. When the radio is first turned on, the status LED briefly glows red, and the radio gives two short beeps. Your radio may not turn on if your battery is very low. -
Page 44: Adjusting The Speaker Volume
Adjusting the speaker volume Rotate the power/volume control clockwise to increase the speaker volume and counterclockwise to decrease the volume. The volume control also changes the volume level of the radio’s audible indicators. Locking and unlocking the keypad The keypad lock feature prevents you from pressing a key accidentally. -
Page 45: Wearing The Headset
Wireless Headset menu, you can still receive and reply to calls without interrupting the selected operation. Headset compatibility with Tait radios Bluetooth wireless headsets may operate with Tait radios, provided the headset: Is compatible with the Bluetooth Specification Ver- ■... - Page 46 Pairing creates a unique and encrypted wireless link between the Bluetooth-capable radio, and the Bluetooth headset. To use a headset with your radio, the devices must first be paired. When you connect to a wireless headset for the first time, you need to instruct the radio to search for compatible headsets using Bluetooth wireless technology.
-
Page 47: Managing Your Headsets
5 When the message Calling. Answer on headset appears, press the Answer button on the headset to confirm the connection. Calling. Headset Answer on connected headset Clear Cancel Clear 6 Repeat the previous steps to add other headsets. While the wireless headset is connected, the wireless headset icon appears in the display. - Page 48 Disconnecting the headset To disconnect the headset from your radio: Press Menu and select Wireless headset > ■ Disconnect. Alternatively, in the My Headsets menu select Options > Disconnect. Reconnecting the headset Your radio may be programmed so that each time the headset is turned on, it will automatically reconnect to the radio.
-
Page 49: Changing The Radio's Operating Mode
Connect: The radio will attempt to connect to the ■ headsets in My Headsets, in priority order. To change the power-on option: 1 Press Menu and select Wireless headset > Options > Power-on option, and change to the required option. Power-on option None Reconnect last... - Page 50 The following examples show typical default displays for trunked and conventional modes. Network 1 Channel 1 200-20001-20 Zone 2 Menu Menu trunked mode conventional mode Basic operation...
-
Page 51: Operating In Trunked Mode
Operating in trunked mode This section explains how your radio operates on a DMR (digital), MPT (analog) or dual-mode trunked network. Your radio must have trunking functionality programmed before it can operate in DMR or MPT trunked mode. This section covers: Checking that your network is available ■... -
Page 52: Checking That Your Network Is Available
Checking that your network is available Check that the orange LED is flashing and the network icon appears in the display. These are the indications that your radio has access to a trunked network. If the network icon is flashing, your radio is attempting to access the trunked network. -
Page 53: Dialing A New Network
The radio will restart, and display a power-up message followed by the name of the new network. Dialing a new network This feature is only available for radios with alphanumeric keys. 1 Dial *700# to display the name of the current trunked network. -
Page 54: Dialing A Preset Call
Dialing a preset call This feature is only available for radios with alphanumeric keys. The preset calls programmed for your radio can be dialed if you know the number associated with the preset call. 1 Dial p, where p is the number of the preset call. If your preset call number is the same as a call to another radio, then you need to dial a leading 0. -
Page 55: Selecting A Zone
Your radio may be programmed to use different names for a ‘zone’ and ‘workgroup’. For example, ‘district’ or ‘area’ may be used in place of zone, and ‘role’ or ‘group’ may be used in place of workgroup. Selecting a zone 1 Select Menu >... -
Page 56: Making A Call To A Workgroup
Making a call to a workgroup Different types of calls may be associated with your workgroups. These calls can be individual calls, preset calls, broadcast calls (no response permitted), or conference calls. To make a call to a workgroup: 1 Select the required zone. See "Selecting a zone"... -
Page 57: Scanning Workgroups
The homegroup icon only appears if you use a function key to select your homegroup. Scanning workgroups The ‘My Workgroups’ list comprises the current workgroup, the homegroup, and other programmed groups. When scanning is active, the radio will receive activity from any subscribed groups in the My Workgroups list. -
Page 58: Making A Preset Emergency Call
dial the emergency call using the alphanumeric ■ keys, or use a function key programmed for emergency ■ mode. Making a preset emergency call To make a preset emergency call from your radio, you may be able to either use a programmed function key, use the main menu, or use your quick access menu. -
Page 59: Dialing An Emergency Call
Dialing an emergency call This feature is only available for radios with alphanumeric keys. 1 Dial *9. 2 Press Send or the or PTT key. An emergency call is now sent to the emergency location that has been programmed for your radio. If you wish to send an emergency call to another radio, you may be able to dial *9*n then press the... -
Page 60: Dialing A Pabx Number
Dialing a PABX number This feature is only available for radios with alphanumeric keys. To dial a PABX extension: 1 Dial n, where n is the PABX extension you wish to call. 2 Press Send or the or PTT key. The call details appear in the display. -
Page 61: Call Time Limit
Full off-air call setup (FOACSU): When a call is ■ received, the radio rings like a telephone. To accept the call, press Answer. The radio gives a beep and the icon appears in the display. You may also be able to accept the call if you briefly press the PTT key or lift the microphone off the microphone clip. -
Page 62: Last Number Recall
Last number recall When an outgoing call has ended, the message Last call to and the called unit’s identity may appear on the display. To make a call to that person again, briefly press the PTT key. Unanswered call When an incoming call is missed, the message Missed call and the caller’s identity may appear in the display. -
Page 63: Accessing The Call Queue
In the example below, the last call received was a status message from Car 1. This call is the first of three calls stored in the call queue. queued calls identity of last type of call unanswered options scroll through position of call available the calls... -
Page 64: About Status Messages
The message Call queuing activated appears. To change call queuing to unanswered call queuing: select Menu > Radio settings > Call ■ settings > Call queuing and choose Off, press the function key programmed for Call queu- ■ ing, or dial #48 then press the or PTT key. - Page 65 2 In the Send To menu, scroll through the list of options until the choice you want appears. Send to Dispatcher Preset Back Select If your radio has alphanumeric keys, you can choose the option Dialed, then dial the number of the party you wish to call. 3 Press Send.
-
Page 66: Dialing A Status Message
Dialing a status message If your radio has alphanumeric keys, the status messages programmed for your radio can be dialed. To dial the message, you need to know the number associated with the status message. To dial a status message: 1 Dial *0s*n, where s is the number of the status message and n is the radio unit number you wish to send the message to. -
Page 67: Sending A Preset Text Message
Repeated presses of these keys will give you the characters shown in the following table. Characters Characters P Q R S 7 A B C 2 T U V 8 D E F 3 W X Y Z 9 G H I space J K L 5 M N O 6... -
Page 68: Editing A Draft Text Message
3 Press Select, and the text message you have chosen is now displayed. Contact base now Back Edit Send 4 Press Send to send the message, or Edit to change the message. Editing a draft text message 1 Press Menu and select Send > Text message >... -
Page 69: Sending A Text Message
Sending a text message 1 When you have chosen or entered a message, press Options and the Text Options menu opens. Text options Send Cancel sending Back Select 2 In the Text Options menu, scroll through the list of options until the choice you want appears. (If your radio has alphanumeric keys, you may be able to dial the number of the party you wish to call.) -
Page 70: Using The Main Menu
The message Do not disturb deactivated appears in the display. Using the Main menu 1 Select Menu > Radio Settings > Call Settings > Do not disturb. 2 In the Do Not Disturb menu, choose On. 3 Press Select. The message Do not disturb activated appears in the display. -
Page 71: Dialing Calls In Trunked Mode
Dialing calls in trunked mode If your radio has alphanumeric keys, you can make dialed calls from your radio. The numbers you dial and dialing features available depend on the way your radio is programmed and the way your network operates. -
Page 72: Mpt 1343 Dialing
MPT 1343 dialing If your MPT or DMR trunked network uses the MPT 1343 dialing scheme, your radio’s unique number on the network consists of: a three-digit prefix, ■ a four-digit fleet number, and ■ a two- or three-digit radio unit number. ■... -
Page 73: Mpt 1343 Dialed Calls
MPT 1343 dialed calls The following table summarizes the way you dial calls to other radios and groups of radios and gives an example of each type of call. In the following examples, the final # may be replaced by a short press of the PTT key. Call to Dialing code and example Radio... -
Page 74: Nokia Ann Fleet Calls
Nokia ANN fleet calls If your trunked network uses Nokia ANN dialing, the numbers you dial depend on your fleet size. Fleets are defined as either large, small or mini. Your radio’s unique number on the network consists of: a lead number 7, 8 or 9, depending on the fleet ■... -
Page 75: Nokia Ann Dialed Calls
Nokia ANN dialed calls The following table summarizes the way you dial calls to other radios and gives an example of each type of call. In the following examples, the final # may be replaced by a short press of the PTT key. Call to Dialing code and example Radio... -
Page 76: Accessing Common Trunking Functions
Accessing common trunking functions The following tables explain how you can access special MPT or DMR trunking functions using the and # keys. The availability of these functions is dependant on the way your radio is programmed and the way your network operates. In the following examples, the final # may be replaced by a short press of the PTT key. - Page 77 *... # functions Dialing Functions Example code *49# Do not disturb #49# Cancel do not disturb *491# Do not disturb — voice calls only #491# Cancel do not disturb — voice calls only *492# Do not disturb — data calls only #492# Cancel do not disturb —...
-
Page 78: Operating In Conventional Mode
Operating in conventional mode This section explains how to operate your radio on a conventional network. This includes how to make and receive different types of calls, use your radio in different repeater areas, and scan a group of channels for activity. -
Page 79: Selecting A Zone
Selecting a zone A zone is a collection of channels and groups. When you select a zone, only the channels and groups assigned to that zone are available. 1 Select Menu > Zones. Main menu Zones Address book Back Select (Depending on how your radio is programmed, you may be able to use the scroll keys or left selection key to select the Zones menu.) -
Page 80: Selecting A Group
2 In the Channels menu, scroll through the list of channels until the channel you want appears. Channels Channel 9 Scan 1 Back Select 3 Press Select, and the programmed channel is now shown in the display. Using the channel selector For channels 1 to 16, rotate the channel selector to the channel you want. - Page 81 Using the Main menu 1 Select Menu > Channels. Main menu Channels Zones Back Select (Depending on how your radio is programmed, you may be able to use a function key, the scroll keys or left selection key to select a group.) 2 In the Channels menu, scroll through the list of channels and groups until the group you want appears.
-
Page 82: Checking That A Channel Is Clear
Checking that a channel is clear Monitor allows you to override some or all of the radio’s mutes, and hear if there is any traffic on a channel. For analog channels, this is so that you can check that the channel is clear before you make a call. Turning monitor on and off 1 Press Menu and select Radio settings >... -
Page 83: Making A Call Using The Address Book
While you are transmitting, the LED glows red and the transmit icon appears in the display. Limiting call time Your radio may limit the amount of time you can talk (transmit) continuously. This is known as the ‘transmit timer’ or ‘time-out timer’ and allows other radio users to make calls on that channel. -
Page 84: Making A Local Call
The call details appear in the display, the LED glows red, and appears in the display. Making a local call Each channel on your radio may have one or more local calls programmed. Using the Main menu 1 Select the required channel. 2 Select Menu >... -
Page 85: Connecting To A Telephone Network
1 Select the required channel. 2 Select Menu > Dial radio call. Alternatively, your radio may be programmed so a local call can be dialed directly from the default display. In this case, you can start dialing the call without selecting the menu option. A series of X and S characters may appear, prompting you to dial over them. - Page 86 Using a function key Depending on how DTMF patch calls are programmed, some or the following steps may not be necessary. 1 Select the required channel. 2 Press the function key programmed for DTMF patch call. Your radio may send tones to capture the line. 3 Press Send, or press the function key a second time, to send the preset number.
-
Page 87: Making An Emergency Call
7 Once the call has finished, press End. Your radio may send tones to release the line. Making an emergency call You may be able to activate emergency mode by using a programmed function key. 1 Press the function key programmed for Emergency Mode and an emergency call is sent to your dispatcher, or some other predetermined location. -
Page 88: Transmitting At Low Power
1 Select Menu > Set status. Main menu Set status Dial radio call Back Select 2 In the Set Status menu, scroll through the list of status messages until the message you want appears. 3 Press Select. The message Status updated appears in the display. -
Page 89: Ending Active Calls
The message Low power tx activated appears briefly, and the low-power transmit icon appears in the display. 2 Press the low-power transmit function key again to turn low-power transmit off, and the message Low power tx deactivated appears in the display. Ending active calls You may have a function key programmed to either end the current call, or end the current call and all... -
Page 90: Activating The Repeater Before A Call
Using the function key programmed for reset monitor / call cleardown to end active calls The function key programmed for reset monitor may be programmed so that a short key press ends your current call, and a long key press ends all active calls in your group. -
Page 91: Communicating Directly With Other Radios
Communicating directly with other radios You can bypass the radio repeater and communicate directly with another radio. This feature is known as repeater talkaround. You can do this, for example, when you are out of range of the repeater, or if the repeater is busy or stops working. -
Page 92: Receiving A Call
Receiving a call When there is valid activity on your radio’s currently selected channel or group, the radio then unmutes and you can hear the call. If the incoming call contains special signaling that matches the signaling programmed for your radio, the LED flashes green and your radio may give a ringing tone. -
Page 93: Hearing Faint And Noisy Signals
Hearing faint and noisy signals Your radio’s squelch allows the radio to unmute only when the strength of the incoming signal is above a predetermined threshold. This means that only signals of reasonable intelligibility are made audible. To make faint and noisy signals audible, use the squelch override function to unmute the radio. -
Page 94: Using The Radio In Different Repeater Areas
Using the function key programmed for monitor The function key programmed for monitor may be programmed so that a short key press turns monitor on, and a long key press turns squelch override on. To activate squelch override: Press and hold the function key programmed for ■... -
Page 95: Scanning A Group Of Channels
Suspending a channel from a voting group You may be able to use the function key programmed for nuisance delete to temporarily delete one of the channels from the voting group. When that voting group is next selected, or after the radio has been turned off and then on, the deleted channel is again part of the voting group. - Page 96 Standard and background scanning The two types of scanning that may be available on your radio are standard scanning, and background scanning. Background scan can only be activated by using a function key programmed for background scan. It differs from standard scanning in that the channel that was selected when background scan was activated is also included as a scan-group member.
- Page 97 1 Select Menu > Advanced > Set scan key. Advanced Set scan key Program groups Back Select 2 In the Set Scan Key menu, scroll through the list of background scan groups until the group you want appears. 3 Press Select. The message Scan key scans new group appears in the display.
- Page 98 Adding or deleting member channels of a group Your radio may be programmed so you can add or delete channels in a voting or scanning group. Changes made are permanent, and will remain after restarting the radio. 1 Select the group. See "Selecting a group"...
- Page 99 Alternatively, you may be able to edit groups by selecting Menu > Advanced > Program groups, then select the group you wish to edit. 3 In the Edit Group menu, choose Change tx chan. 4 Press Select. 5 Press the scroll keys to select the new transmit channel.
- Page 100 5 Press the scroll keys to select the new priority channel. 6 Press OK. If successful, the message Priority 1 channel changed or Priority 2 channel changed appears. To check the new group details, press Back and select the Group members menu option. The new priority channel has the icon next to it.
- Page 101 The following messages may appear when using nuisance delete to temporarily delete a channel from a group, when adding or deleting channels from a group, or changing a group’s transmit or priority channels. Message Meaning Scanning You cannot use nuisance delete to temporarily not on delete a channel from a group, as there is no group currently selected.
-
Page 102: Loneworker Monitoring
Loneworker monitoring Loneworker monitoring is a safety feature for people who work alone. Loneworker monitoring may be programmed to be on or off at all times, or can be switched on and off by the user using a programmed function key or the menu. A loneworker alarm is activated if for a predetermined period of time: the radio has been tilted by more than 60 degrees... -
Page 103: Responding To A Loneworker Alarm
A vertical scroll bar on the right-hand side of the display indicates the remaining activity timeout. remaining activity Channel 12 timeout Menu Responding to a loneworker alarm If you hear a beep to indicate that the radio is expecting a response from you to acknowledge that you are safe. - Page 104 You now have the opportunity to turn the radio off and one to cancel the loneworker alarm. The emergency action can be delayed only once. 104 Loneworker monitoring...
-
Page 105: Customizing Radio Settings
Customizing radio settings Your radio’s audible indicators and display settings can be changed in the Alert Settings menu and the Display Settings menu. These features are common to radios operating in either trunked or conventional mode. This section covers: Changing the volume of all audible indicators ■... -
Page 106: Changing The Volume Of Keypress Tones
Changing the volume of keypress tones Whenever you press the radio keys, the keypress tones give you an audible indication as to whether or not your action is allowed. A short, medium-pitched beep indicates that an action is allowed. A long, low- pitched beep indicates that the action is not allowed. -
Page 107: Changing To Silent Operation
Changing to silent operation When silent operation is on, all the radio’s audible tones are turned off, and only channel traffic can be heard. To turn silent operation on or off: 1 Select Menu > Radio settings > Alert settings > Silent operation. Alert settings Silent operation External alert... -
Page 108: Turning Backlighting On Momentarily
Turning backlighting on momentarily You may be able to use a programmed function key to turn backlighting on momentarily. Press the assigned function key to turn backlight- ■ ing on. Backlighting remains on for a few seconds, and then turns off. Alternatively, the function key may be programmed so that: a short key press turns backlighting on momen-... -
Page 109: Charging And Caring For Batteries
10 Charging and caring for batteries This section describes how to charge your Tait radio battery as well as care for it, to ensure safe operation, maximum performance and prolonged battery life. This section covers: About the chargers ■ Before using the charger ■... -
Page 110: About The Chargers
Unless otherwise indicated, the charging advice and instructions in this chapter apply to all chargers. There are three types of charger available for your Tait radio battery: Desktop charger: Small enough to ■ fit on a desk, it charges one bat- tery at a time. -
Page 111: Attaching Of Labels
included with your battery, and follow the instruc- tions it provides. Incorrect use of a Li-ion battery can cause explosion or fire. Do not short-circuit the battery contacts, neither ■ intentionally nor accidentally, e.g. by placing the battery with conductive materials such as keys or jewelry inside a pocket or container. -
Page 112: Temperature Indications
If possible, charge the battery in ■ temperatures between 50 °F and 77 °F 25 °C 77 °F (between 10 °C and 25 °C). This temperature range is the opti- 50 °F mal charging range. 10 °C Charging only starts when the battery is between 32 °F to 104 °F (0 °C to 40 °C). -
Page 113: Low Battery Warning
is off, and will continue to draw power from the vehicle battery. Once the battery is charged, the charger draws minimal current and has little effect on a healthy vehicle battery. Receiving calls while charging Applies to desktop charger and multicharger only. -
Page 114: Charging The Battery
The red LED stays lit while the battery charges. To charge the battery: 1 Desktop charger: Connect the charger to the correct Tait power adaptor. Multicharger and vehicle charger: Power on the charger. Initially, all three LEDs are lit for two seconds. -
Page 115: Led Behavior
No action is required. There is a fault. Contact your local ■ regional Tait office. There is a fault. Contact your local all off regional Tait office. If the charger does not behave as expected: Make sure the radio or battery is seated properly ■... -
Page 116: Maintaining Battery Life And Performance
With proper care and maintenance you will maintain the performance and life of the battery. It is recommended that you: Use only Tait batteries and chargers. ■ Do not expose a battery to very high or very low ■... -
Page 117: Storing Batteries
Storing batteries When not in use for a month or more, batteries should be stored correctly to prolong their life. Remove the battery from the radio before storage. ■ Fully charge the battery if storing for less than one ■ month. -
Page 118: 11 Troubleshooting
11 Troubleshooting This section describes troubleshooting procedures, and basic maintenance. This section covers: About troubleshooting ■ When your radio won’t turn on ■ Identifying the radio’s audible tones ■ Checking the version of your radio ■ General care ■ Cleaning the contacts of the battery ■... -
Page 119: About Troubleshooting
About troubleshooting If you are experiencing difficulty operating your radio, you may find the following sections helpful. Consult your radio provider for assistance, if necessary. When your radio won’t turn on If the LED on your radio does not glow red when the radio is turned on, it is probable that power is not reaching the radio. -
Page 120: Checking The Version Of Your Radio
Audible tone Meaning Two high- The radio’s temperature is in the very pitched beeps high range; all calls will now be at low power. If the radio’s temperature rises above this range, calls will be inhibited. Turn off the radio and allow it to cool down. -
Page 121: Cleaning The Contacts Of The Battery
Notice To prevent permanent damage to the radio case, do not allow the radio to come into contact with detergents, alcohol, aerosol sprays, or petroleum- based products. For general battery care, see "Maintaining battery life performance". Cleaning the contacts of the battery Notice Do not scratch or scrape the contacts of the battery. -
Page 122: Directive 1999/5/Ce Declaration Of Conformity
Zie ook: www.taitradio.com/eudoc/ Ελληνικά Português Η Tait Limited δηλώνει ότι το TPDB1A & Tait Limited declara que este TPDB1A & TPDH5A συμμορφώνεται προς τις TPDH5A está conforme com os requisitos ουσιώδεις απαιτήσεις και τις λοιπές essenciais e outras provisões da Directiva 1999/5/CE. -
Page 123: Tait Software Licence Agreement
CD, downloaded from the instructions the computer carries out in Tait website, or provided in any other hardware. Executable code may also form, you agree to be bound by the refer to programs written in interpreted terms of this Agreement. - Page 124 Open Source Software are in the Open versions and new releases of the Source Software Licenses of the software provided by Tait; and (iii) may copyright owner and not in this contain one or more items of software Agreement. If there is a conflict owned by a third-party supplier.
- Page 125 (vi) remove, or in any Licensee’s premises, books and way alter or obscure any copyright records, upon reasonable prior notice notice or other notice of Tait or third- to Licensee, during Licensee’s normal party licensor’s proprietary rights; (vii) business hours and subject to...
- Page 126 Vulnerabilities. If Tait cannot correct Intellectual Property developed, the defect within a reasonable time, originated, or prepared by Tait in then at Tait option, Tait will replace the connection with providing the defective Software with functionally Software, Designated Products, equivalent Software, license to...
- Page 127 Licensee has first Licensee's breach of this Agreement obtained from its Customer (and, if will result in irreparable harm to Tait for Licensee is acting as a subcontractor, which monetary damages would be from the interim transferee(s) and from inadequate.
- Page 128 10.2. Licensee’s sole remedy against Tait and Licensee. No third party has Tait will be limited to breach of contract the right to make any claim or assert and Tait sole and total liability for any...
- Page 129 Tait and Licensee to the contrary, this is the complete and exclusive statement of the Agreement between it and Tait in relation to the Software. This Agreement supersedes any proposal or prior agreement, oral or written, and...
- Page 130 Tait Software Licence Agreement...
Need help?
Do you have a question about the TP9300 and is the answer not in the manual?
Questions and answers